Migrate to Amazon CodeCatalyst - GatsbyJS example
Introduction
Amazon CodeCatalyst is a new service from Amazon Web Services (AWS) that helps developers accelerate their development process. With CodeCatalyst, developers can quickly and easily create, test, and deploy code, without worrying about the underlying infrastructure.
This makes it easier for developers to focus on what matters – building high-quality, scalable applications that drive business success. In this blog post, we’ll take a closer look at CodeCatalyst and what it has to offer and demo how you could migrate an existing CI/CD pipeline to Amazon CodeCatalyst.
We will take the example of a GatbsyJS static site and deploy it to s3 - along with invalidating an Amazon CloudFront distribution.
Prerequisites
The following are required to follow along with this guide:
- An account on Amazon CodeCatalyst. You can do this by visiting https://codecatalyst.aws and signing up. Amazon CodeCatalyst is one of the first services to leverage the new Builder ID system - a universal login system for AWS/Amazon sites moving forward.
- A GitHub account and a repository with a GatsbyJS site, you can take a look at my one for inspiration t04glovern/aws-codecatalyst-gatsbyjs
- An AWS account
Setup an Amazon CodeCatalyst Space
CodeCatalyst spaces are the top-level unit for CodeCatalyst. They are used to group together projects and environments. You can have multiple spaces in CodeCatalyst, and each space can have its own set of users, repositories and environments.
Crate a new space
Lets get started by creating a new space for ourselves. Login to Amazon CodeCatalyst and create a new space.
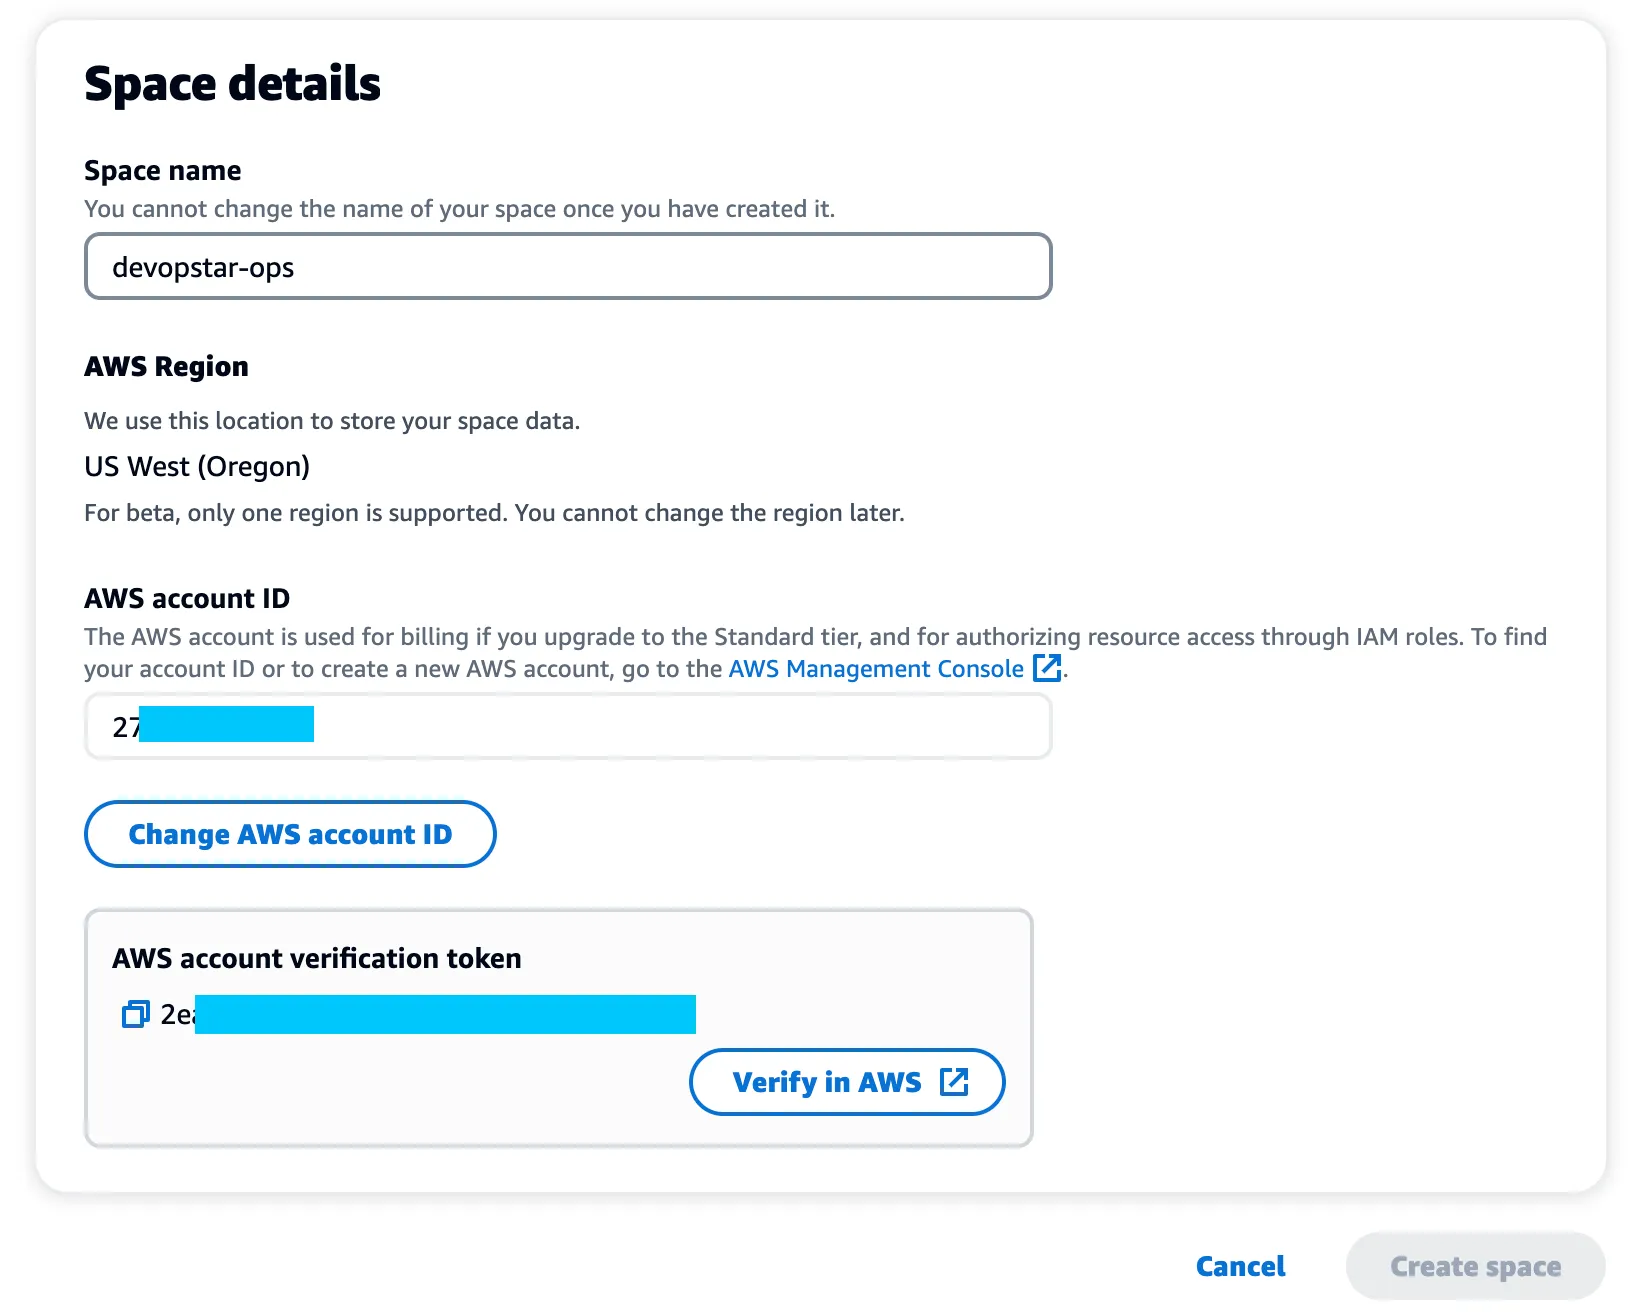
In this example I’ve called mine devopstar-ops but you can call your space whatever you want!
Next we need to attach an AWS account to CodeCatalyst for a couple reasons:
- Billing - Although there is a free tier for CodeCatalyst, you will need to link an AWS account to CodeCatalyst to be able to deploy your application - you can also leverage the paid tier of CodeCatalyst and have the bill ship straight to the AWS account you link.
- Environments - CodeCatalyst environments are created in your AWS account, so when deploying an application from CodeCataltyst, it will assume a role inside the AWS account you link.
You can either use the Link in the space creation page (labelled Verify in AWS) or you can login to the AWS account you want to link, navigate to the CodeCatalyst service page and click the Verify in AWS button.
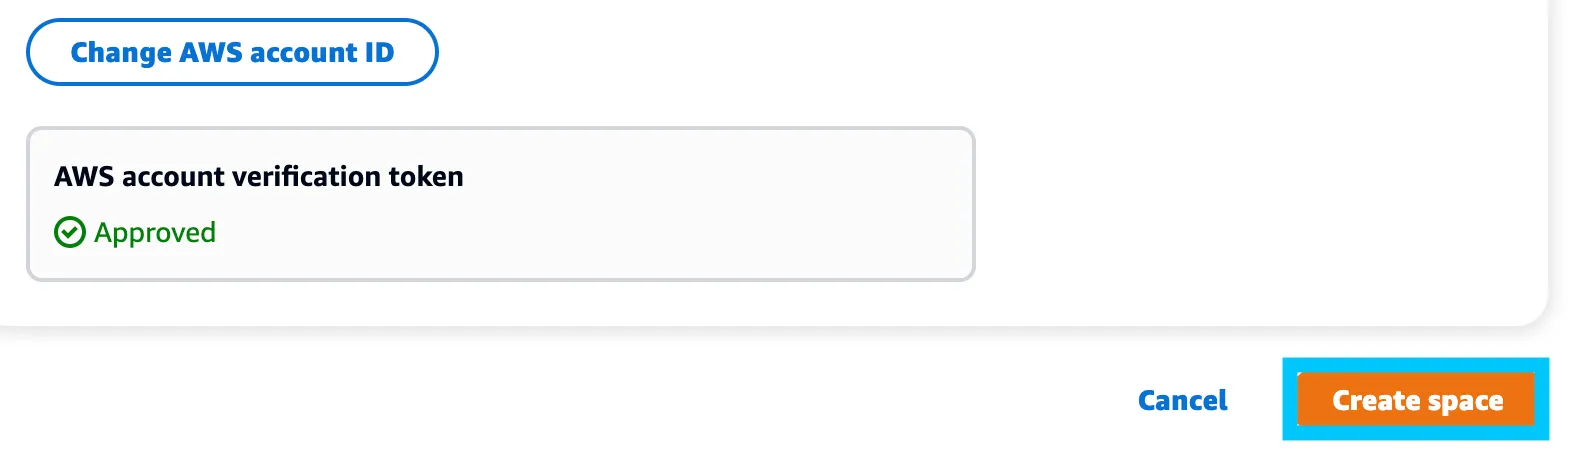
Paste the token from the CodeCatalyst page into the AWS console and click Verify Space.
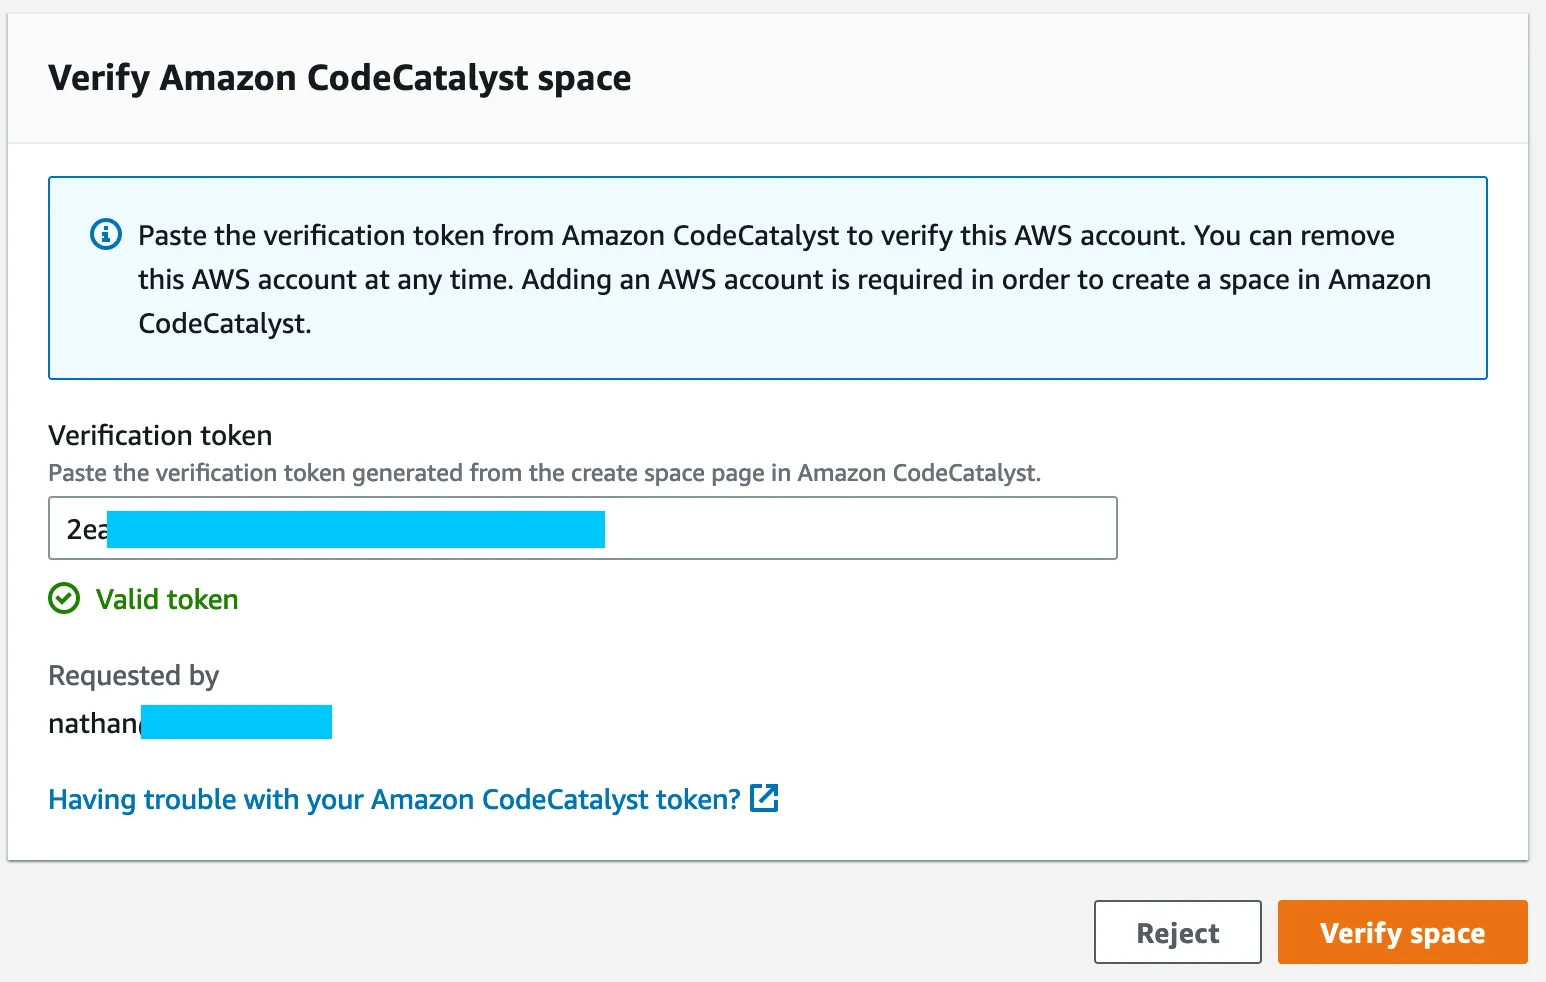
When you’ve clicked Verify Space, the Amazon CodeCatalyst console should change to show a green tick and the word Approved. It will also allow you to proceed with creating the space. Do so by clicking Create space.
Create IAM Role for CodeCatalyst
We are going to manually deploy an IAM role that will allow Amazon CodeCatalyst to interact with our AWS account. I’ve done this because the CI/CD pipeline I want to run in CodeCatalyst will need permissions to interact with an extra service that the default permissions that ship with CodeCatalyst don’t cover.
I’ve created a sample CloudFormation template that you can use to deploy a role with the following policies:
- CodeCatalystPreviewDevelopmentAdministrator: This policy allows CodeCatalyst to do everything it needs to do to deploy your application.
- CloudFrontInvalidation: This policy allows CodeCatalyst workflows to invalidate CloudFront distributions.
The template can be found in the sample gatsby repo here: .codecatalyst/role.yml
To deploy this template, run the following CloudFormation deploy command - alternatively you can deploy this template via the AWS CloudFormation console.
aws cloudformation deploy \
    --template-file role.yml \
    --stack-name devopstar-ops-codecatalyst-role \
    --region us-west-2 \
    --capabilities CAPABILITY_NAMED_IAM
Link IAM Role to CodeCatalyst
In your AWS account, navigate to the Amazon CodeCatalyst console available here: https://us-west-2.console.aws.amazon.com/codecatalyst/home?region=us-west-2#/ and click on your new space.
You should see an empty list under IAM roles available to CodeCatalyst. Click Add IAM role and put the ARN of the role from the CloudFormation stack above into this field. It should be in the following format: arn:aws:iam::012345678912:role/CodeCatalystGatsbyRole

This role will now be available to CodeCatalyst environments and can be targetted in your workflows later on in this guide.
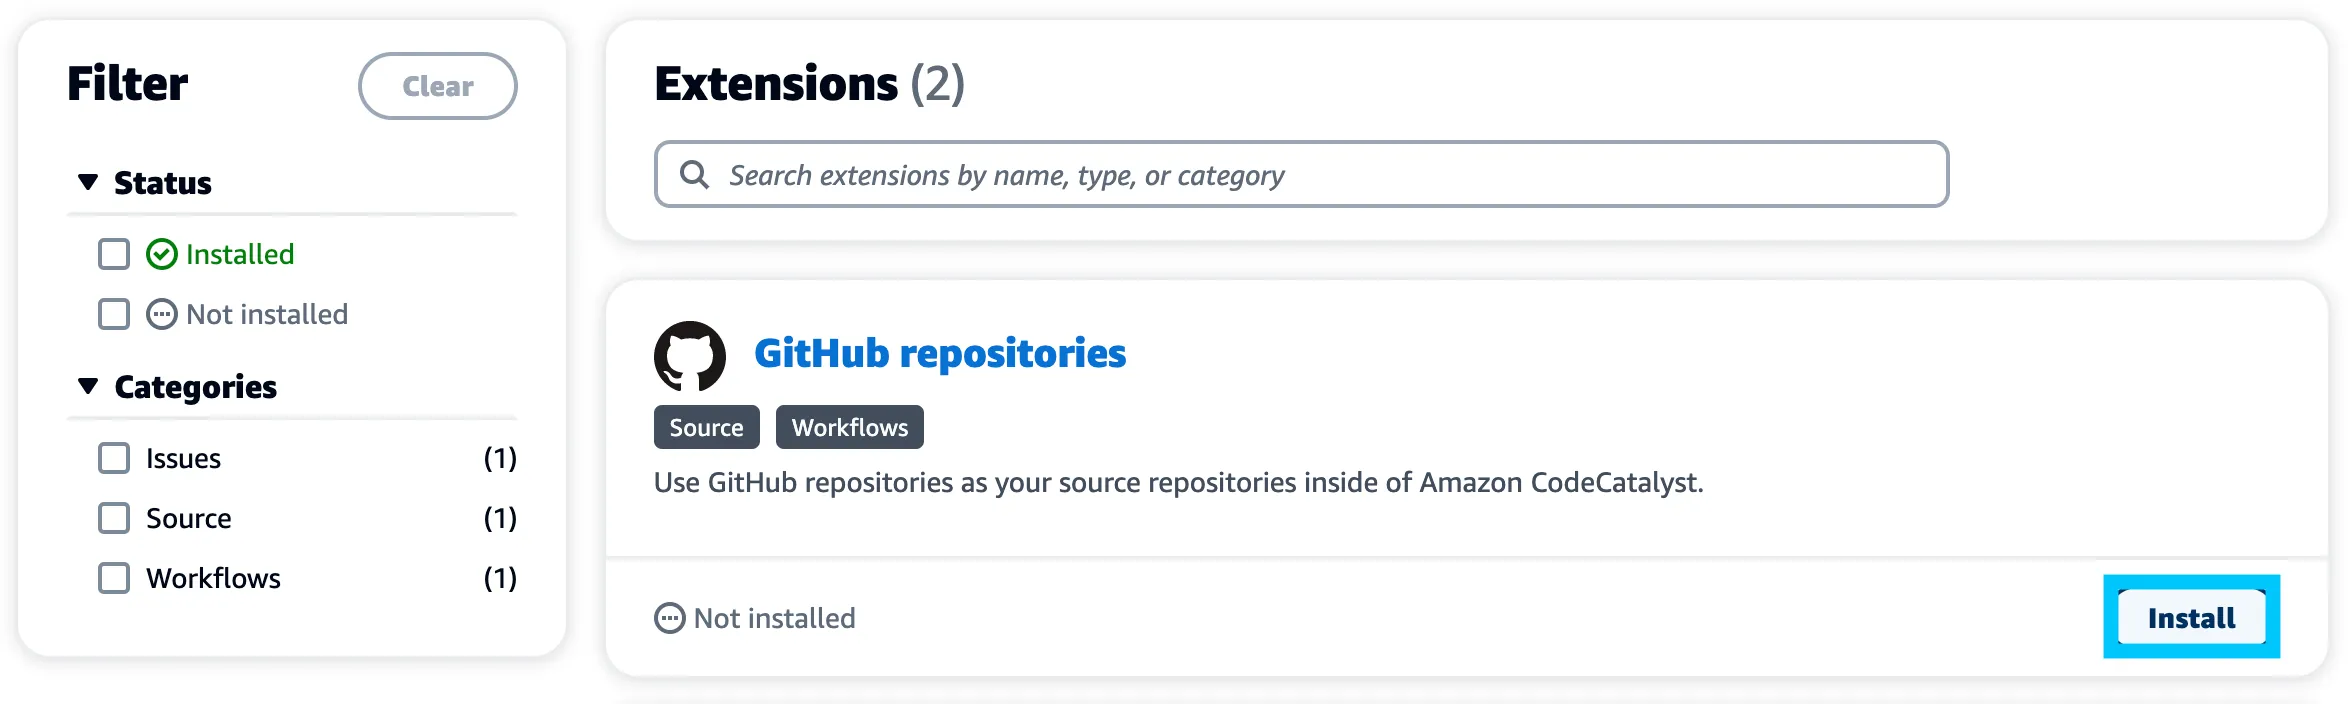
Install the Amazon CodeCatalyst GitHub Extension
We will need our Amazon CodeCatalyst space to be able to interact with our GitHub repository(ies). To do this, we will install the GitHub extension for CodeCatalyst.
Head back over to CodeCatalyst and click Installed extensions under your newly created space. Filter and find the GitHub repositories extension and click Install.
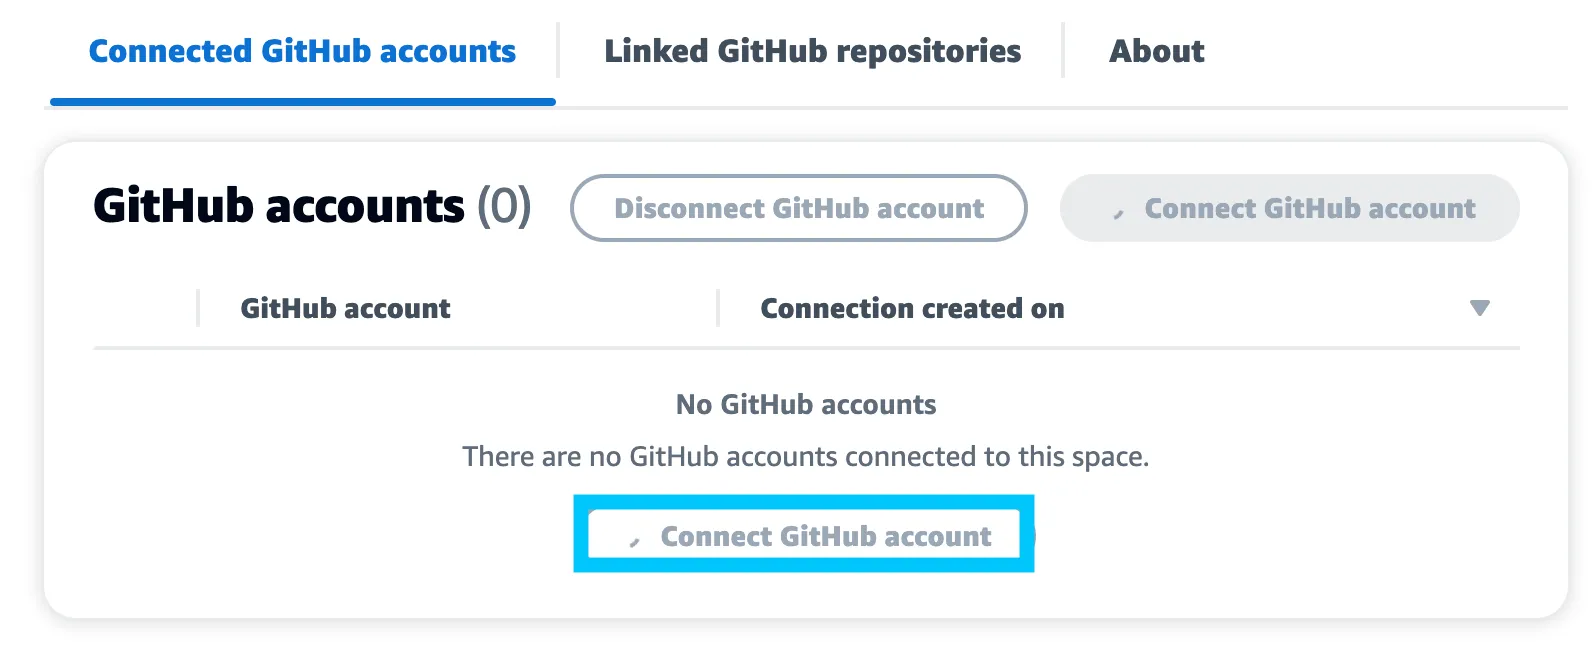
You should then be prompted to configure the GitHub extension and connect it to a GitHub account. Do this by clicking Connect GitHub account which will pull up an application permission dialog in GitHub for the Amazon CodeCatalyst app.
It’s usually best practice to only provide a limited permission scope that covers just the GitHub repository(ies) you want Amazon CodeCatalyst to interact with.
In my case, I’ve only given the CodeCatalyst app access to my t04glovern/aws-codecatalyst-gatsbyjs repository - If you are following along at home you should select whatever repository you want to use.
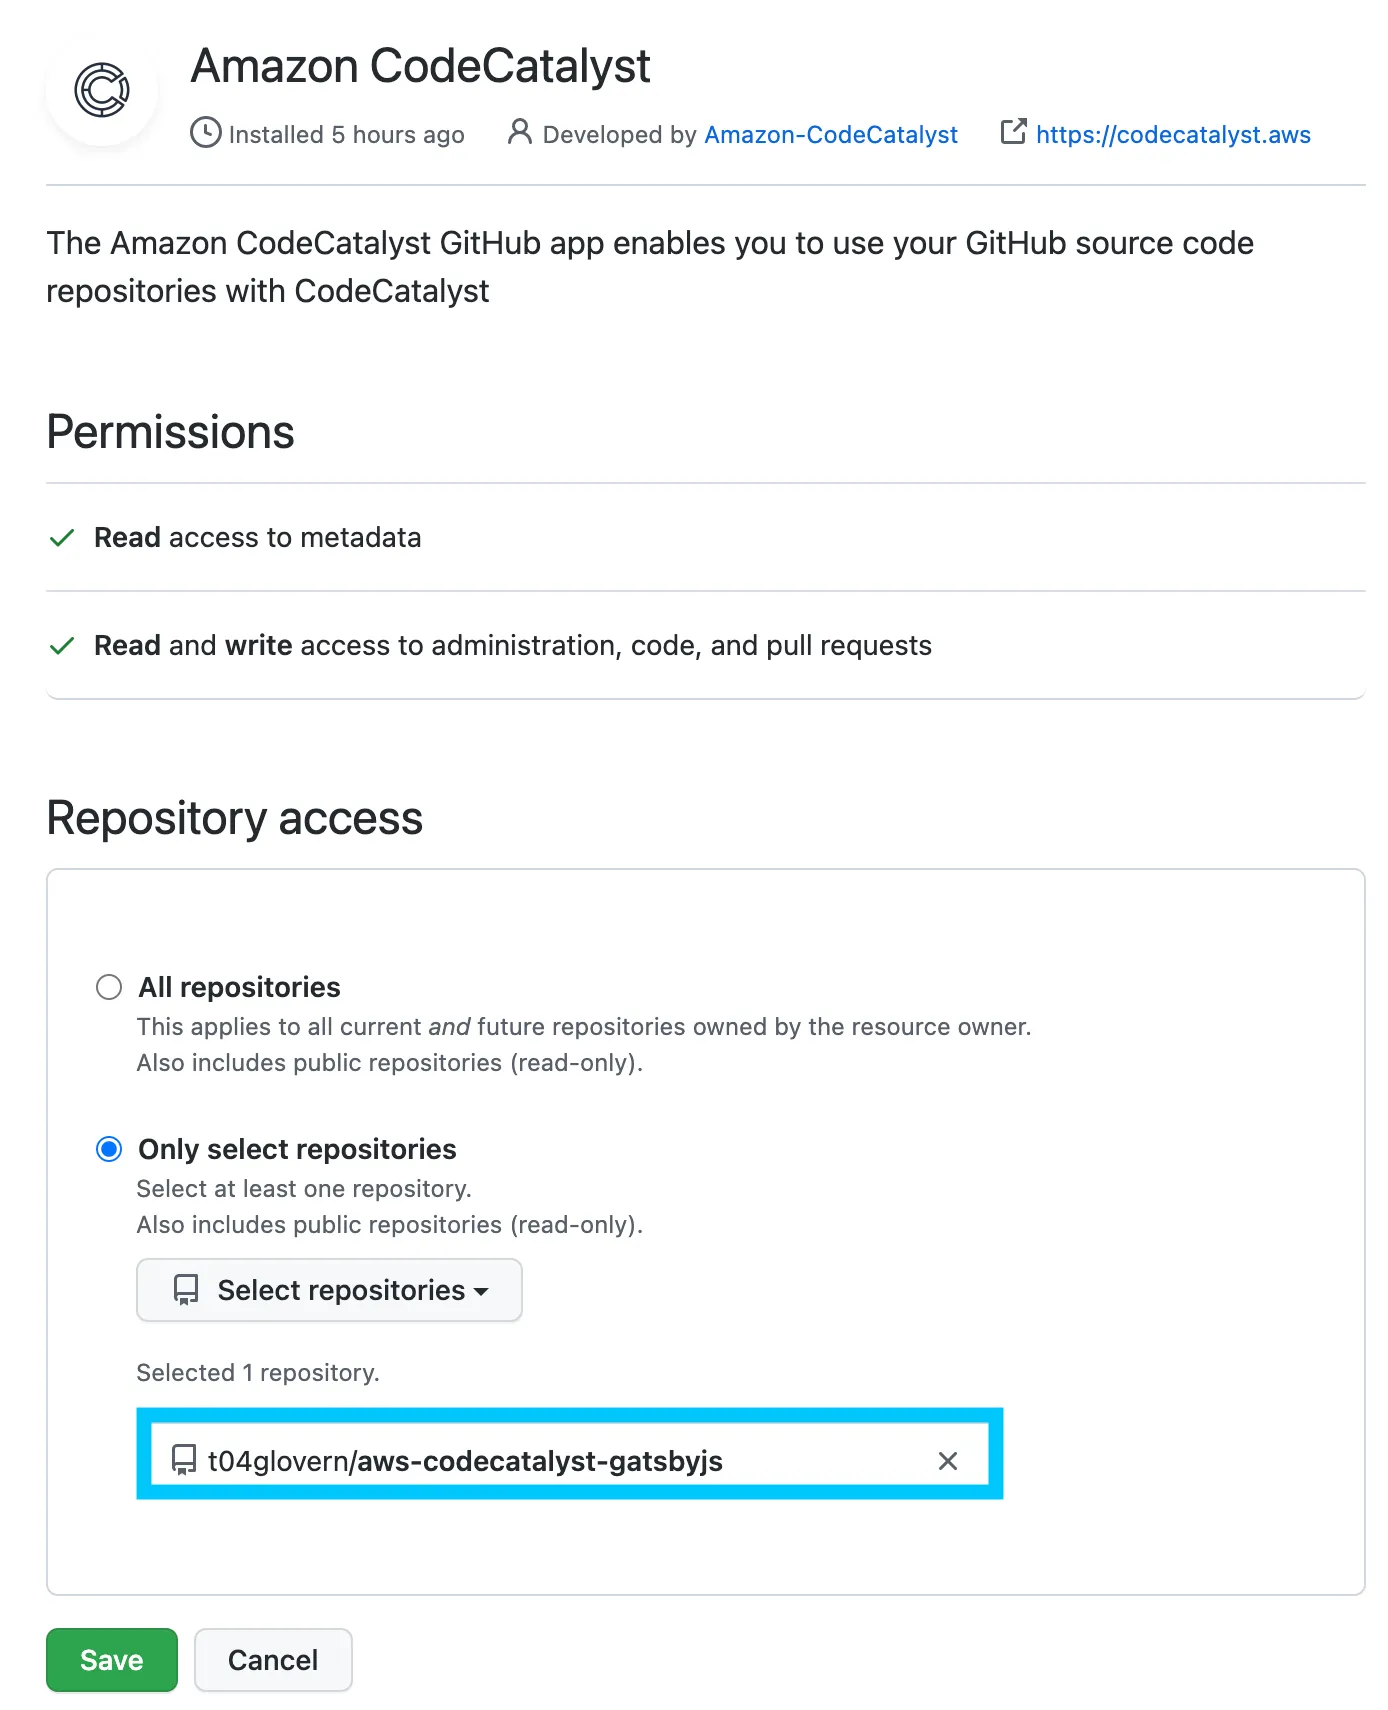
Click Save and the extension should return you back to the Amazon CodeCataltyst console. If you didn’t run into any errors you should now have a configured GitHub extension ready to use in your space.
Create an Amazon CodeCatalyst Project
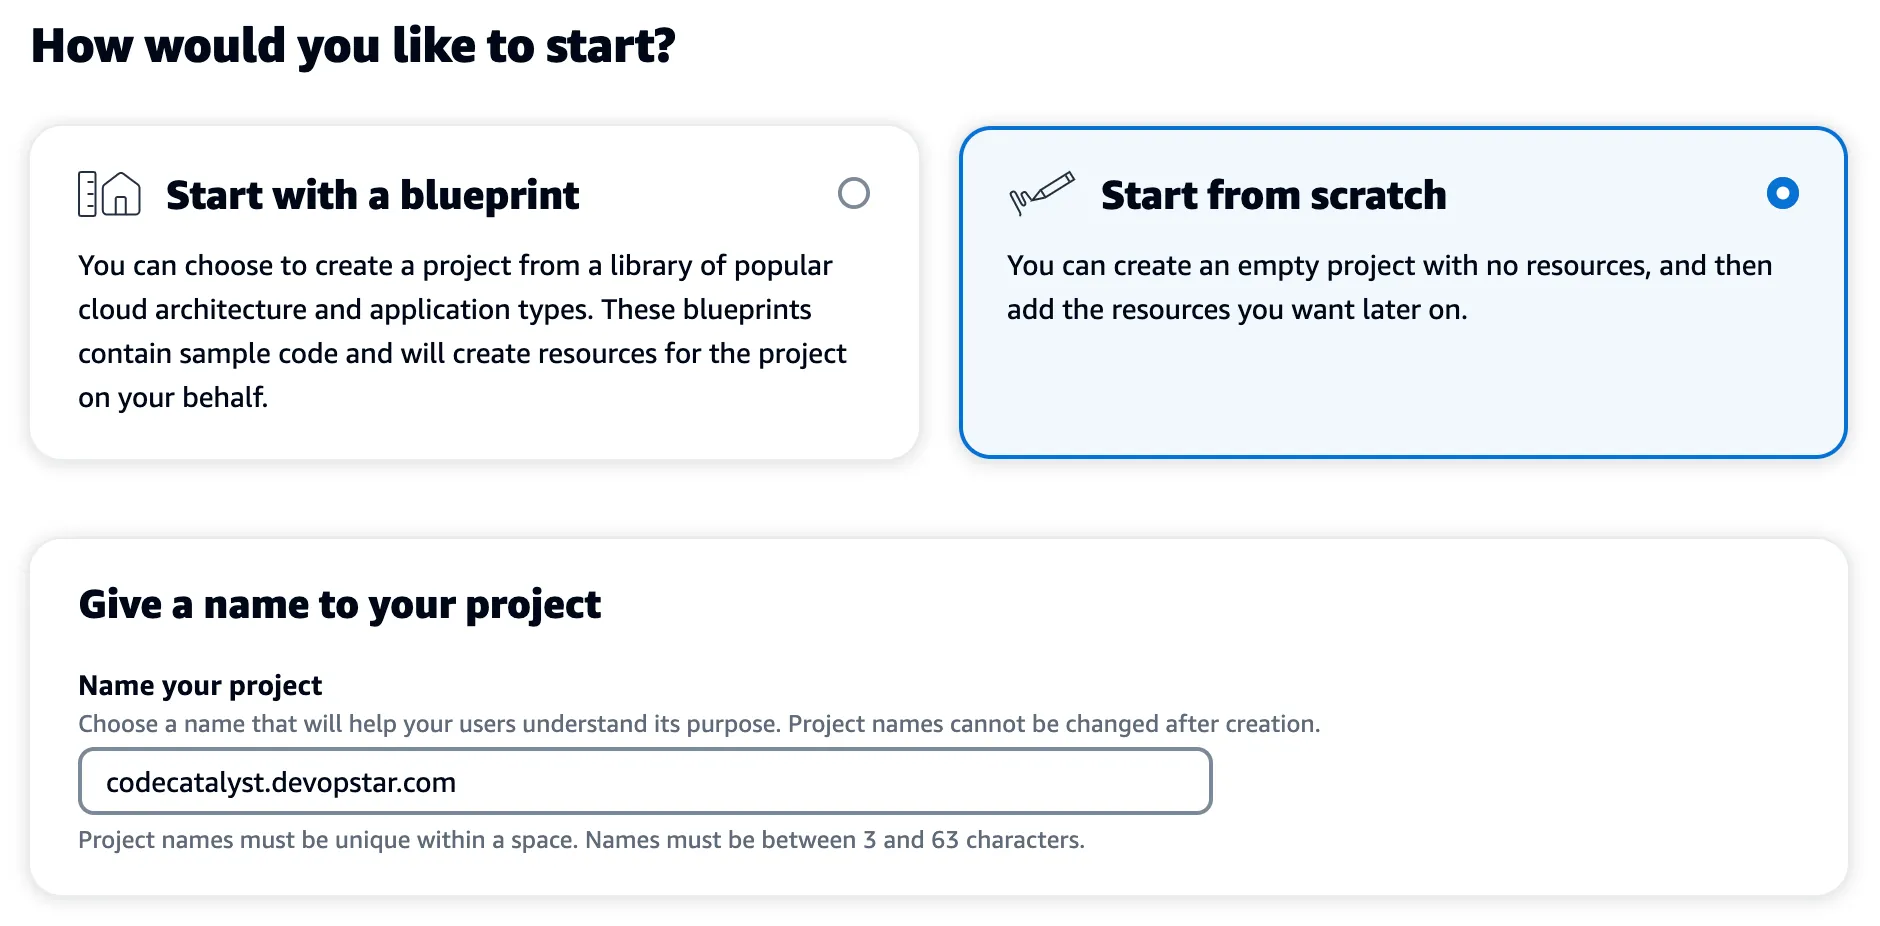
Now that we have our Amazon CodeCatalyst space setup, we can create a new project. Click on the Create project button, and select Start from scratch.
I recommend playing around with the other template options available here if you’d like to get a feel for other things Amazon CodeCatalyst can do for you.
Give your project a name that makes sense to you, in my case I’ve gone with codecatalyst.devopstar.com implying that the project will deploy a website of that name.
Click Create Project when you are happy to proceed.
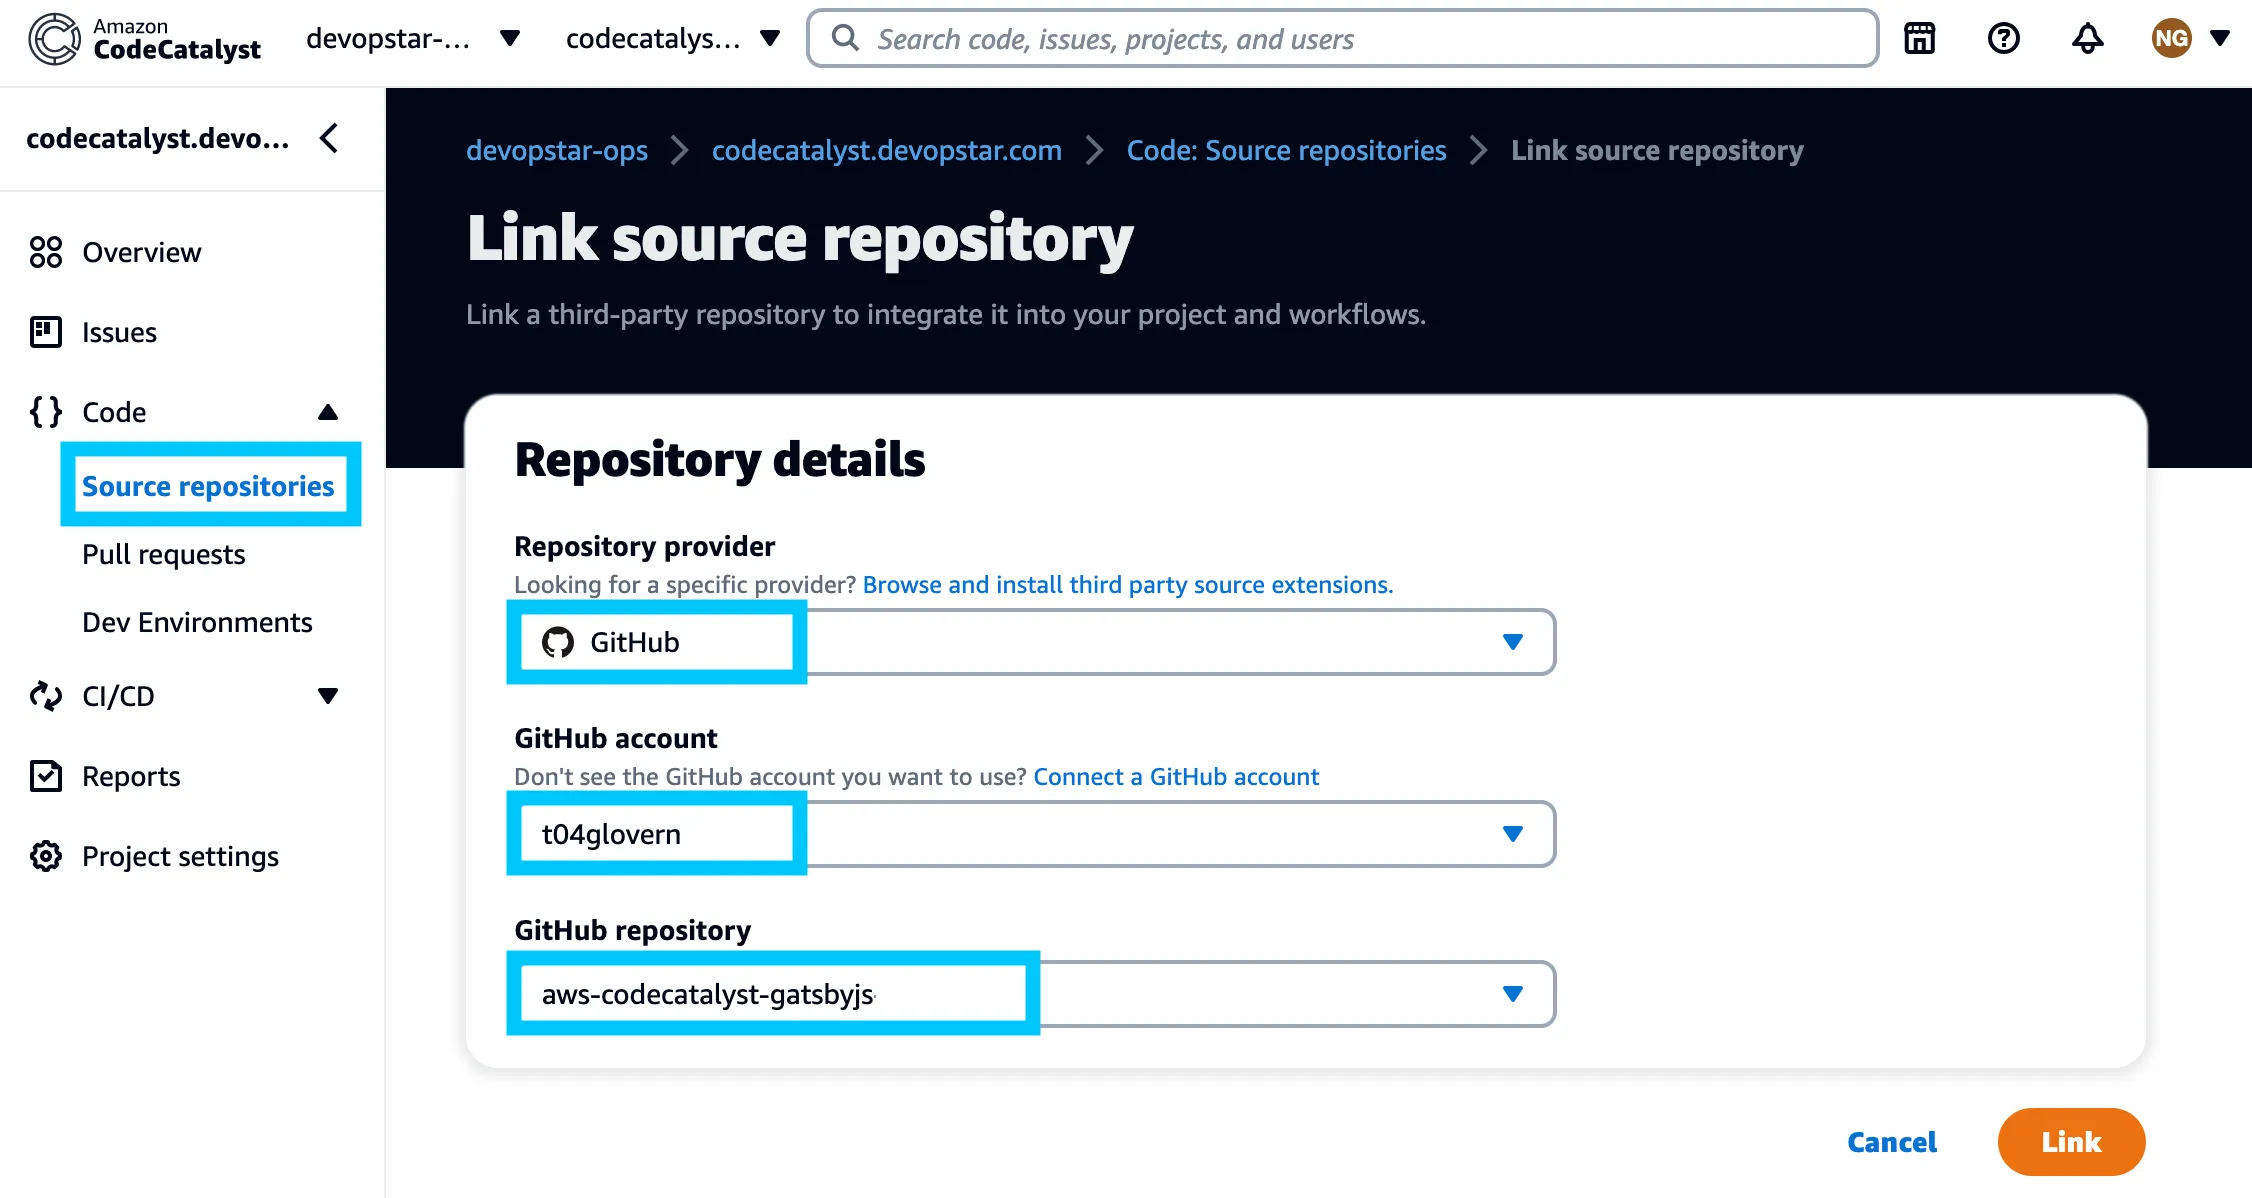
Link GitHub Repository to Project
Although we have linked our GitHub to CodeCatalyst via permissions, we still need to link the individual repository(ies) to a project. Head over to the project screen and add a new repository source.
Select the GitHub account and repository from the list and click Link.
Note that the first time you link a repository to a project, Amazon CodeCatalyst can take a few minutes to sync.
Create a CodeCatalyst Environment
In Amazon CodeCatalyst, an environment can be thought of as a deployment target. For example, you might have a staging and a production environment. Each of these environments would be a separate deployment target and should be a different environment in CodeCatalyst.
For this guide we will just be creating one environment called production - this should point to the AWS account we connected at the start of this guide.
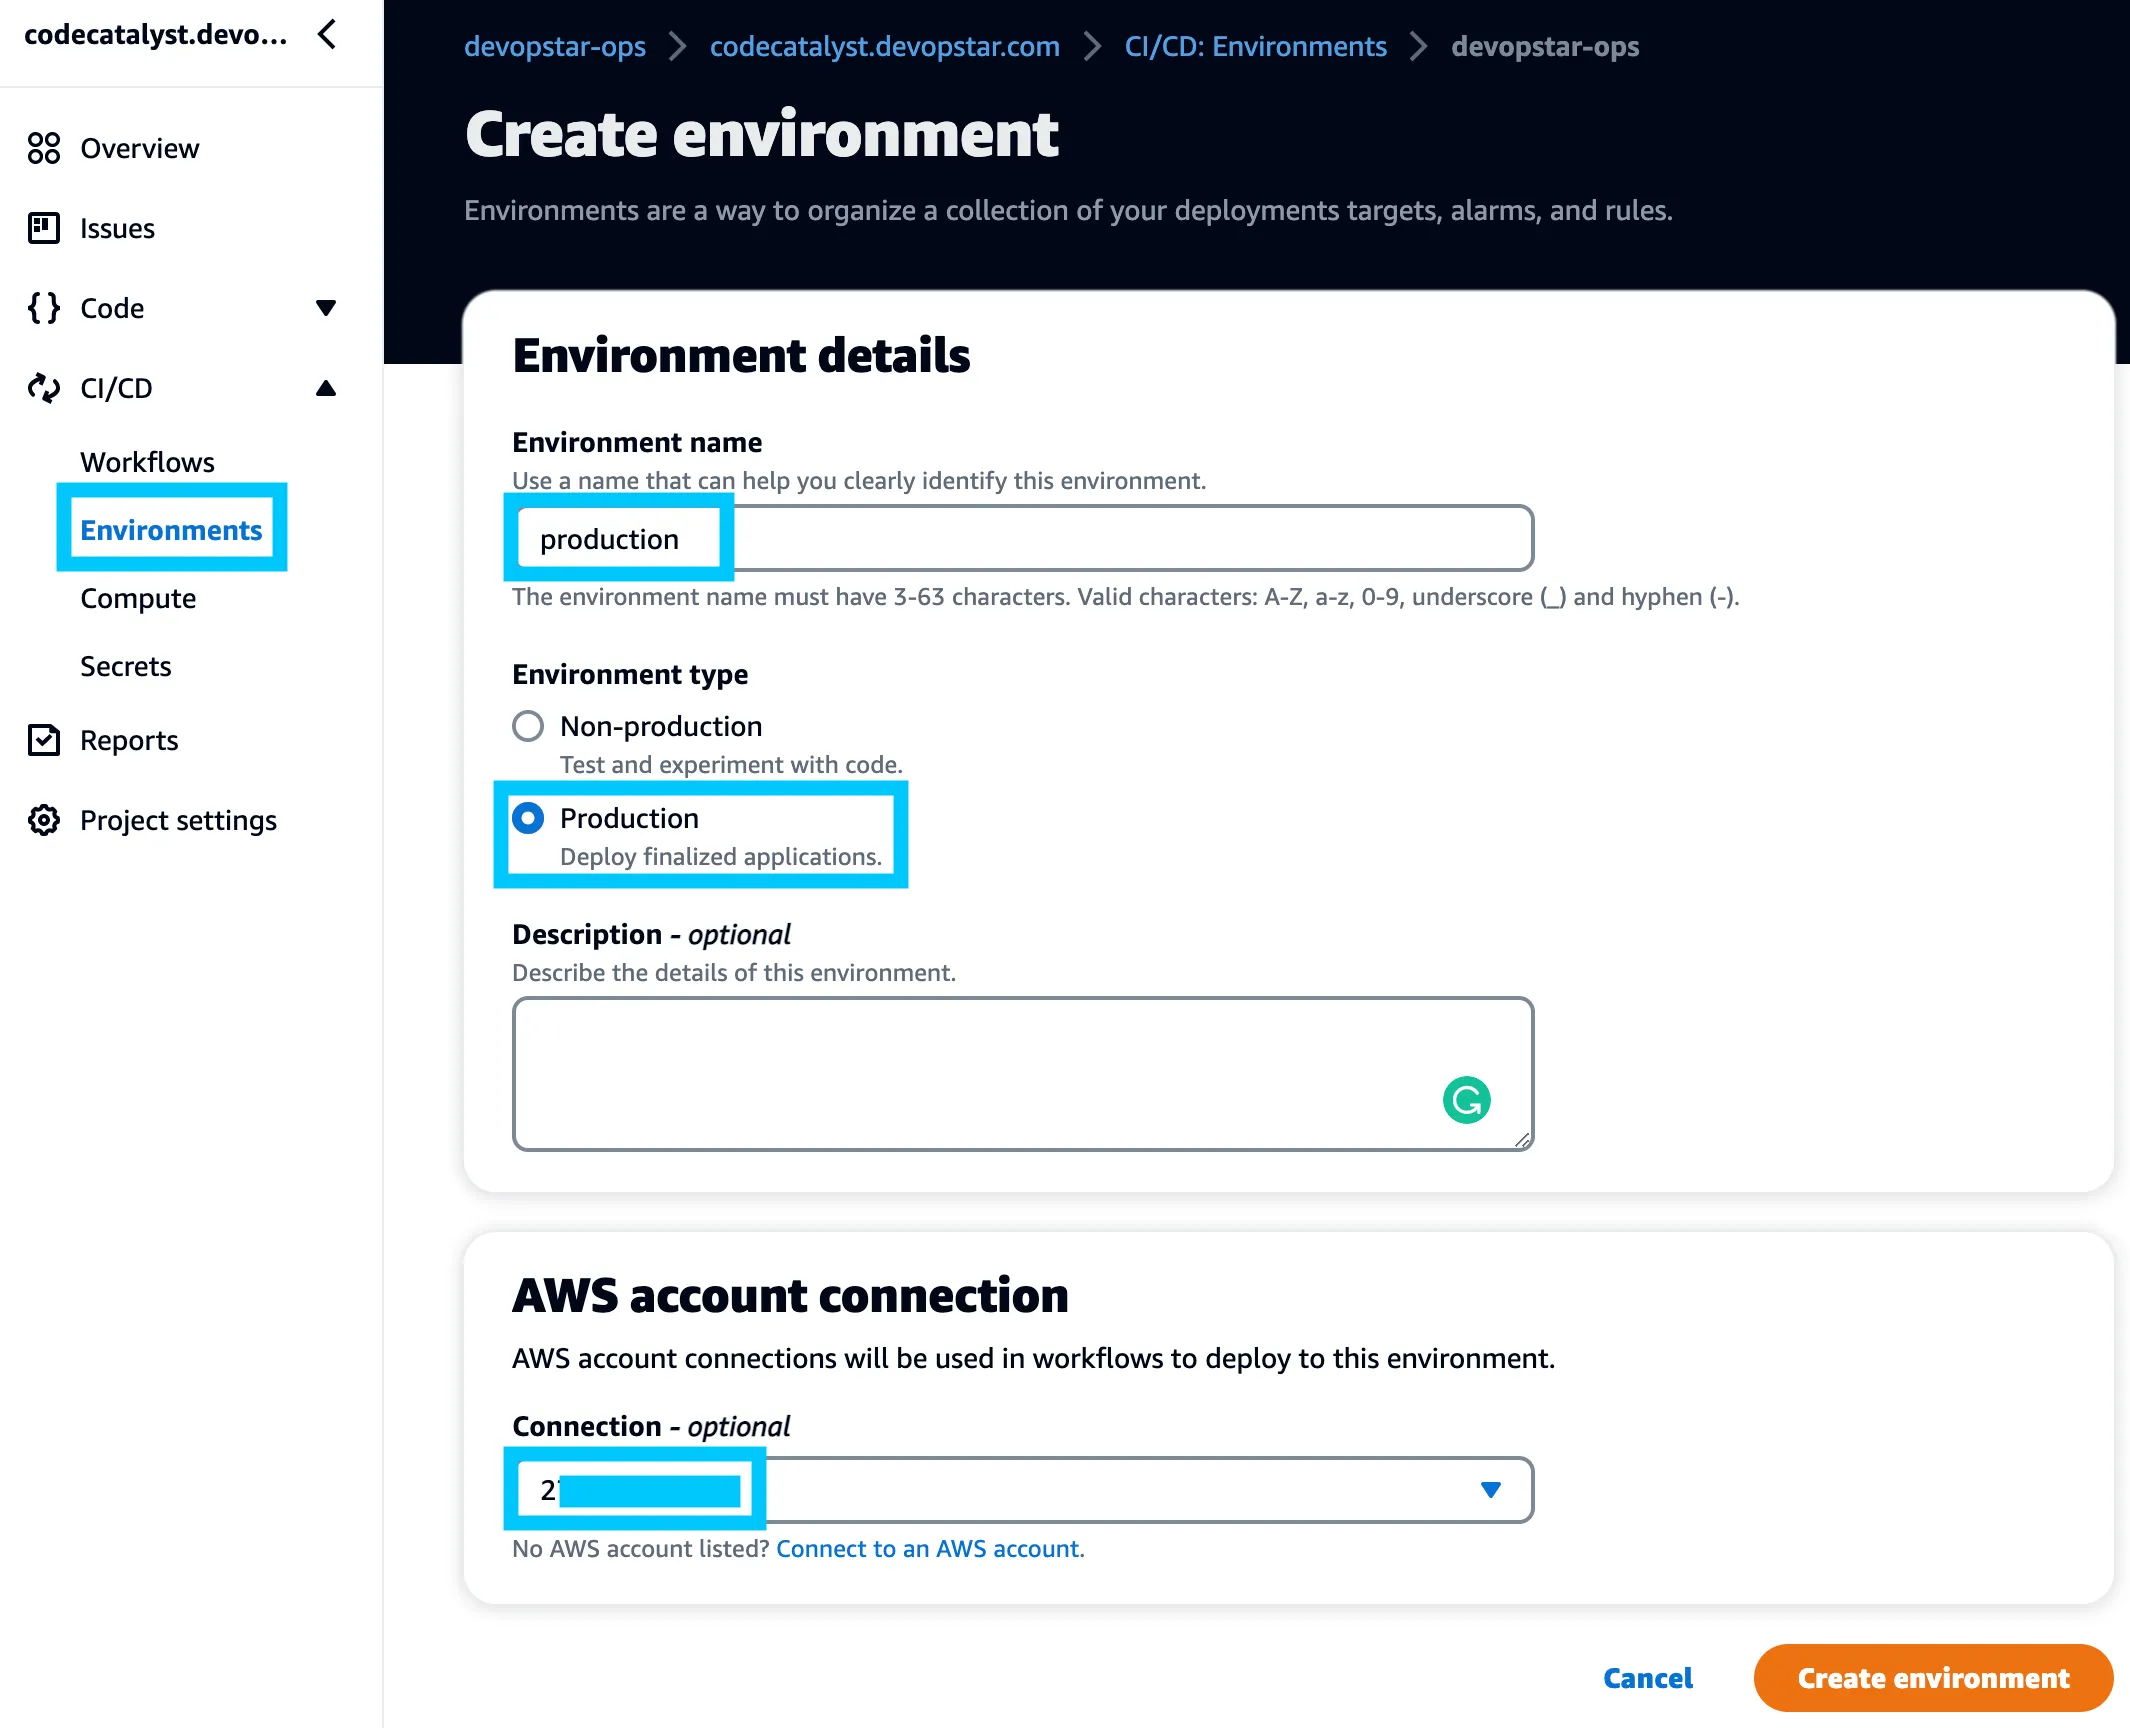
Note that the name of this environment is important - it will be referenced by name in our Workflow in a second.
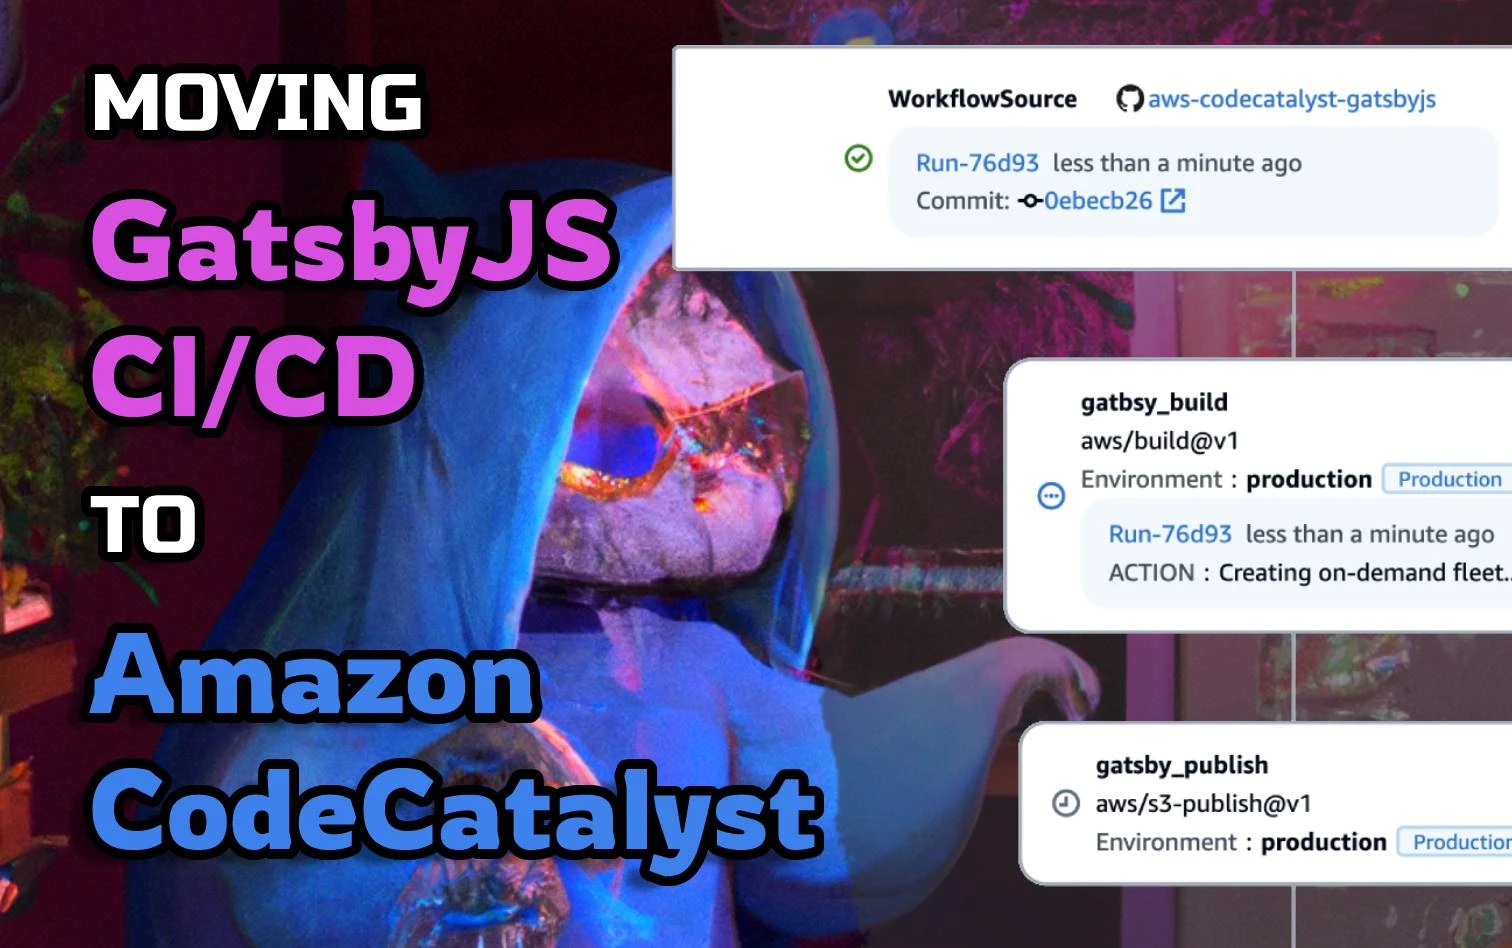
Creating a Amazon CodeCatalyst Workflow
A workflow is a set of steps that will be executed when a trigger is met for a given repository repository. Workflows can be configured run on changes to certain branches, or only run when a particular file/path is changed.
For example, the trigger below will only run when code is push to the main branch of the repository.
Triggers:
  - Type: Push
    Branches:
      - main
When a trigger is met, the workflow will execute one or more Actions defined by us in the workflow. An example of an action could be to build the code in the repository and produce a directory containing the built code as an output.
Amazon CodeCatalyst comes with a number of built-in actions that can be used to perform common tasks within the context of AWS - things like deploying CloudFormation, uploading to s3 or setting up containers in AWS ECS. Each of these common patterns have been abstracted into actions that can be used in a workflow by Amazon.
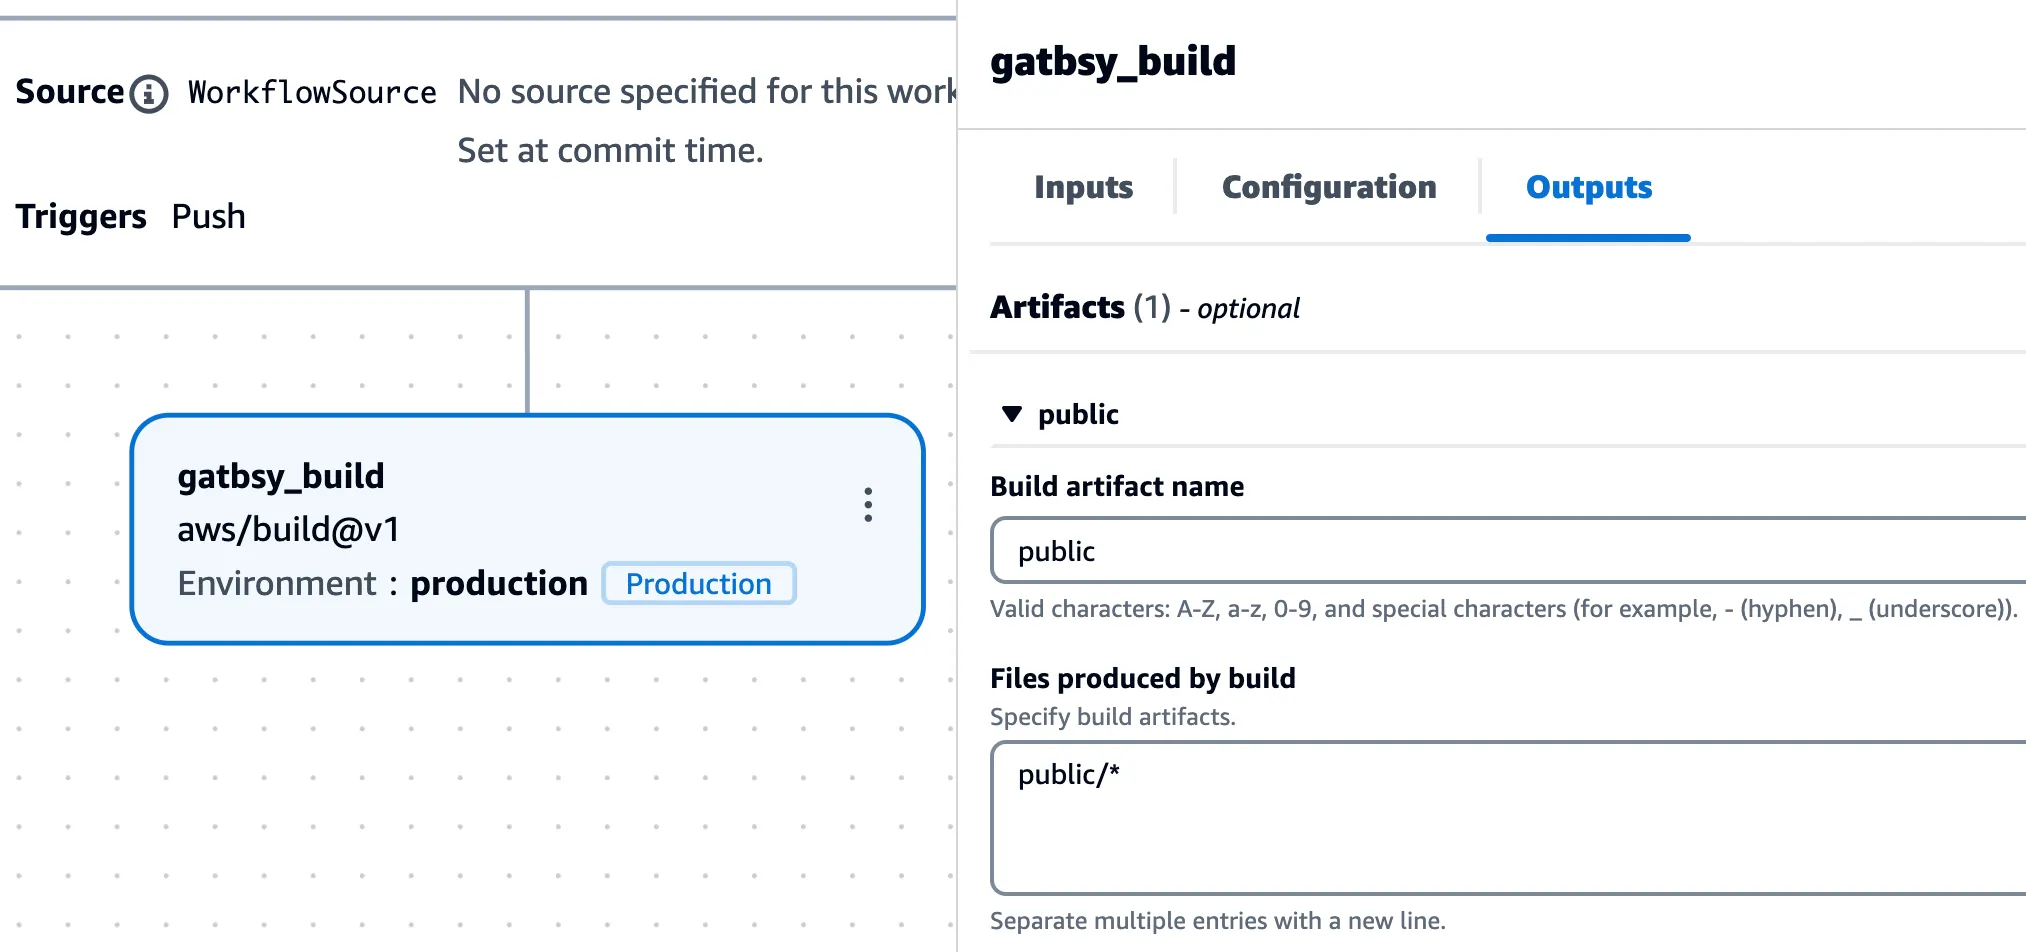
Let’s have a look at the workflow action that I use for building the GatsbyJS website
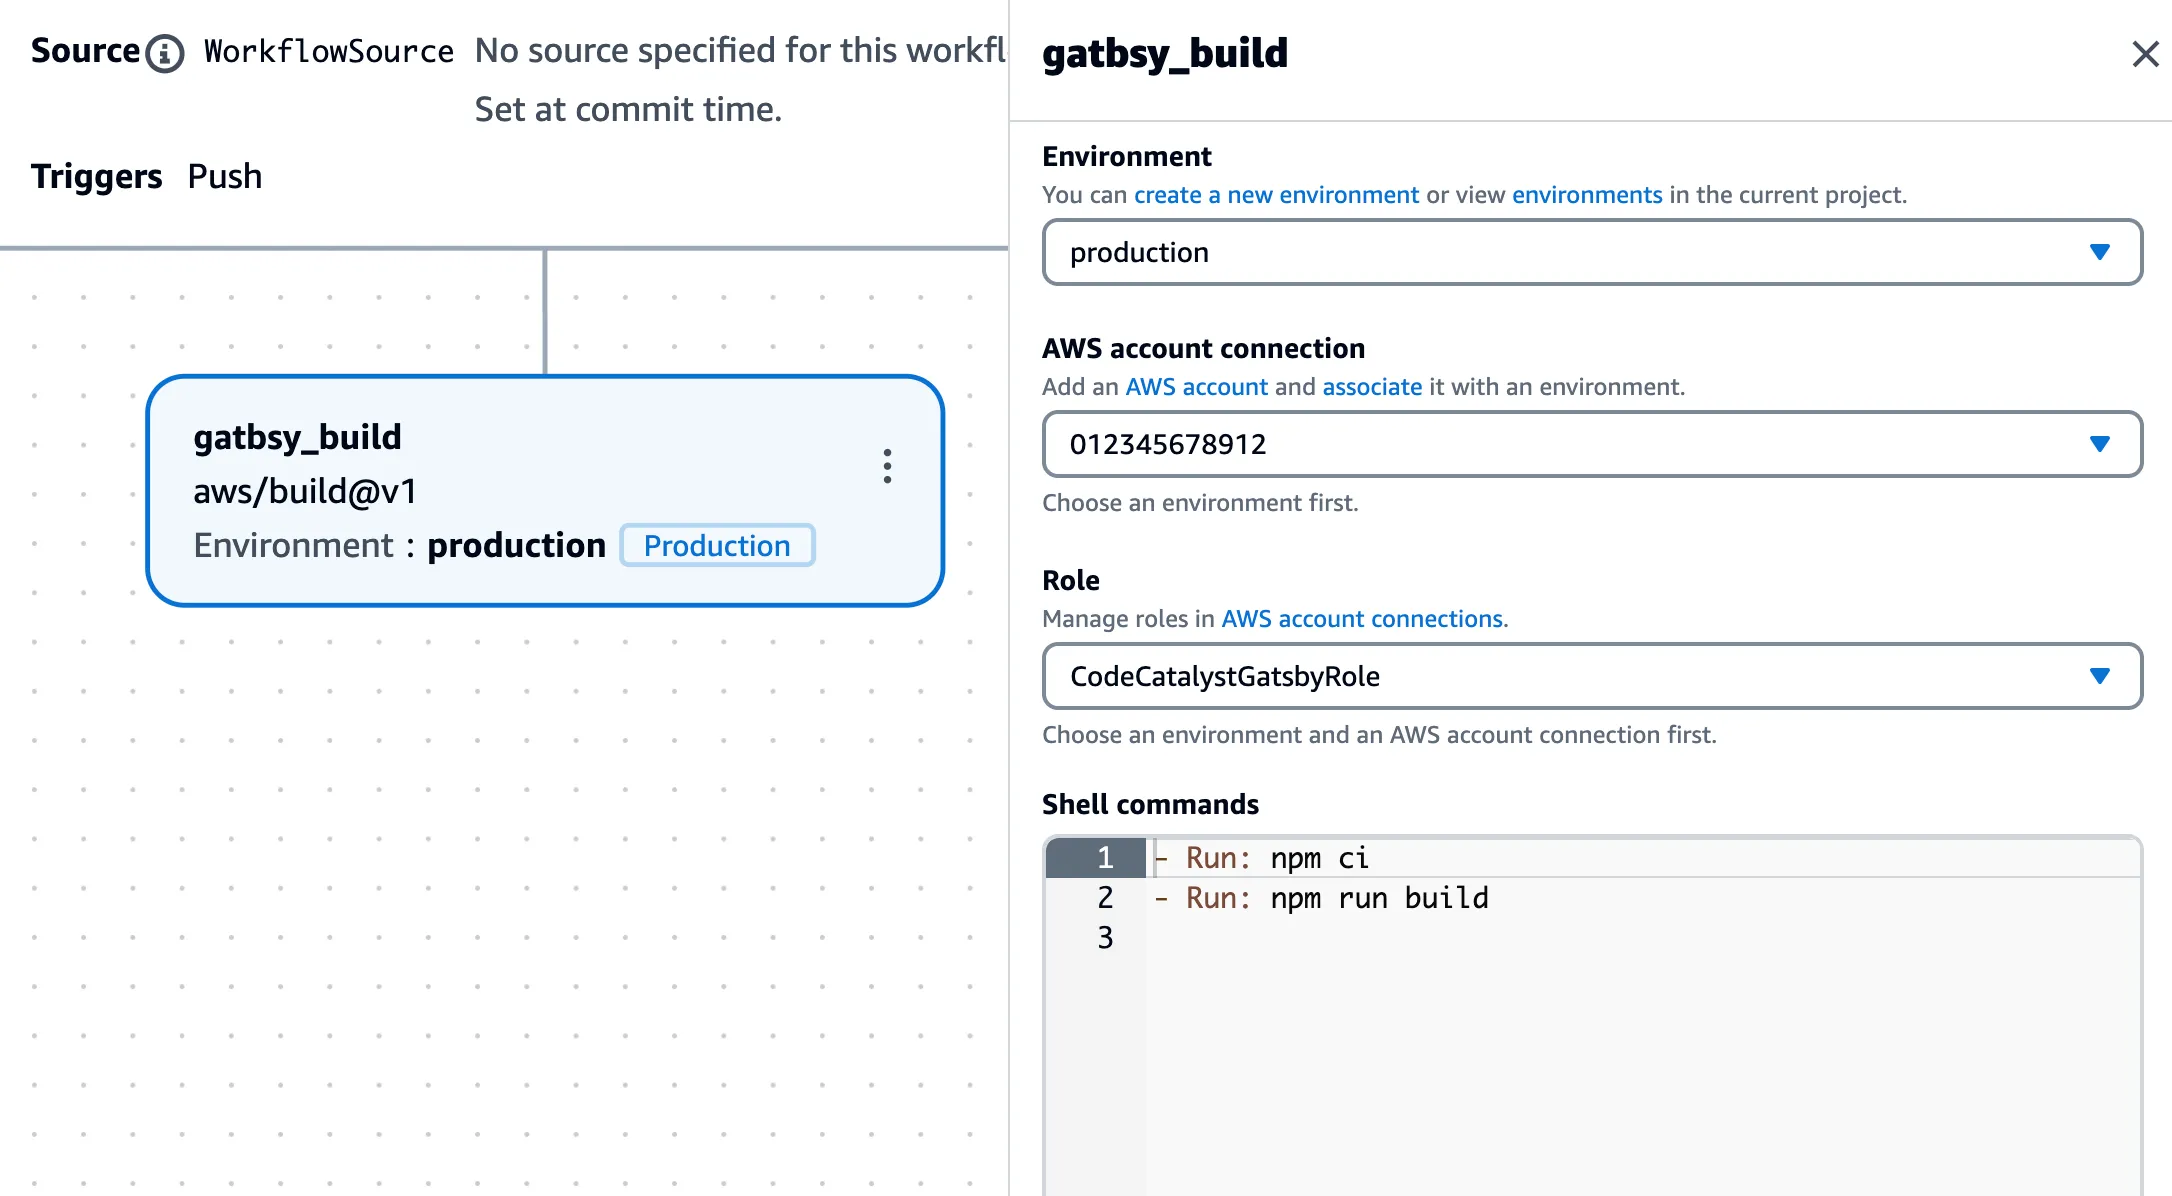
You can see that we must define the following:
- Environment: set this to
productionor whatever you called your environment in previous steps. - Account connection: set this to the AWS account connection you created at the start of this guide.
- Role: The IAM role we created in the previous steps - these are the permission provided to the CodeCatalyst action when it runs.
Then a list of commands need to be provided that are run by the Action when triggered. In my example we are just running an npm ci to install the dependencies and then npm run build to build the website.
Take note of the outputs tab - this is where we can define the output of the action. In my example, I am defining the output as a directory called public which is the output of the GatsbyJS build.
All of the above configuration can also be defined in a YAML file and checked into the repository. The gatsby_build action looks something like the following:
  gatbsy_build:
    Identifier: aws/build@v1
    Inputs:
      Sources:
        - WorkflowSource
    Outputs:
      AutoDiscoverReports:
        Enabled: false
      Artifacts:
        - Name: public
          Files:
            - public/*
    Configuration:
      Steps:
        - Run: npm ci
        - Run: npm run build
      Container:
        Registry: DockerHub
        Image: node:18
    Compute:
      Type: EC2
      Fleet: Linux.x86-64.Large
    Environment:
      Connections:
        - Role: CodeCatalystGatsbyRole
          Name: "012345678912"
      Name: production
The outputs from one action can be strung together into another - for example I have an action that deploys the built website to s3 with the following definition
  gatsby_publish:
    Identifier: aws/s3-publish@v1
    Environment:
      Name: production
      Connections:
        - Role: CodeCatalystGatsbyRole
          Name: "012345678912"
    Compute:
      Type: EC2
    Inputs:
      Artifacts:
        - public
    Configuration:
      DestinationBucketName: codecatalyst.devopstar.com
      SourcePath: public/
    DependsOn:
      - gatbsy_build
The finaly step for my pipeline is to run an extra AWS CLI command that invalidates a CloudFront distribution. This is required to ensure that the CloudFront cache is cleared and the new website is served.
You can also see how environment variables can be passed into the action - in this case I am passing in the CloudFront distribution ID as an environment variable.
  cloudfront_invalidate:
    Identifier: aws/build@v1
    Outputs:
      AutoDiscoverReports:
        Enabled: false
    Configuration:
      Steps:
        - Run: aws cloudfront create-invalidation --distribution-id=${CLOUDFRONT_DIST_ID}
            --paths "/*"
    Compute:
      Type: EC2
    DependsOn:
      - gatsby_publish
    Environment:
      Name: production
      Connections:
        - Role: CodeCatalystGatsbyRole
          Name: "012345678912"
    Inputs:
      Variables:
        - Name: CLOUDFRONT_DIST_ID
          Value: EXAMPLEN7CFEUT
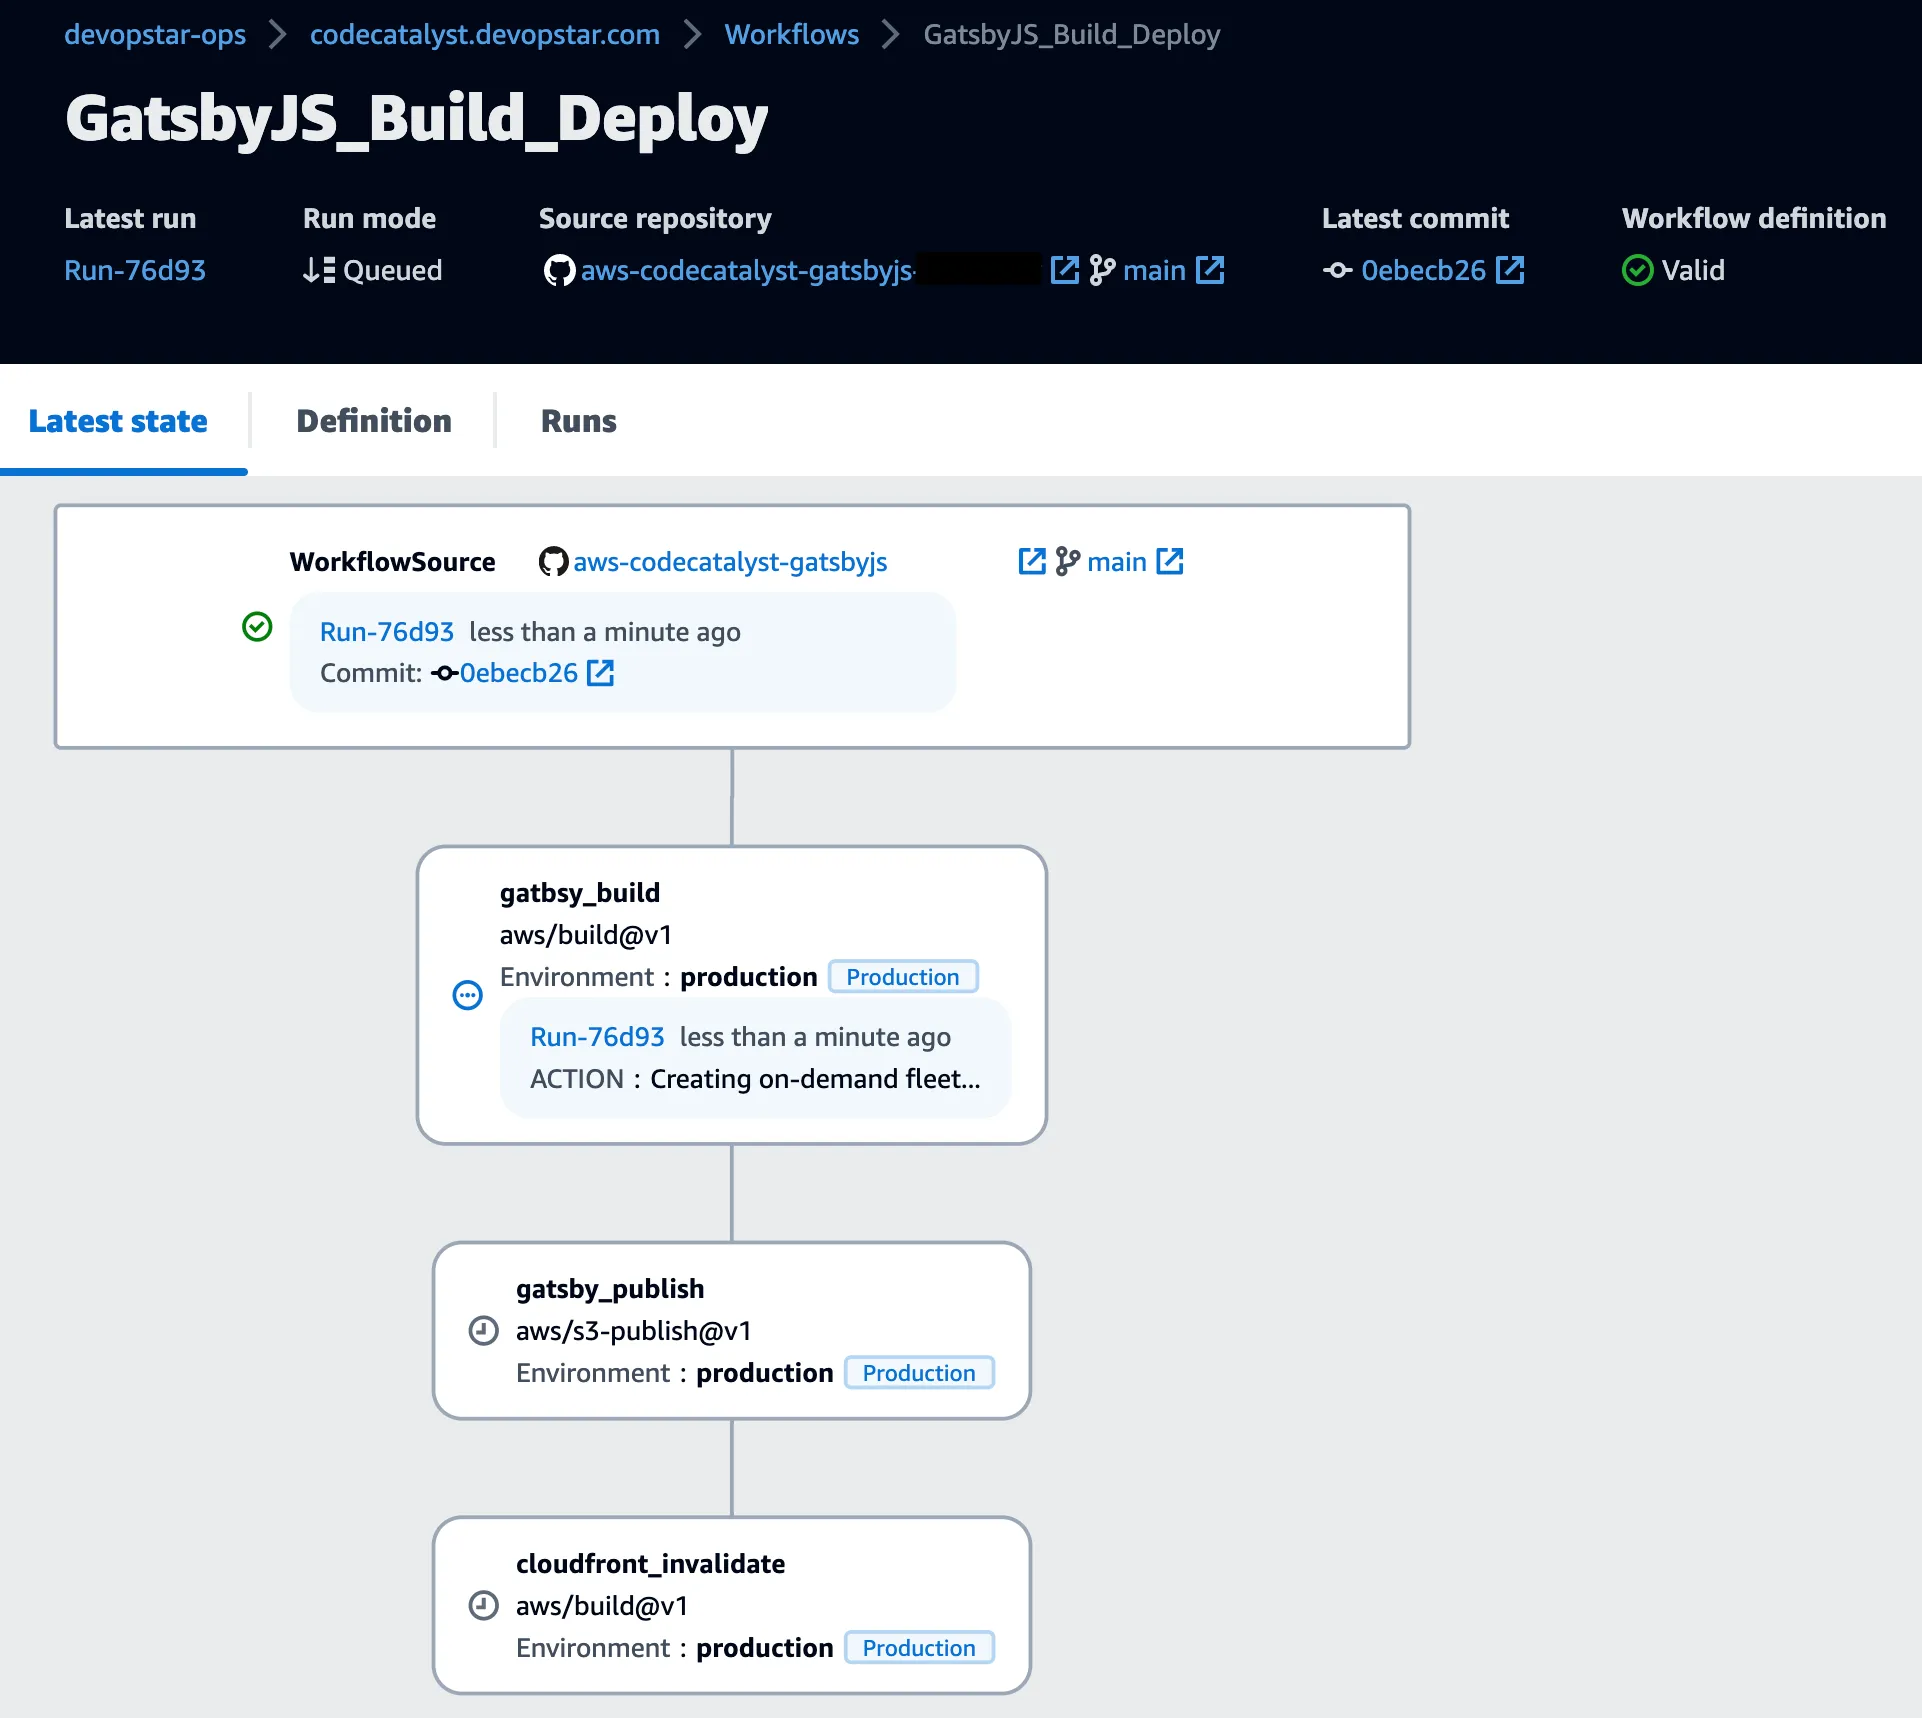
Checking in the complete workflow file to the .codecatalyst/workflows/ directory in a repository - then making a commit to the repository should trigger a build! Check out the complete workflow I used in .codecatalyst/workflows/GatsbyJS_Build_Deploy.yaml
Conclusion
Overall, Amazon CodeCatalyst is a valuable tool for any developer looking to accelerate their development process and deploy their applications to the cloud. Because Amazon CodeCatalyst is built on top of AWS, things like roles and permissions being passed straight to the workflow actions is a great benefit that makes security less of a concern to the developer.
I hope to see Amazon continue to support and bring in new source and action types to support more common use cases.
If you have any questions or think parts of this guide could be improved on, please reach out to me on Twitter @nathangloverAUS or via the contact page.