Using GitHub Actions for Greengrass v2 Continuous Deployment
Being able to iterate quickly when working on IoT projects plays a big impact on how confident you can feel when building out new features.
I’m a big fan of GitHub actions, and ever since OIDC support was added that allowed GitHub actions to authenticate with AWS I have typically defaulted to using it on all my projects.
In this guide, I will show you how you can set up a continuous deployment pipeline for AWS IoT Greengrass v2 from GitHub actions, along with how to use the Greengrass Development Kit - Command Line Interface (GDK CLI) to streamline your workflow and deploy more often with more confidence.
Prerequisites
- Read and deploy: Setting up an AWS IoT Greengrass v2 Learning environment - If you are looking for a very hands-on example of doing Continuous deployment for Greengrass, then I would recommend you follow my previous guide on Setting up an AWS IoT Greengrass v2 Learning environment
- An AWS Account with AWS CLI Setup. It would be ideal if you have unrestricted permissions in your AWS account (if you are using your personal account this should be fine). The services we will primarily be using are:
- AWS IoT Core / Greengrass, S3 and AWS IAM
Greengrass Development Kit setup
To do CI/CD nicely with AWS IoT Greengrass v2 projects, I would recommend checking out the Greengrass Development Kit - Command Line Interface (GDK CLI).
Setting up your Greengrass project with it is as simple as creating a gdk-config.json file in the root directory of your Greengrass component. Check the greengrass-cicd folder in the t04glovern/aws-greengrass-bricks repository for an example.
- Component Name
- Build system
zip, means the component is just zipped up into a folder and uploaded as a zip when published - Define the bucket name and region where you want to publish component versions. The naming convention I used here is very standard, and I recommend you use it too - the same bucket can be used across all your Greengrass projects.
{
  "component": {
    "com.devopstar.Robocat": { // 1
      "author": "Nathan Glover",
      "version": "NEXT_PATCH",
      "build": {
        "build_system": "zip" // 2
      },
      "publish": { // 3
        "bucket": "greengrass-component-artifacts",
        "region": "ap-southeast-2"
      }
    }
  },
  "gdk_version": "1.1.0"
}
The other requirement your component repo needs is a recipe.yaml file (note you need an A in the YAML extension).
Check the greengrass-cicd folder in the t04glovern/aws-greengrass-bricks repository, specifically the recipe.yaml file.
Most of the recipe file is pretty standard and unrelated to the GDK CLI / deployment process. For more information check out the AWS documentation on this spec: https://docs.aws.amazon.com/greengrass/v2/developerguide/component-recipe-reference.html
- The COMPONENT_NAME, COMPONENT_VERSION, COMPONENT_AUTHOR and BUCKET_NAME are all passed to the recipe from GDK CLI.
---
RecipeFormatVersion: "2020-01-25"
ComponentName: "{COMPONENT_NAME}"
ComponentVersion: "{COMPONENT_VERSION}"
ComponentDescription: AWS IoT Greengrass component to pet your robocat fleet via subscription
ComponentPublisher: "{COMPONENT_AUTHOR}"
ComponentConfiguration:
  DefaultConfiguration:
    accessControl:
      aws.greengrass.ipc.mqttproxy:
        com.devopstar.Robocat:mqttproxy:1:
          policyDescription: Allows access to subscribe to devopstar/robocat/pet topic
          operations:
            - aws.greengrass#SubscribeToIoTCore
          resources:
            - devopstar/robocat/pet
Manifests:
- Name: Linux
  Platform:
    os: linux
  Artifacts:
    - URI: "s3://BUCKET_NAME/COMPONENT_NAME/COMPONENT_VERSION/greengrass-cicd.zip"
      Unarchive: ZIP
      Permission:
        Execute: ALL
        READ: ALL
  Lifecycle:
    Install:
      RequiresPrivilege: false
      Script: |-
        pip3 install -r {artifacts:decompressedPath}/greengrass-cicd/requirements.txt
    Run:
      RequiresPrivilege: false
      Script: |-
        python3 {artifacts:decompressedPath}/greengrass-cicd/src/robocat.py
Finally, a deployment config also needs to be present; which is pretty standard and aligns to the spec outlined best in the AWS docs: https://docs.aws.amazon.com/greengrass/v2/developerguide/create-deployments.html
The main difference is that we need to update the component version we will be deploying to point to the new one (once the first step in CI has been executed).
We do this by templating a couple of variables; check the example I have in the greengrass-cicd folder in the t04glovern/aws-greengrass-bricks repository, specifically the deployment.json.template file. The following variables can be seen and will be replaced by the CI pipeline
- AWS_REGION
- AWS_ACCOUNT_ID
- LATEST_COMPONENT_VERSION
{
    "targetArn": "arn:aws:iot:$AWS_REGION:$AWS_ACCOUNT_ID:thinggroup/robocat",
    "deploymentName": "Deployment for robocat group",
    "components": {
        "com.devopstar.Robocat": {
            "componentVersion": "$LATEST_COMPONENT_VERSION",
            "runWith": {}
        },
        "aws.greengrass.Nucleus": {
            "componentVersion": "2.8.1"
        },
        "aws.greengrass.clientdevices.mqtt.Bridge": {
            "componentVersion": "2.2.2",
            "configurationUpdate": {
                "merge": "{\"mqttTopicMapping\":{\"StatMapping\":{\"topic\":\"devopstar/robocat/pet\",\"source\":\"IotCore\",\"target\":\"Pubsub\"}}}"
            },
            "runWith": {}
        }
    },
    "deploymentPolicies": {
        "failureHandlingPolicy": "ROLLBACK",
        "componentUpdatePolicy": {
            "timeoutInSeconds": 60,
            "action": "NOTIFY_COMPONENTS"
        },
        "configurationValidationPolicy": {
            "timeoutInSeconds": 60
        }
    },
    "iotJobConfiguration": {}
}
Once all the above is set up, we’re good to start looking into how we will be authenticating with AWS from GitHub actions!
OIDC Authentication [Optional]
OIDC or OpenID Connect is an authentication protocol on top of OAuth 2.0 that allows 3rd party applications, like Github in our case to perform actions against AWS given an OIDC Provider is set up in the account we are targetting.
This mechanism for authentication is far superior to credential-based access, as there is no secret key material involved. If you would like to use OIDC for this demo (I recommend it) you will need to deploy a provider into your AWS account. This only has to be deployed once per account - and can be re-used by any future projects in a similar way.
Deploy OIDC Provider [Optional]
If you would like to use the OIDC method to authenticate GitHub Actions with AWS, then I would recommend having a look at the gist I have written here: https://gist.github.com/t04glovern/07b9eeb0900fa39fdbbfbe9ccebb4324
TLDR; you need to deploy an OIDC provider into your AWS account (once, for all your projects to use). Do this by uploading/deploying the following CloudFormation template
NOTE: You will need to replace the GithubOrg parameter with the name of your GitHub Organisation or GitHub username.
AWSTemplateFormatVersion: 2010-09-09
Description: 'GitHub OIDC: Provider - Deployed once into each account'

Parameters:
  GithubOrg:
    Type: String
  GithubTokenThumbprint:
    Type: String
    Default: 6938fd4d98bab03faadb97b34396831e3780aea1

Resources:
  GithubOidc:
    Type: AWS::IAM::OIDCProvider
    Properties:
      Url: https://token.actions.githubusercontent.com
      ThumbprintList:
        - !Ref GithubTokenThumbprint
      ClientIdList:
        - sts.amazonaws.com
This can be deployed using the AWS CLI locally by running the following
export AWS_REGION="ap-southeast-2"

aws cloudformation deploy \
    --template-file provider.yml \
    --stack-name oidc-provider-$AWS_REGION \
    --parameter-overrides \
        GithubOrg=YourGithubUsername \
    --region $AWS_REGION
There is a chance that the Github thumbprint might change (very unlucky), so if it does you will need to get the new thumbprint. This can be done by running the thumbprint.sh script; which is also set up to update your CloudFormation template too.
Deploy OIDC Role for Repository [Optional]
Once the OIDC provider is deployed, the next step is to deploy a role that can be assumed by our GitHub repository. I recommend deploying a slight variation of the one that I have in the t04glovern/aws-greengrass-bricks repository in the .github/cfn/oidc-role.yml file
NOTE: You will need to replace
t04glovern/aws-greengrass-brickswith your repository name.
Some key things to highlight with the following role template are:
- Assumes your AWS IoT Thing group will be called
robocat. You should change this to be whatever the thinggroup is you are working with - Assumes the Component name that is being deployed is called
com.devopstar.Robocat
AWSTemplateFormatVersion: 2010-09-09
Description: 'GitHub OIDC: t04glovern/aws-greengrass-bricks | Stack: oidc-t04glovern-aws-greengrass-bricks'

Parameters:
  FullRepoName:
    Type: String
    Default: t04glovern/aws-greengrass-bricks
  GreengrassThingGroupName:
    Type: String
    Default: robocat
  GreengrassComponentName:
    Type: String
    Default: com.devopstar.Robocat

Resources:
  Role:
    Type: AWS::IAM::Role
    Properties:
      RoleName: oidc-t04glovern-aws-greengrass-bricks
      Policies:
        - PolicyName: iot-thing-group
          PolicyDocument:
            Version: '2012-10-17'
            Statement:
              - Effect: Allow
                Action:
                  - iot:DescribeThingGroup
                  - iot:CreateJob
                Resource:
                  - !Sub arn:aws:iot:${AWS::Region}:${AWS::AccountId}:thinggroup/${GreengrassThingGroupName}
        - PolicyName: iot-jobs
          PolicyDocument:
            Version: '2012-10-17'
            Statement:
              - Effect: Allow
                Action:
                  - iot:DescribeJob
                  - iot:CreateJob
                  - iot:CancelJob
                Resource:
                  - !Sub arn:aws:iot:${AWS::Region}:${AWS::AccountId}:job/*
        - PolicyName: s3-greengrass-bucket
          PolicyDocument:
            Version: '2012-10-17'
            Statement:
              - Effect: Allow
                Action:
                  - s3:CreateBucket
                  - s3:GetBucketLocation
                  - s3:ListBucket
                Resource:
                  - !Sub arn:aws:s3:::greengrass-component-artifacts-${AWS::Region}-${AWS::AccountId}
        - PolicyName: s3-greengrass-components
          PolicyDocument:
            Version: '2012-10-17'
            Statement:
              - Effect: Allow
                Action:
                  - s3:GetObject
                  - s3:PutObject
                Resource:
                  - !Sub arn:aws:s3:::greengrass-component-artifacts-${AWS::Region}-${AWS::AccountId}/${GreengrassComponentName}/*
        - PolicyName: greengrass-components
          PolicyDocument:
            Version: '2012-10-17'
            Statement:
              - Effect: Allow
                Action:
                  - greengrass:CreateComponentVersion
                  - greengrass:ListComponentVersions
                Resource:
                  - !Sub arn:aws:greengrass:${AWS::Region}:${AWS::AccountId}:components:${GreengrassComponentName}
        - PolicyName: greengrass-deployment
          PolicyDocument:
            Version: '2012-10-17'
            Statement:
              - Effect: Allow
                Action:
                  - greengrass:CreateDeployment
                Resource:
                  - !Sub arn:aws:greengrass:${AWS::Region}:${AWS::AccountId}:deployments
      AssumeRolePolicyDocument:
        Statement:
          - Effect: Allow
            Action: sts:AssumeRoleWithWebIdentity
            Principal:
              Federated: !Sub arn:aws:iam::${AWS::AccountId}:oidc-provider/token.actions.githubusercontent.com
            Condition:
              StringLike:
                token.actions.githubusercontent.com:sub: !Sub repo:${FullRepoName}:*

Outputs:
  OidcRoleAwsAccountId:
    Value: !Ref AWS::AccountId
  OidcRoleAwsRegion:
    Value: !Ref AWS::Region
  OidcRoleAwsRoleToAssume:
    Value: !GetAtt Role.Arn
You can deploy the above template (copy it from here and call it oidc-role.yml for example) either through the CloudFormation console yourself or by running the following CLI command
export AWS_REGION="ap-southeast-2"
export GITHUB_USERNAME="github-username"
export GITHUB_REPONAME="github-repo-name"

aws cloudformation deploy \
    --template-file oidc-role.yml \
    --stack-name oidc-$GITHUB_USERNAME-$GITHUB_REPONAME \
    --parameter-overrides \
        FullRepoName=$GITHUB_USERNAME/$GITHUB_REPONAME \
    --region $AWS_REGION
Retrieve the outputs from the CloudFormation stack.
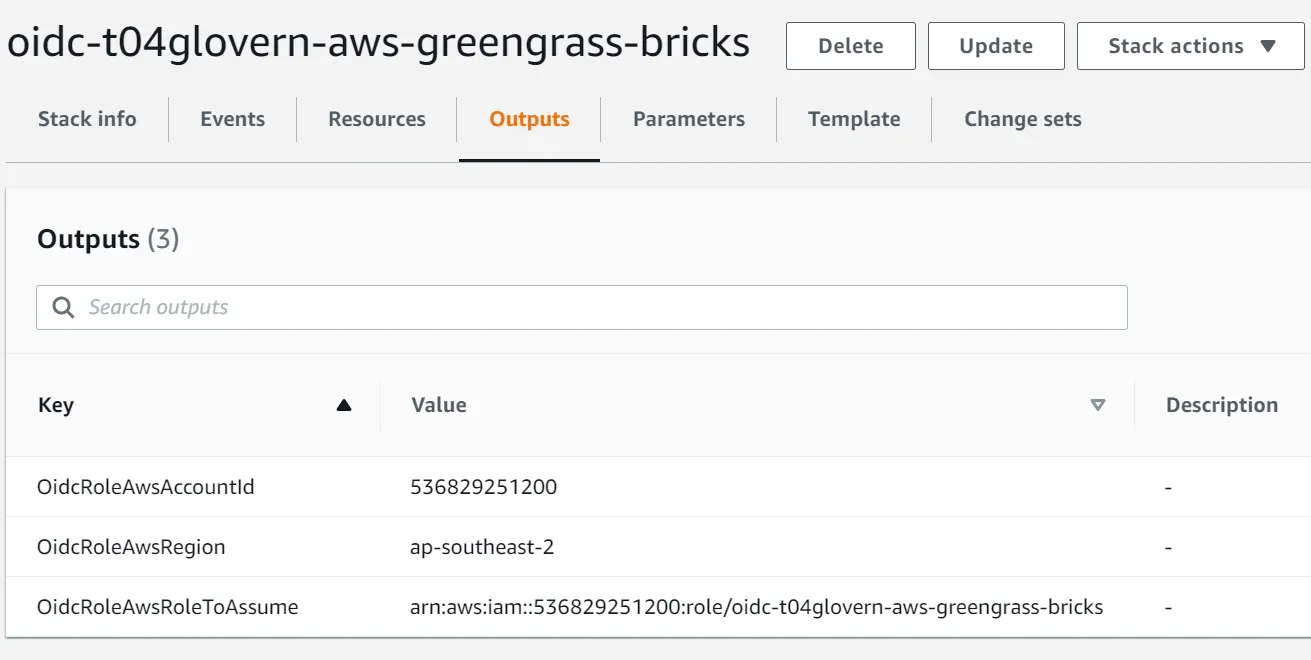
Take note specifically of the following two outputs:
- OidcRoleAwsRegion
- OidcRoleAwsRoleToAssume
GitHub Repository Secrets
Depending on if you are wanting to use the OIDC provider above, or if you want to use AWS access tokens, you will need to create a couple of GitHub repository secrets.
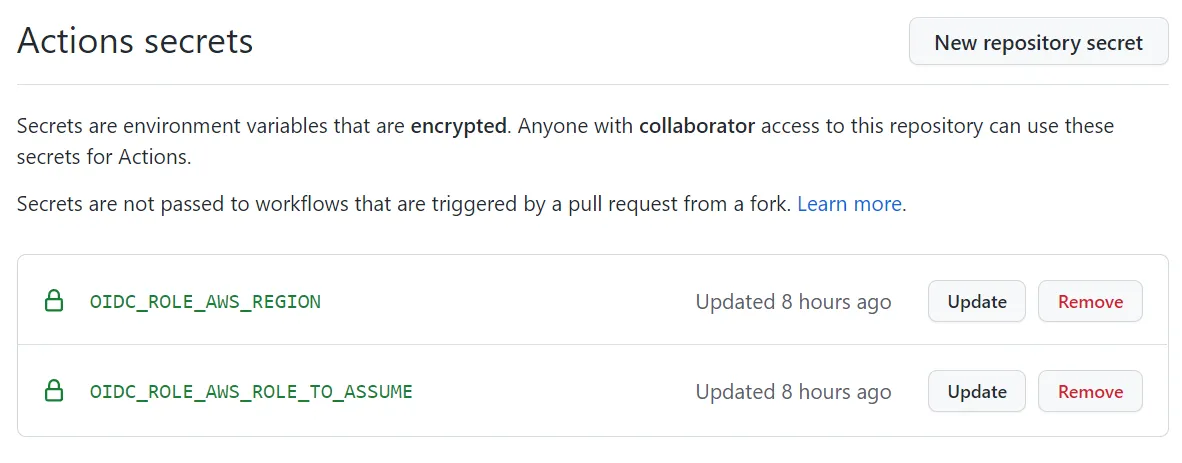
If you are using OIDC, create a secret for:
- OIDC_ROLE_AWS_REGION: OidcRoleAwsRegion
- OIDC_ROLE_AWS_ROLE_TO_ASSUME: OidcRoleAwsRoleToAssume
If you are using AWS Access tokens, then create the following secrets instead:
- AWS_ACCESS_KEY_ID
- AWS_SECRET_ACCESS_KEY
- AWS_REGION
Github Actions Definition
For the best experience, check out the .github/workflows/greengrass-cicd.yml file as it is could be more up to date than this post. I’ll break down each part now so you get a better idea of how it all works
- The action will trigger on push to the
mainbranch, you can add more triggers to theonsection of your action if you’d like the deployment to happen in different situations - We also create two global environment variables that will be referenced later on in the action
name: Greengrass Component Deploy

on:
  workflow_dispatch:
  push:
    branches:
      - main ###### 1 ######

env: ###### 2 ######
  GREENGRASS_COMPONENT_NAME: com.devopstar.Robocat
  GREENGRASS_REGION: ap-southeast-2
- A publish job is run and includes a
permissionsblock that gives the action permission to pull our OIDC id-token - Once published, we need to output the new component version for the deployment step in our action
- Authenticate with AWS, using the OIDC role details defined in our secrets. If you decide to use AWS access tokens instead, you will need to change the
withfields to the following instead- aws-access-key-id: ${{ secrets.AWS_ACCESS_KEY_ID }}
- aws-secret-access-key: ${{ secrets.AWS_SECRET_ACCESS_KEY }}
- aws-region: ${{ secrets.AWS_REGION }}
- Build and publish the Greengrass component using the gdk CLI.
- Run a long and verbose command that just retrieves the most recent Greengrass component that just got published with GDK. This is a workaround as there is currently no way to get the version from the gdk - https://github.com/aws-greengrass/aws-greengrass-gdk-cli/issues/105
jobs:
  publish:
    name: Component publish
    runs-on: ubuntu-latest
    permissions: ###### 3 ######
      id-token: write
      contents: read
    outputs: ###### 4 ######
      publised_version: ${{ steps.gdk_version.outputs.version }}

    steps:
    - name: Checkout
      uses: actions/checkout@v3
    - uses: actions/setup-python@v3
      with:
        python-version: '3.9'

    - name: Configure AWS credentials
      uses: aws-actions/configure-aws-credentials@v1
      with: ###### 5 ######
        role-to-assume: ${{ secrets.OIDC_ROLE_AWS_ROLE_TO_ASSUME }}
        aws-region: ${{ secrets.OIDC_ROLE_AWS_REGION }}

    - name: Install Greengrass Development Kit
      run: pip install -U git+https://github.com/aws-greengrass/aws-greengrass-gdk-cli.git@v1.1.0

    - name: GDK Build ###### 6 ######
      run: gdk component build

    - name: GDK Publish
      run: gdk component publish

    - name: Get published version ###### 7 ######
      id: gdk_version
      run: |
        export AWS_ACCOUNT_ID=$(aws sts get-caller-identity |  jq -r '.Account')
        export AWS_REGION=${GREENGRASS_REGION}
        export LATEST_COMPONENT_VERSION=$(aws greengrassv2 list-component-versions \
          --output text \
          --no-paginate \
          --arn arn:aws:greengrass:${AWS_REGION}:${AWS_ACCOUNT_ID}:components:${GREENGRASS_COMPONENT_NAME} \
          --query 'componentVersions[0].componentVersion')

        echo "::set-output name=version::${LATEST_COMPONENT_VERSION}"
- Again, change the
withblock if you are using AWS access tokens instead. - Run a new deployment using the component version from the previous action step
  deploy:
    name: Component deploy
    runs-on: ubuntu-latest
    needs: publish
    permissions:
      id-token: write
      contents: read

    steps:
    - name: Checkout
      uses: actions/checkout@v3

    - name: Configure AWS credentials
      uses: aws-actions/configure-aws-credentials@v1
      with: ###### 8 ######
        role-to-assume: ${{ secrets.OIDC_ROLE_AWS_ROLE_TO_ASSUME }}
        aws-region: ${{ secrets.OIDC_ROLE_AWS_REGION }}

    - name: Deploy Greengrass component ###### 9 ######
      run: |
        export AWS_ACCOUNT_ID=$(aws sts get-caller-identity |  jq -r '.Account')
        export AWS_REGION=${GREENGRASS_REGION}
        envsubst < "deployment.json.template" > "deployment.json"
        aws greengrassv2 create-deployment \
          --cli-input-json file://deployment.json \
          --region ${AWS_REGION}
      env:
        LATEST_COMPONENT_VERSION: ${{needs.publish.outputs.publised_version}}
Time to test this pipeline out! Push a new commit to your component and push to the branch defined in the GitHub action to trigger a build.
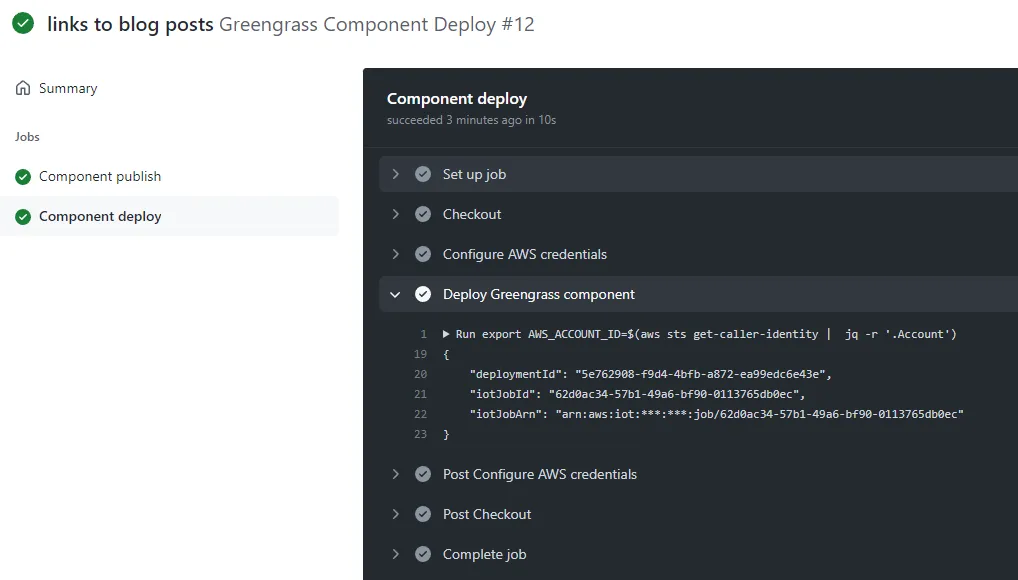
You can track the GitHub actions status under the following link (which will be different for your repository) https://github.com/t04glovern/aws-greengrass-bricks/actions.
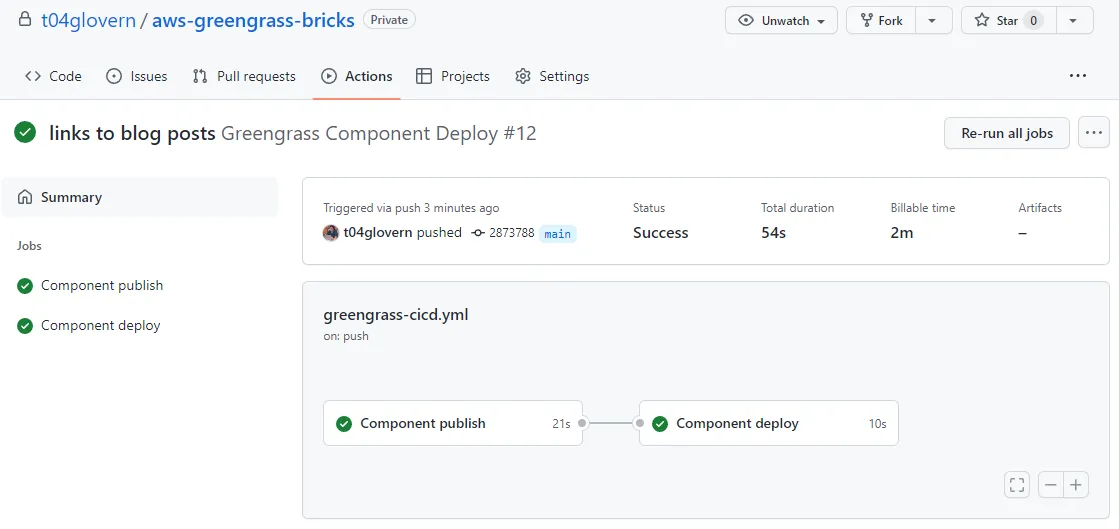
Click on the job list on the left to get a breakdown of each step. As you can see the Greengrass deployment was a success and the deployment ID is even printed out to the actions console
Summary
In this guide, you’ve gone through the process of setting up a GitHub actions pipeline to handle the deployments of a Greengrass component to a fleet of things.
You can now move on to one of the other parts of this series! I recommend checking out one of the following:
If you have any questions or think parts of this guide could be improved on, please reach out to me on Twitter @nathangloverAUS or via the contact page.