Deploying Containers to AWS Greengrass v2 - A Comprehensive Guide
AWS Greengrass v2 is a powerful edge computing platform that extends the capabilities of AWS IoT to edge devices. It allows developers to run containerized applications, manage device resources, and process data locally while maintaining a connection with the cloud. In this blog post, we will explore various ways to deploy containers to Greengrass v2 using the Greengrass Development Kit (GDK) CLI and tools like Docker Buildx for cross-compiling armv7 container images, exporting containers as tar files, and creating Greengrass recipes for seamless deployment.
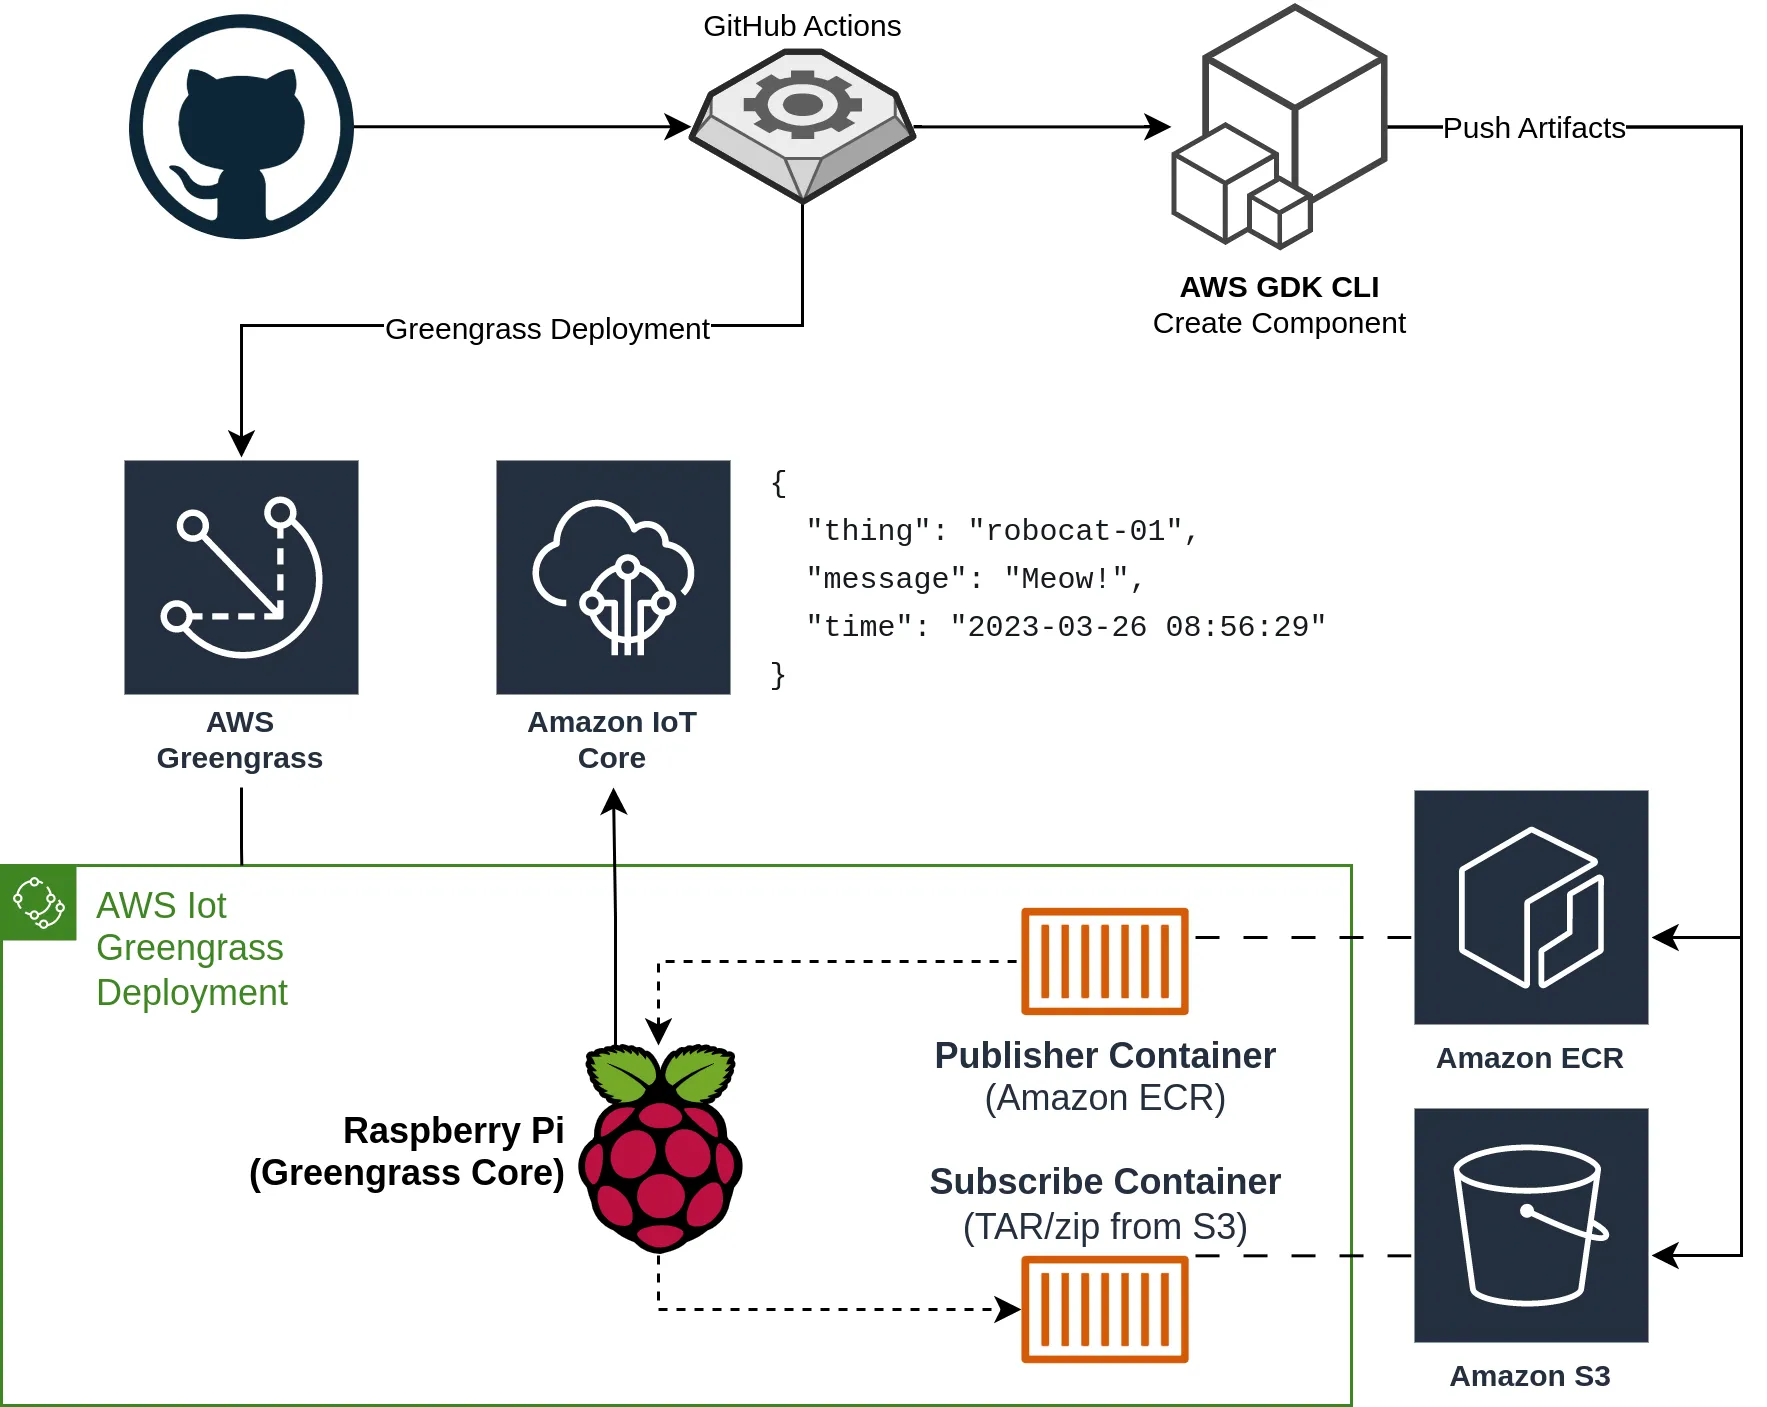
By the end of this post, you will have a solid understanding of the various ways of deploying containers to run on Greengrass v2 and how the GDK CLI can be used to simplify the process. You will understand the pros and cons of each method and be able to choose the best method for your use case. The following diagram shows the overall architecture we will be deploying in this post.
Prerequisites
To have the best experience with this post, I would recommend you have the following before you start on this blog post:
-
Read the two previous blog posts in this series - while it isn’t required they cover some basic usage of Greengrass v2 and the GDK CLI, along with the continous deployment pipeline we will be using in this post.
-
Install the following tools onto your system
- Docker - ensure you have the latest version installed as we will be using some of the newer BuildKit features.
- AWS CLI
- The Greengrass Development Kit - Command Line Interface (GDK CLI)
-
Create or Clone the following repositories
- t04glovern/aws-greengrass-bricks - This is the repository we have been using in the previous blog posts. It contains the Greengrass recipes and the source code for the Greengrass components we are deploying in this post. In this post we will be working from the
greengrass-dockerfolder in the repository.
- t04glovern/aws-greengrass-bricks - This is the repository we have been using in the previous blog posts. It contains the Greengrass recipes and the source code for the Greengrass components we are deploying in this post. In this post we will be working from the
Using Greengrass Development Kit CLI (GDK) to build & push docker containers
The Greengrass Development Kit (GDK) CLI is a tool that allows developers to build, package and deploy Greengrass components to Greengrass v2. GDK CLI deals with the complexities of building and packaging Greengrass components and allows developers to focus on the code.
In the previous post we used GDK CLI to bundle python code into a zip file that could be deployed to Greengrass v2. Taking a look at that gdk-config.json file you are able see the build_system configuration item that controls this behaviour.
{
  "component": {
    "com.devopstar.Robocat": {
      ...
      "build": {
        "build_system": "zip"
      },
      ...
For this post however, we are wanting to do something that is slightly outside of the scope of functionality currently offered by the GDK CLI. Instead of bundling source code we instead want to build and push a docker container for use on the Greengrass device and for this we will need to use the custom build system.
Referring to the GDK CLI configuration documentation on this topic the following format is required - where custom_build_command is a list of commands that will be executed in order.
{
  "component": {
    "com.devopstar.RobocatContainer": {
      ...
      "build": {
        "build_system": "custom",
        "custom_build_command": [
          "bash",
          "build.sh"
        ]
      },
      ...
When gdk component build is run, the GDK CLI will execute the commands from the custom_build_command list in order. When using the custom build system a particular folder structure is expected to be present after your custom build commands have been executed.
|-- greengrass-build
|   |-- recipes
|   |   |-- recipe.yaml
|   |-- artifacts
|   |   |-- <COMPONENT_NAME>
|   |   |   |-- <COMPONENT_VERSION>
|   |   |   |   |-- <ARTIFACTS/SOURCE_CODE>
The state we want to achieve for this blog post is to have the gdk component build command build the docker container - then create a tar file of the container image which is placed in the artifacts folder.
We will also support the ability to push the container to a container registry, in this case Amazon Elastic Container Registry (ECR) as part of the gdk component build command.
Note: the action of pushing a container to a container registry as part of the
gdk component buildcommand is antithetical to what the build step should be doing. In an ideal world, the build step should only be building artifacts on the local system. Then duringgdk component publishthe container/artifacts should be pushed. However, this workflow with docker is not currently possible with the GDK CLI. Hopefully in the furture this is something the GDK CLI team will address.
Some other requirements I had while working on this project were:
- Building containers for multiple architectures (x86_64, armv7l, aarch64), as the Raspberry Pi I was working with is ARMv7 based.
- Keeping build times to a minimum - so leveraging docker build cache where possible.
The solution I came up with was to develop a generic custom-build-docker.sh utility for building and pushing docker containers for use on Greengrass v2. The utility can be found in t04glovern/aws-greengrass-bricks/greengrass-docker/custom-build-docker.sh
The utility supports the following command line arguments:
--component-name- The name of the component as defined in thegdk-config.jsonfile. This is used to determine the name of the folder in theartifactsfolder.--component-version- The version of the component as defined in thegdk-config.jsonfile. This is also used to determine the name of the folder in theartifactsfolder.--container-name- The name of the container to be built. This is used as the repository name when pushing the container to the container registry, and the container name when saving the container to a tar file.--container-arch- The architecture of the container to be built. This defines what architecture the container will be built for. The default value islinux/amd64.--container-push- If this flag is present, the container will be pushed to Amazon Elastic Container Registry (ECR).
The utility can be called from the custom_build_command list in the gdk-config.json file like so:
{
  "component": {
    "com.devopstar.RobocatContainer": {
      "author": "Nathan Glover",
      "version": "NEXT_PATCH",
      "build": {
        "build_system": "custom",
        "custom_build_command": [
          "bash",
          "custom-build-docker.sh",
          "--component-name=com.devopstar.RobocatContainer",
          "--component-version=NEXT_PATCH",
          "--container-name=robocatcontainer",
          "--container-arch=linux/arm/v7",
          "--container-push"
        ]
      },
      ...
Feel free to dig through the utility and see how it works. Ultimately it would be good if this functionality could be baked into the GDK CLI itself - but until that happens I’d be interested to hear any feedback you have on my solution!
Run the following command to kick off the GDK CLI build process and confirm that it works as expected. Note that if you are pushing to ECR you will need to have the AWS_ACCESS_KEY_ID and AWS_SECRET_ACCESS_KEY environment variables set.
gdk component build
What we haven’t done yet is to add the container to the recipe.yaml file - along with describing how that piece of the puzzle works. So let’s do that now!
Referencing docker containers in a Greengrass recipe
Up until now we have just been building artifacts that can be used by a Greengrass component. This is where a Greengrass recipe comes into play.
A Greengrass recipe is a YAML or JSON file that describes how the artifacts should be installed and run on the Greengrass device. The recipe describes things like what permissions the component needs, what environment variables should be set, what files should be copied to the Greengrass device - and in our case, what docker containers need to be pulled and run.
The full recipe.yaml file used in this post is available at: t04glovern/aws-greengrass-bricks/greengrass-docker/recipe.yaml. I recommend having a look at this file before reading on - see if you can figure out what is going on!
To keep things simple, I’m going to describe how to run docker containers for each of the following sources independently - feel free to skip to the section that is relevant to you:
Loading and running a docker container from a TAR file
Below in a snippet from the recipe.yaml file that describes how to load and run a docker container from a TAR file. It is arguably the simplest way to run a docker container on a Greengrass device.
RecipeFormatVersion: "2020-01-25"
ComponentName: com.devopstar.RobocatContainer
...
Manifests:
- Name: Linux
  Platform:
    os: linux
  Artifacts:
    - URI: "s3://BUCKET_NAME/COMPONENT_NAME/COMPONENT_VERSION/container.zip"
      Unarchive: ZIP
  Lifecycle:
    Install:
      Script: docker load -i {artifacts:decompressedPath}/container/container.tar
    Run:
      Script: docker run --rm robocatcontainer
Pros
- Simple to implement and integrate with an existing Greengrass component process - since the TAR file is just another artifact that is downloaded and unarchived.
Cons
- The TAR file must be downloaded from S3 in full each time the component is deployed which can be quite inefficient if the changes made to the container are small. Docker containers are built up in layers - so if a change is made to a single layer, normally only that layer would need to be downloaded during a deployment. However, when the TAR file is downloaded from S3, the entire file is downloaded each time.
Loading and running a docker container Amazon ECR
Below is a snippet from the recipe.yaml file that describes how to load and run a docker container from Amazon ECR.
RecipeFormatVersion: "2020-01-25"
ComponentName: com.devopstar.RobocatContainer
...
ComponentDependencies:
  aws.greengrass.DockerApplicationManager:
    VersionRequirement: ~2.0.0
  aws.greengrass.TokenExchangeService:
    VersionRequirement: ~2.0.0
Manifests:
- Name: Linux
  Platform:
    os: linux
  Artifacts:
    - URI: "docker:012345678901.dkr.ecr.ap-southeast-2.amazonaws.com/robocatcontainer:latest"
  Lifecycle:
    Run:
      Script: docker run --rm 012345678901.dkr.ecr.ap-southeast-2.amazonaws.com/robocatcontainer:latest
A prerequisite for this to work is that the device policy that is attached to our Greengrass device must have a policy that allows pulling from the given ECR repository
If you followed the steps in Setting up an AWS IoT Greengrass v2 Learning environment you will have already created a policy that allows pulling from ECR.
An example of this policy can be seen in t04glover/aws-greengrass-bricks/device-policy.json.template
An important change between this approach and the former is also the requirement on the aws.greengrass.DockerApplicationManager and aws.greengrass.TokenExchangeService components. These components are responsible for authenticating with ECR and pulling the container image. In this scenario, the token exchange service is responsible for providing the AWS session credentials to the docker application manager.
ComponentDependencies:
  aws.greengrass.DockerApplicationManager:
    VersionRequirement: ~2.0.0
  aws.greengrass.TokenExchangeService:
    VersionRequirement: ~2.0.0
Pros
- Conversely to the TAR file approach, only the layers that have changed need to be downloaded from ECR. This can significantly reduce the amount of data that needs to be downloaded during a deployment, and therefore reduce the time it takes to deploy a new version of the container.
- With container images being stored in a registry, it is possible to share that image across other use cases outside of Greengrass more easily.
Cons
- As of right now, there does not appear to be a way of passing the artifact URI at deployment time. This means that the URI must be hard-coded into the recipe - and therefore the AWS Account ID and region.
Communicate with Greengrass nucleus from a docker container
Containers are a great way to isolate and encapsulate an application. However there are times when you may want to communicate with Greengrass from within a container. For example, you may want code running in the container to be able to publish messages to the Greengrass MQTT broker; but you don’t want to need to provide separate certificates to the container to do so.
Luckily there is a way to do this by using the Greengrass interprocess communication (IPC) libraries in the AWS IoT Device SDK to communicate with the Greengrass nucleus - the process that is responsible for running the Greengrass components on the host device.
Note: The full guide for this process can be found on the offical AWS Documentation page as Run a Docker container - Use interprocess communication in Docker container components. I will be summarising the steps below.
The IPC socket is located by default at /<GREENGRASS_INSTALL_PATH>/ipc.socket on the Greengrass host device. To use the IPC socket, you need to mount the socket file into the container and set the AWS_GG_NUCLEUS_DOMAIN_SOCKET_FILEPATH_FOR_COMPONENT environment variable to the path of the socket file.
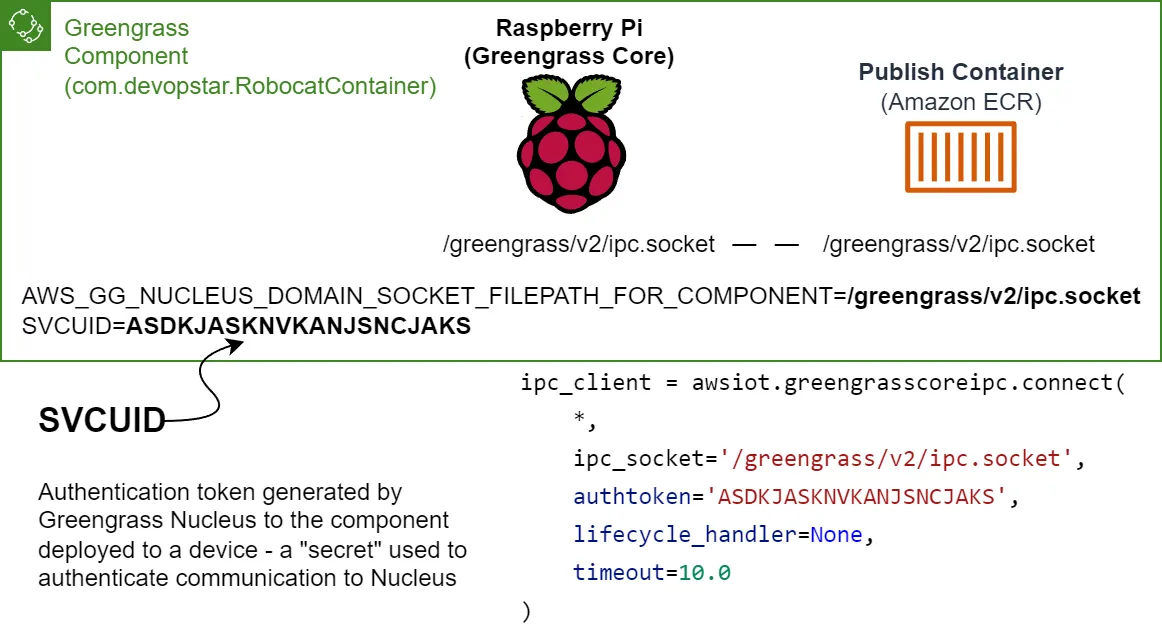
There is however a shortcut in that the AWS_GG_NUCLEUS_DOMAIN_SOCKET_FILEPATH_FOR_COMPONENT is automatically set to the correct path on the host; so it can be passed through to the container without defining it explicitly.
Another environment variable that is required to be passed through to the container is SVCUID. This is a secret token provided to your component by Greengrass that is used to authenticate with the Greengrass nucleus. Similar to the AWS_GG_NUCLEUS_DOMAIN_SOCKET_FILEPATH_FOR_COMPONENT environment variable, this is automatically set by Greengrass and can be passed through to the container.
Additionally, the root path for Greengrass can be referenced in a recipe using the {kernel:rootPath} variable. This means that the full path to the IPC socket can be referenced as {kernel:rootPath}/ipc.socket.
Below is an example of how to run a docker container that uses the IPC socket to communicate with Greengrass. The SVCUID environment variable is also passed through to the container to ensure that the container is running as the same user as the Greengrass nucleus.
Lifecycle:
  Run:
    Script: |-
      docker run --rm \
        -e SVCUID=${SVCUID} \
        -e AWS_GG_NUCLEUS_DOMAIN_SOCKET_FILEPATH_FOR_COMPONENT=${AWS_GG_NUCLEUS_DOMAIN_SOCKET_FILEPATH_FOR_COMPONENT} \
        -v {kernel:rootPath}/ipc.socket:{kernel:rootPath}/ipc.socket \
        012345678901.dkr.ecr.ap-southeast-2.amazonaws.com/robocatcontainer:latest
Authenticating with AWS services from a docker container
When running a docker container on a Greengrass device, it is possible to authenticate with AWS services using the same IAM role that is used by Greengrass nucleus. We can leverage the aws.greengrass.TokenExchangeService component we setup in the previous section to provide the container with the AWS session credentials.
This is done by passing through the following two environment variables to the container:
AWS_CONTAINER_AUTHORIZATION_TOKEN: The authorization token that is used to authenticate against the token exchange service running on the Greengrass host device.AWS_CONTAINER_CREDENTIALS_FULL_URI: HTTP URL endpoint that is used to retrieve the AWS session credentials from the token exchange service.

Both of these environment variables are automatically set by Greengrass for the component and can be passed through to the container. Below is an example of how to run a docker container with these environment variables passed through.
Note: The
--network hostflag is required to ensure that the container can communicate with the token exchange service running on the host device.
Lifecycle:
  Run:
    Script: |-
      docker run --rm \
        --network host \
        -e AWS_CONTAINER_AUTHORIZATION_TOKEN=${AWS_CONTAINER_AUTHORIZATION_TOKEN} \
        -e AWS_CONTAINER_CREDENTIALS_FULL_URI=${AWS_CONTAINER_CREDENTIALS_FULL_URI} \
        012345678901.dkr.ecr.ap-southeast-2.amazonaws.com/robocatcontainer:latest
Bringing it all together with docker compose
In this section, you will learn how to combine the concepts from the previous sections into a single Greengrass V2 recipe that leverages Docker Compose. This will enable seamless deployment lifecycle and management of the Robocat application within Docker containers, taking advantage of Greengrass features for IPC communication and authentication with AWS services.
The full recipe can be found in the t04glovern/aws-greengrass-bricks/greengrass-docker/recipe.yaml file - but I will be breaking it down into sections below.
The component dependencies are defined at the top of the recipe. This is required for the component to access AWS ECR and the Token Exchange Service for authentication with AWS services.
# ... (Greengrass V2 recipe header)
ComponentDependencies:
  aws.greengrass.DockerApplicationManager:
    VersionRequirement: ~2.0.0
  aws.greengrass.TokenExchangeService:
    VersionRequirement: ~2.0.0
Then the Greengrass component is configured to allow access to publish and subscribe to topics in the form devopstar/robocat/*/meow. The * wildcard is intended to allow access to any devices in the robocat thing group.
# ... (Greengrass V2 recipe header and dependencies)
ComponentConfiguration:
  DefaultConfiguration:
    accessControl:
      aws.greengrass.ipc.pubsub:
        com.devopstar.RobocatContainer:pubsub:1:
          policyDescription: Allows access to publish to devopstar/robocat/+/meow topic
          operations:
            - aws.greengrass#PublishToTopic
            - aws.greengrass#SubscribeToTopic
          resources:
            - devopstar/robocat/*/meow
The next block handles pulling the Robocat container image from ECR and the TAR archive from S3. The TAR archive is loaded into the docker daemon using the docker load in the first lifecycle block.
Manifests:
- Name: Linux
  Platform:
    os: linux
  Artifacts:
    - URI: "s3://BUCKET_NAME/COMPONENT_NAME/COMPONENT_VERSION/container.zip"
      Unarchive: ZIP
    - URI: "docker:012345678901.dkr.ecr.ap-southeast-2.amazonaws.com/robocatcontainer:latest"
  Lifecycle:
    Install:
      Script: docker load -i {artifacts:decompressedPath}/container/container.tar
The next block is the meat and potatos of the recipe. It defines the docker compose file that will be used to run the Robocat application. A docker-compose.yml file is dynamically generated inline with all the things learnt in the previous sections.
- robocatcontainer-pub: A publisher container that runs
robocat_pub.pyscript that leverages the IPC socket to publish messages to the local mqtt broker. - robocatcontainer-sub: A subscriber container that runs
robocat_sub.pyscript that leverages the IPC socket to subscribe to messages from the local mqtt broker. - robocatcontainer-aws-auth: A container that runs
robocat_aws_auth.pyscript and authenticates with AWS services using the TokenExchangeService component.
# ... (Greengrass V2 recipe header, dependencies, artifacts, and install)
Run:
  Script: |-
    cat <<EOF > docker-compose.yml
    version: '3'

    services:
      robocatcontainer-pub:
        container_name: robocatcontainer-pub
        image: robocatcontainer
        command: robocat_pub.py
        environment:
          - SVCUID=${SVCUID}
          - AWS_GG_NUCLEUS_DOMAIN_SOCKET_FILEPATH_FOR_COMPONENT=${AWS_GG_NUCLEUS_DOMAIN_SOCKET_FILEPATH_FOR_COMPONENT}
          - AWS_IOT_THING_NAME=${AWS_IOT_THING_NAME}
        volumes:
          - {kernel:rootPath}/ipc.socket:{kernel:rootPath}/ipc.socket

      robocatcontainer-sub:
        container_name: robocatcontainer-sub
        image: 012345678901.dkr.ecr.ap-southeast-2.amazonaws.com/robocatcontainer:latest
        command: robocat_sub.py
        environment:
          - SVCUID=${SVCUID}
          - AWS_GG_NUCLEUS_DOMAIN_SOCKET_FILEPATH_FOR_COMPONENT=${AWS_GG_NUCLEUS_DOMAIN_SOCKET_FILEPATH_FOR_COMPONENT}
          - AWS_IOT_THING_NAME=${AWS_IOT_THING_NAME}
        volumes:
          - {kernel:rootPath}/ipc.socket:{kernel:rootPath}/ipc.socket

      robocatcontainer-aws-auth:
        container_name: robocatcontainer-aws-auth
        image: 012345678901.dkr.ecr.ap-southeast-2.amazonaws.com/robocatcontainer:latest
        command: robocat_aws_auth.py
        environment:
          - AWS_CONTAINER_AUTHORIZATION_TOKEN=${AWS_CONTAINER_AUTHORIZATION_TOKEN}
          - AWS_CONTAINER_CREDENTIALS_FULL_URI=${AWS_CONTAINER_CREDENTIALS_FULL_URI}
        network_mode: "host"
    EOF

    docker compose up
The final block handles the cleanup & recovery of the docker containers by running docker compose down and docker compose restart respectively. This will ensure that the containers are stopped and restarted appropriately during deployment lifecycle - cleaning up old deployments and recovering from failures.
# ... (Greengrass V2 recipe header, dependencies, artifacts, install, and run)
Shutdown:
  Script: |-
    docker compose down
Recover:
  Script: |-
    docker compose restart
Conclusion
In this post, you have learnt all of the important concepts to understand how container deployments work on Greengrass V2. You have learnt how images can be bundles and pushed to either ECR or S3 and how each of these methods compare to each other.
- You have learnt how to use the Docker Application Manager component to deploy containers and provide them a way to communicate with the local mqtt broker using IPC.
- You have learnt how to use the Token Exchange Service component to provide access to AWS services from within the container.
- You have learnt how to combine all of these concepts into a single recipe that can be deployed to Greengrass V2 device and demonstrate all of these concepts in action.
You can now move on to one of the other parts of this series! I recommend checking out one of the following:
I’m interested to hear about any parts of container deployments you might think are missing - Have you run into problems where you think I could have helped provide a guide? Please let me know on Twitter @nathangloverAUS or in the comments below!