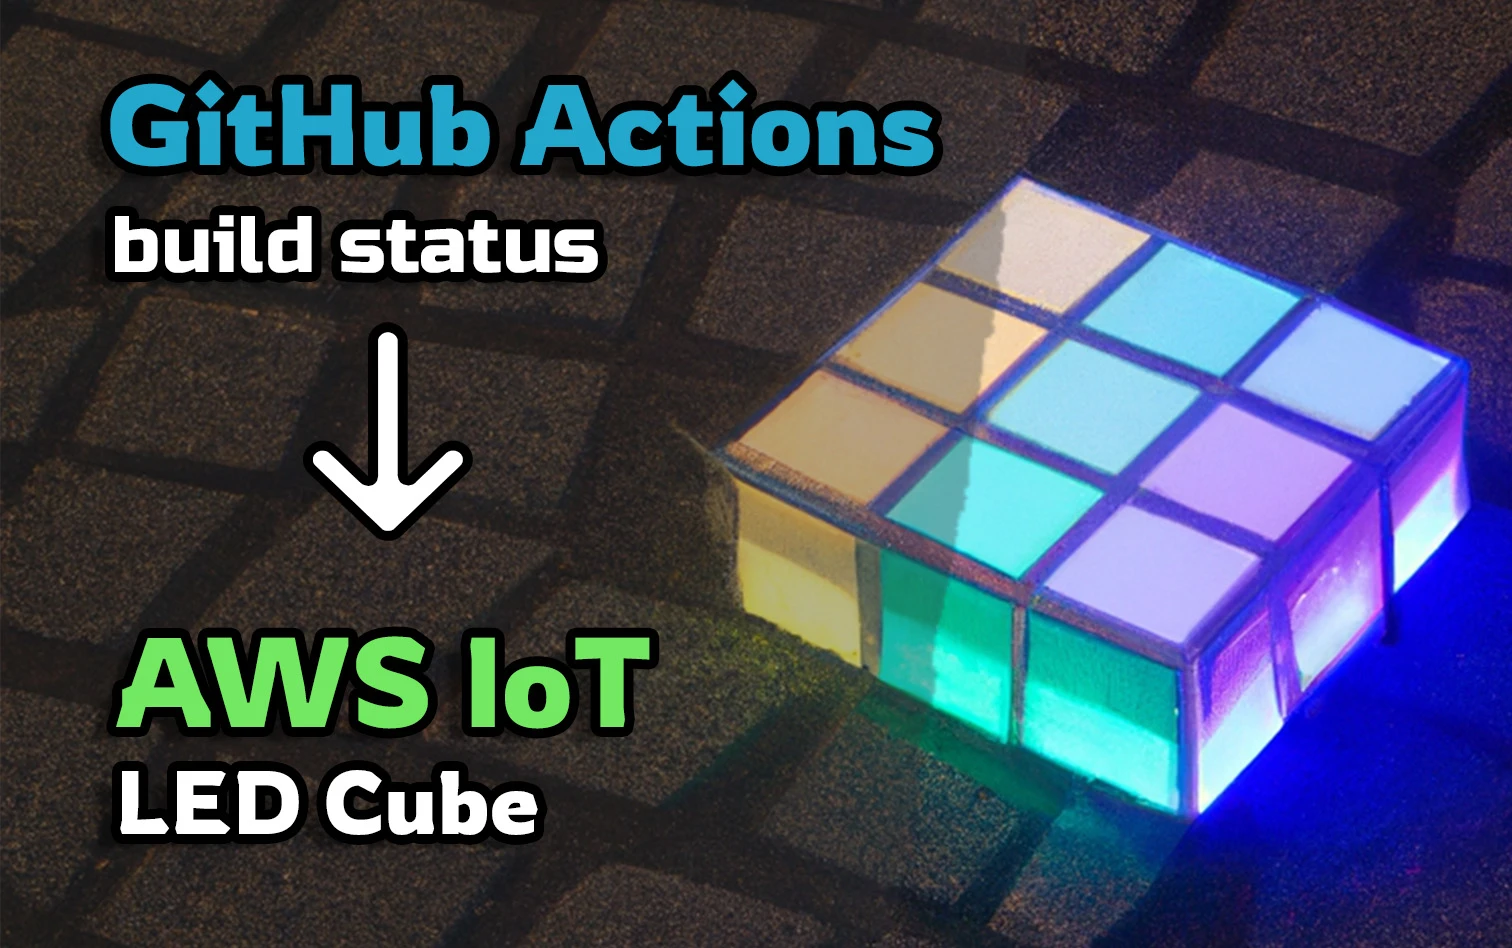
GitHub Actions - AWS IoT build status light
Introduction
Are you tired of breaking your GitHub action builds but having no visibility of the failure? Well, have no fear because I have the solution for you!
Introducing the GitHub Actions Build Status Light, powered by a Raspberry Pi, LED cube and AWS IoT - this revolutionary device will ensure that you’ll never have to worry about missing a build failure again.
What you’ll need
If you are following along at home you will need the following:
- An AWS Account with AWS CLI Setup. It would be ideal if you have unrestricted permissions in your AWS account (if you are using your account this should be fine). The services we will primarily be using are:
- AWS IoT Core and AWS IAM
- Raspberry Pi, however any device that runs Python will also work
- LED light or any device/light/speaker that you’d like to control and activate when a build failure (or success) happens.
The full code used in this project can be found here: t04glovern/github-actions-aws-iot-build-status-light
Setting up the Raspberry Pi
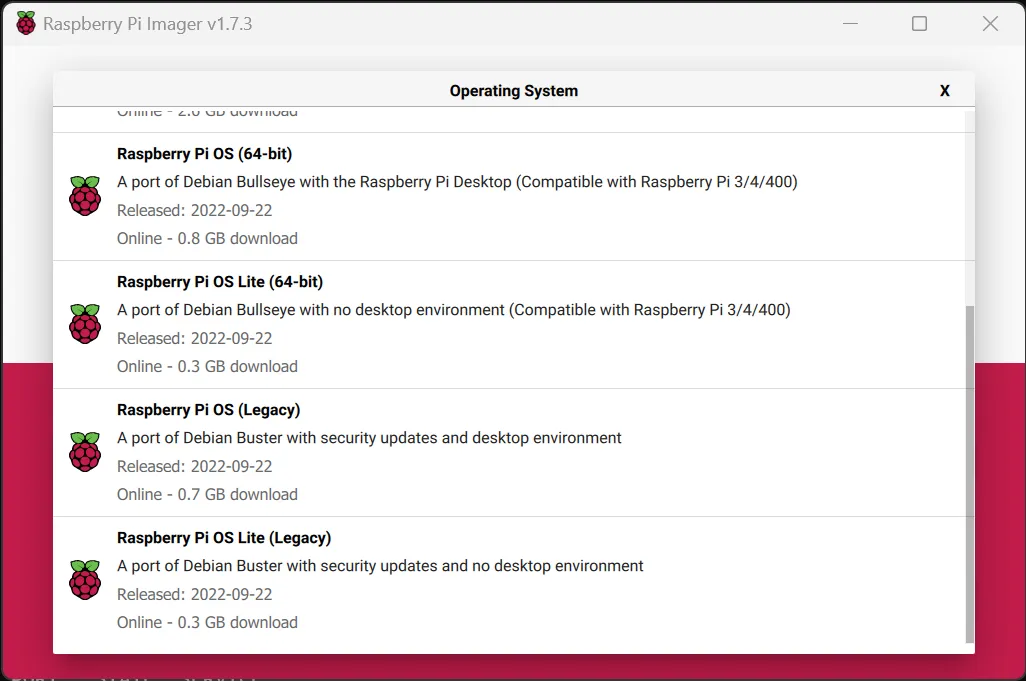
If you are working with a Raspberry Pi you’ll need to start by flashing it with Raspberry Pi OS. Currently the best way to do this is with the Raspberry Pi Imager which can be downloaded and installed from here.
Insert an SD card you want to flash into your computer and select the version of Raspberry Pi OS - I was using a Raspberry Pi v2 for this tutorial which needs to run the Legacy version of Pi OS.
Click choose storage next and select the entry of the SD card connected to your computer

I would also recommend clicking the cog icon in the bottom right and configuring a couple advanced options; specifically setup the following:
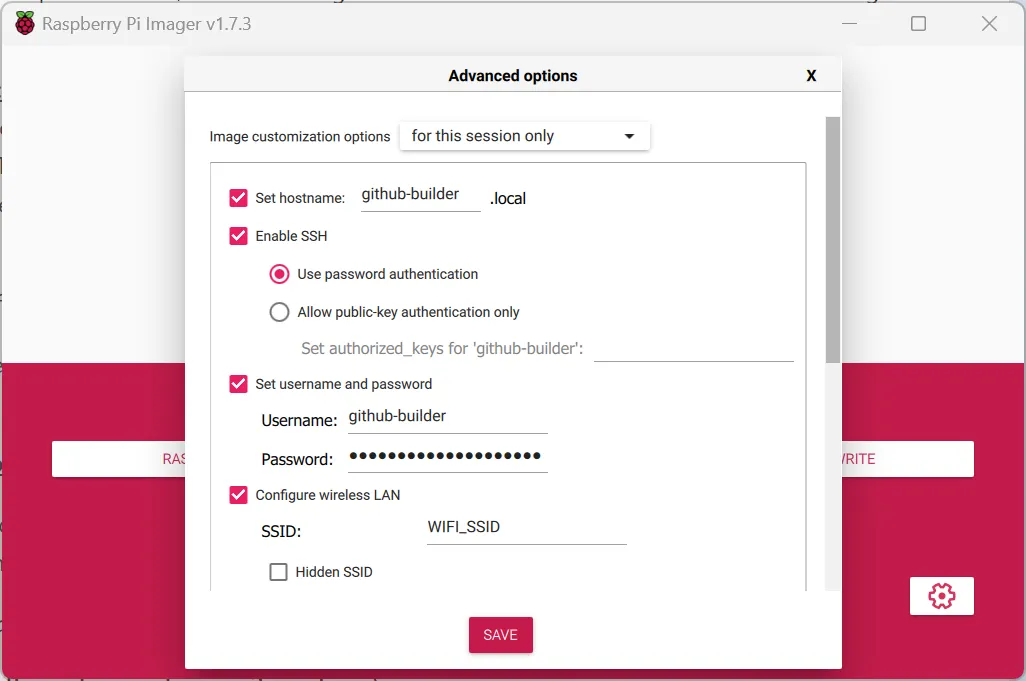
- Set a hostname to something like
github-builder - Set a username and password, in this guide my user was called
github-builder - Configure the SSID and password of your WiFi access point (if you are using WiFi).
Click Write when you are ready to flash, and once it completes plug the SD card into your Raspberry Pi and confirm it boots. SSH into the pi as well to confirm you have connectivity
Note: If you named the device something different, or used a different username you will need to change the SSH command to what you used.
ssh github-builder@github-builder.local
# type your raspberry pi password
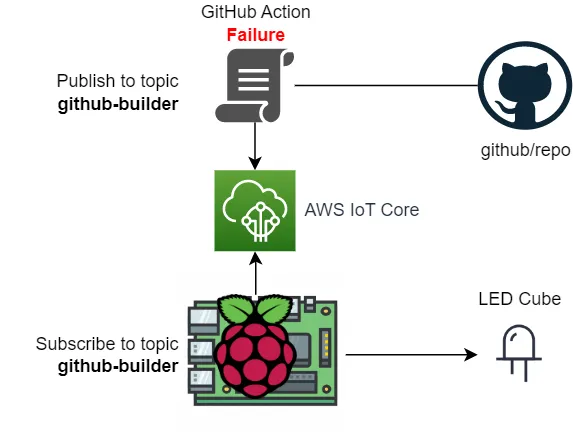
Connecting Raspberry Pi to AWS IoT
Now that we have connectivity with the Raspberry Pi we are going to setup the connectivity between our Raspberry Pi and AWS IoT by creating a new AWS IoT thing and assigning it to our device.
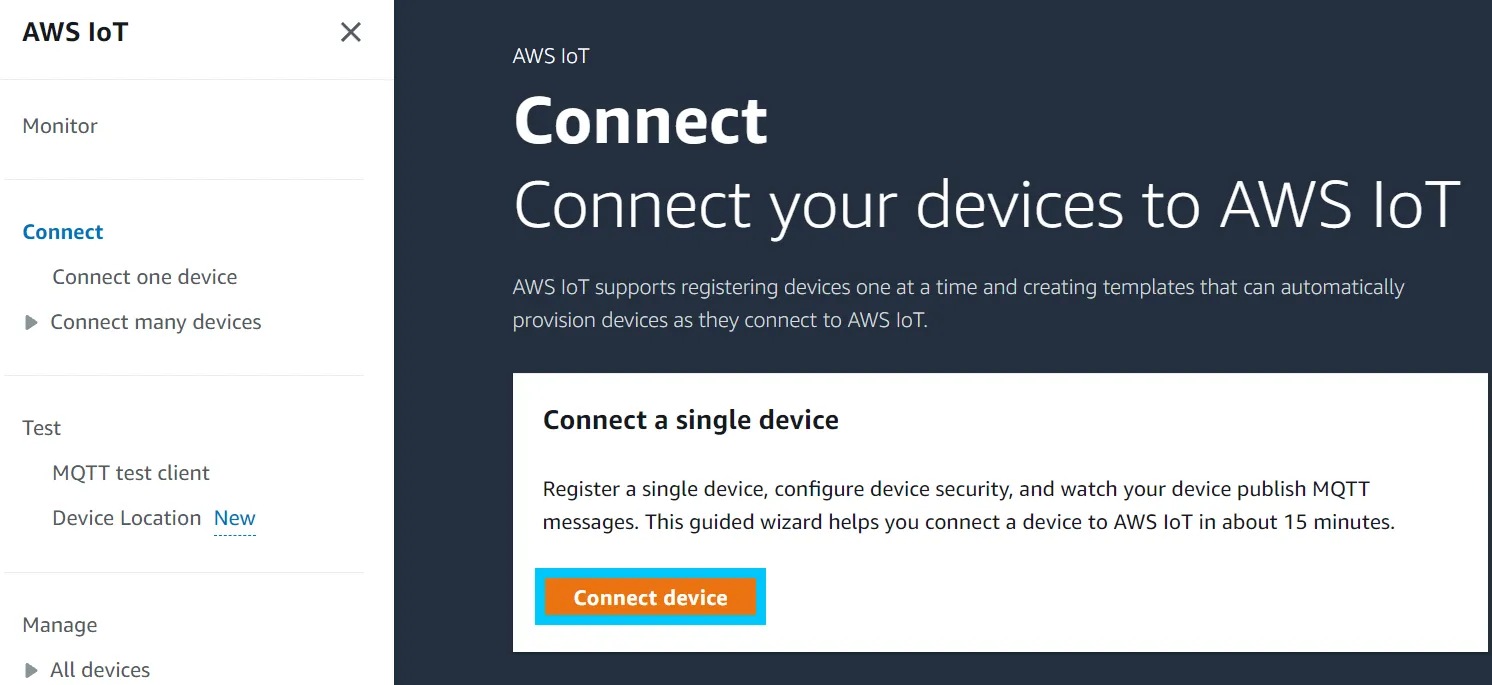
Head over to the AWS IoT console and click “Connect a device” to run through the guided setup of a single IoT thing.
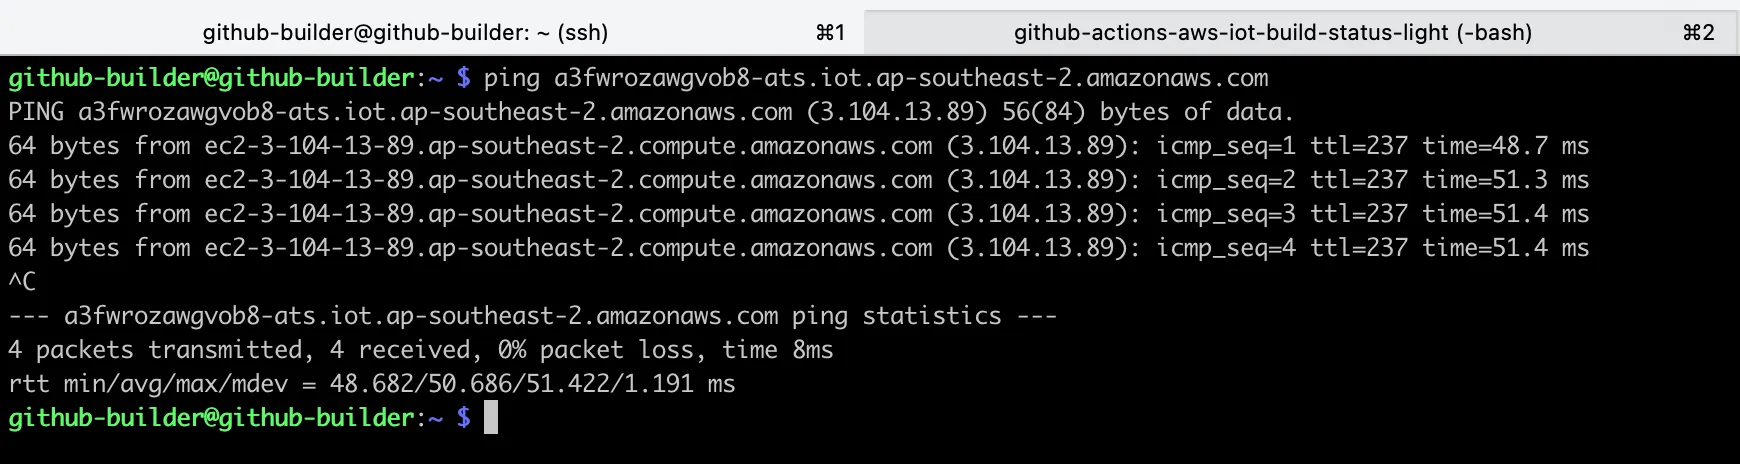
The first step will have you ping your IoT endpoint to confirm your device as internet connectivity. Here’s an example of my URL endpoint (your one will be unique to you)
ping a3fwrozawgvob8-ats.iot.ap-southeast-2.amazonaws.com
Copy the ping command from your console and run it on the Raspberry pi. Confirm that you get a response back before moving on; if you cannot ping you might need to troubleshoot internet access for your Raspberry Pi.
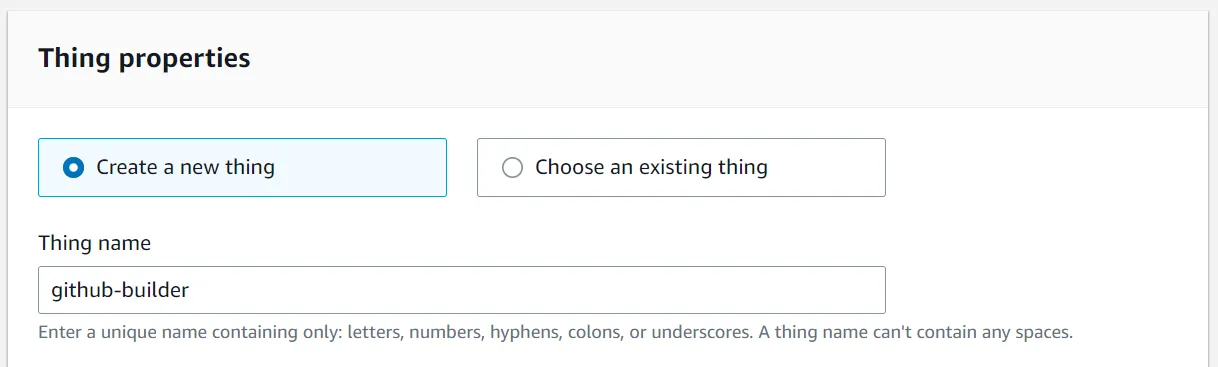
Now we need to give our AWS IoT thing a name - I would recommend using the name github-builder so you can follow along with a little changes to the code I provide as possible.
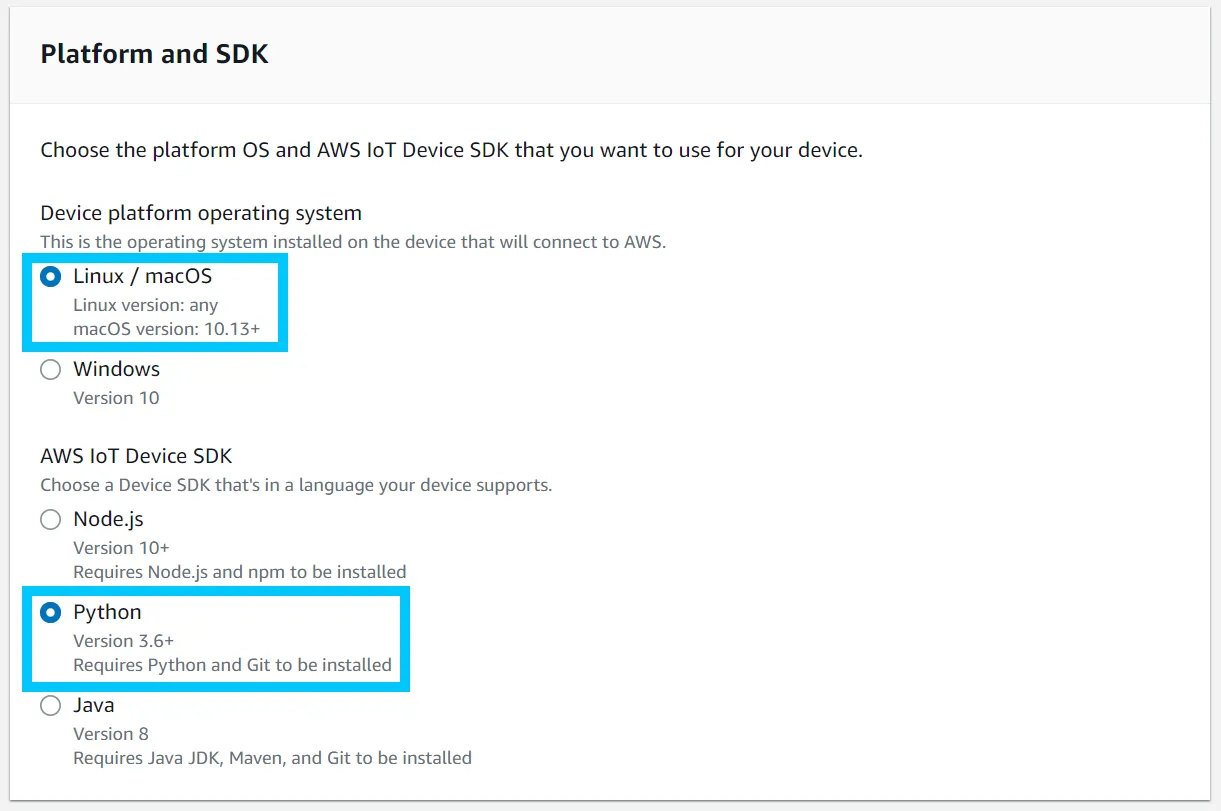
The next screen will have you select the intended platform you will be running this IoT thing on - select Linux and Python as the SDK language.
Download the bundle containing your new AWS IoT things certificates. Be sure to keep these safe, and do not give them to anyone or check them into GitHub - they are secrets!
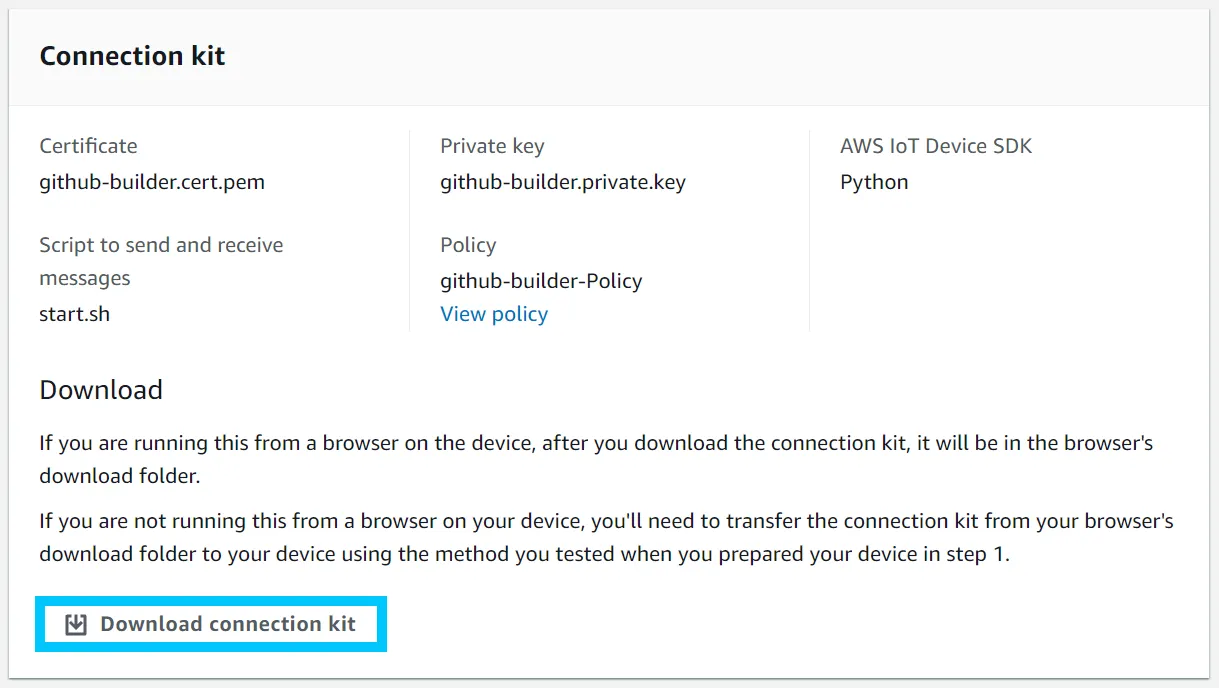
You should now have a file called connect_device_package.zip ready to go! You will need to get this file onto your Raspberry Pi - for this I recommend using scp and copying the file like so
scp ./connect_device_package.zip github-builder@github-builder.local:~/connect_device_package.zip
# type your raspberry pi password
In the AWS IoT console, click to the Security > Policies menu and edit the github-builder-Policy to contain a policy document similar to the one below:
You should change the Account ID, Region and GitHub org to match your requirements. This policy basically allows the certificates we just downloaded in the connect_device_package.zip file to subscribe and recieve messages from a topic called github-org/github-builder.
{
  "Version": "2012-10-17",
  "Statement": [
    {
      "Effect": "Allow",
      "Action": [
        "iot:Receive"
      ],
      "Resource": [
        "arn:aws:iot:$AWS_REGION:$AWS_ACCOUNT_ID:topic/$GITHUB_ORG/github-builder"
      ]
    },
    {
      "Effect": "Allow",
      "Action": [
        "iot:Subscribe"
      ],
      "Resource": [
        "arn:aws:iot:$AWS_REGION:$AWS_ACCOUNT_ID:topicfilter/$GITHUB_ORG/github-builder"
      ]
    },
    {
      "Effect": "Allow",
      "Action": [
        "iot:Connect"
      ],
      "Resource": [
        "arn:aws:iot:$AWS_REGION:$AWS_ACCOUNT_ID:client/github-builder"
      ]
    }
  ]
}
You can also programmatically apply this change by running the following commands from an AWS CLI authenticated terminal session
export AWS_ACCOUNT_ID=$(aws sts get-caller-identity |  jq -r '.Account')
export AWS_REGION="ap-southeast-2"
export GITHUB_ORG="t04glovern" # Change to your github org

envsubst < "policy.json.template" > "policy.json"
aws iot create-policy-version \
    --region $AWS_REGION \
    --policy-name github-builder-Policy \
    --policy-document file://policy.json \
    --set-as-default
Note: The remaining commands should be run from your raspberry Pi
SSH into your Raspberry Pi and start by installing the Git client, curl and Python pip so we can clone down the codebase and install Python dependencies.
sudo apt update && sudo apt install git curl python3-pip
Then, clone the repository and we’ll also unzip the connect_device_package.zip file into a folder called certs within the project
Note: I recommend you fork the repository before cloning it, as you will be making modifications
export GITHUB_ORG="t04glovern" # Change to your github org if you forked the repository

git clone git@github.com:$GITHUB_ORG/github-actions-aws-iot-build-status-light.git
cd github-actions-aws-iot-build-status-light && mkdir certs
unzip ~/connect_device_package.zip -d certs

# public root CA certificate is also needed
curl https://www.amazontrust.com/repository/AmazonRootCA1.pem > certs/root-CA.crt
The main changes you will need to make to the files in the git project you just pulled down is to replace the AWS IoT endpoint inside the github-builder.service file before installing the service. Open up the github-builder.service file and modify the --endpoint flag to match your AWS IoT endpoint - and the topic flag to contain your Github user/org name.
[Unit]
Description=GitHub Build Light
After=multi-user.target

[Service]
Type=simple
User=github-builder
ExecStart=/usr/bin/python3 /home/github-builder/github-actions-aws-iot-build-status-light/main.py \
    --endpoint $AWS_IOT_ENDPOINT \
    --ca_file /home/github-builder/github-actions-aws-iot-build-status-light/certs/root-CA.crt \
    --cert /home/github-builder/github-actions-aws-iot-build-status-light/certs/github-builder.cert.pem \
    --key /home/github-builder/github-actions-aws-iot-build-status-light/certs/github-builder.private.key \
    --client_id github-builder \
    --topic $GITHUB_ORG/github-builder
Restart=on-abort

[Install]
WantedBy=multi-user.target
Again, if you want to complete the above step programmatically, run the following commands
Note: You will need to have the AWS CLI and have it authenticated on the system that you run these commands - so it’s likely easier not to run this on the Raspberry Pi
export AWS_REGION="ap-southeast-2"
export GITHUB_ORG="t04glovern" # Change to your github org
export AWS_IOT_ENDPOINT=$(aws iot describe-endpoint --endpoint-type iot:Data-ATS --region $AWS_REGION | jq -r '.endpointAddress')

envsubst < "github-builder.service.template" > "github-builder.service"
The final step for this section is to install and start the systemd unit - this will run the python code in the Github project and subscribe to messages coming in on the topic we specified called $GITHUB_ORG/github-builder
cd /home/github-builder/github-actions-aws-iot-build-status-light
sudo cp github-builder.service /etc/systemd/system/github-builder.service
sudo systemctl daemon-reload
sudo systemctl enable github-builder
sudo systemctl start github-builder
sudo systemctl status github-builder
Take a look at the code that runs in the main.py file in the codebase, specifically the on_message_recieved function - here is where you can make modifications based on what you want to do when a build status message comes through
def on_message_received(topic, payload, dup, qos, retain, **kwargs):
    logger.info("Received message from topic '{}': {}".format(topic, payload))
    message = json.loads(payload)
    if message['status'] == 'SUCCESS':
        set_colour('GREEN')
    elif message['status'] == 'FAILED':
        set_colour('RED')
    else:
        set_colour('BLACK')
I call a function called set_colour that talks to a Cube4 by Freetronics over USB serial and changes the colour of the cube based on the build status
def set_colour(colour):
    try:
        logger.info("Listing serial ports")
        ports = serial.tools.list_ports.comports()
        for port, desc, hwid in sorted(ports):
            logger.info("Found port: {}: {} [{}]".format(port, desc, hwid))
            if "Arduino Leonardo" in desc:
                ser = serial.Serial(port, 115200, timeout=1)
                ser.write("all {};".format(colour).encode())
                ser.close()
    except serial.SerialException as error:
        logger.error("Serial didn't serial good. error: {}".format(error))
What you decide to do is totally up to you however!
Connect GitHub actions to AWS IoT
In this section we’ll go through how you can setup your GitHub actions so that they publish a build status message to AWS IoT - this message can then be consumed by a device like the one step in the previous steps and trigger a light on success or failure.
I’m going to be authenticating my GitHub actions with an OIDC role that explicitely allows a repository permission to publish to a given AWS IoT topic. If you want to authenticate with AWS in a different way (with Access tokens / secrets for example) you just need to ensure that the following policy statement is assigned to whatever role you use
- PolicyName: aws-iot-publish
  PolicyDocument:
    Version: 2012-10-17
    Statement:
      - Effect: Allow
        Action:
          - iot:Publish
        Resource: !Sub arn:${AWS::Partition}:iot:${AWS::Region}:${AWS::AccountId}:topic/${GitHubOrgName}/github-builder
If you’d prefer to the the same OIDC method as me, check out the oidc-role.yml file in GitHub and deploying it like so
Note: If you already have an OIDC provider installed in your AWS account, you should change CREATE_OIDC_PROVIDER to false
export AWS_REGION="ap-southeast-2"
export GITHUB_ORG="t04glovern" # Change to your github org
export GITHUB_REPONAME="github-actions-aws-iot-build-status-light"
export CREATE_OIDC_PROVIDER='true'

aws cloudformation deploy \
    --template-file oidc-role.yml \
    --stack-name oidc-$GITHUB_ORG-$GITHUB_REPONAME \
    --parameter-overrides \
        GitHubOrgName=$GITHUB_ORG \
        GitHubRepoName=$GITHUB_REPONAME \
        CreateGitHubOidcProvider=$CREATE_OIDC_PROVIDER \
    --capabilities CAPABILITY_NAMED_IAM \
    --region $AWS_REGION
This template creates a role that can be used in your GitHub actions workflows that has the permission needed to publish to $GITHUB_ORG/github-builder
Lets test this by creating a new GitHub Actions workflow called .github/workflows/build_test.yml that has the following inside - be sure to replace the environment variables with your own setup as well.
- ${AWS_ACCOUNT_ID}
- ${AWS_REGION}
- ${GITHUB_ORG}
name: Test IoT Build Failure
on:
workflow_dispatch:
push:
branches:
- main
jobs:
deploy:
name: Test Build
runs-on: ubuntu-latest
permissions:
id-token: write
contents: read
steps:
- name: Checkout
uses: actions/checkout@v3
- name: Configure AWS credentials
uses: aws-actions/configure-aws-credentials@v1
with:
role-to-assume: arn:aws:iam::<AWS_ACCOUNT_ID>:role/oidc-<GITHUB_ORG>-github-actions-aws-iot-build-status-light
aws-region: <AWS_REGION>
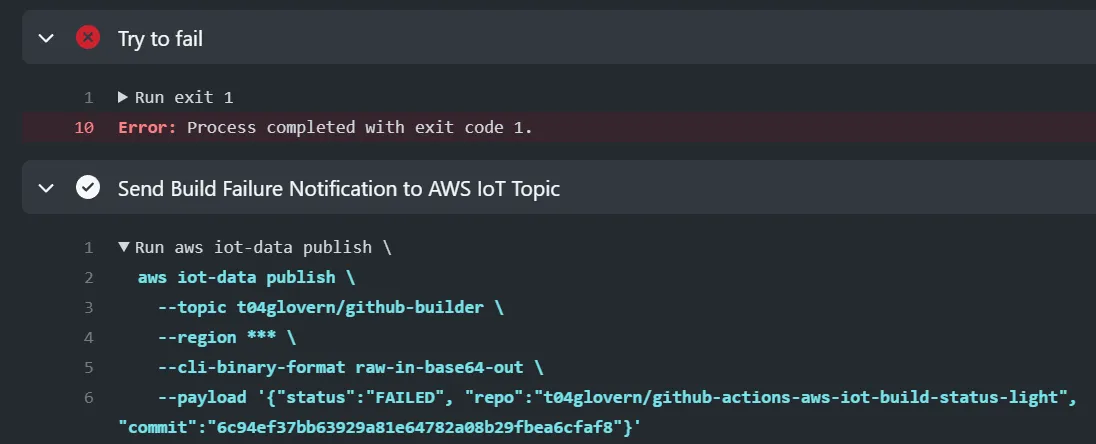
- name: Try to fail
run: exit 1
- name: Send Build Failure Notification to AWS IoT Topic
if: ${{ failure() }}
run: |
aws iot-data publish \
--topic <GITHUB_ORG>/github-builder \
--region <AWS_REGION> \
--cli-binary-format raw-in-base64-out \
--payload '{"status":"FAILED", "repo":"${{ github.repository }}", "commit":"${{ github.sha }}"}'
- name: Send Build Success Notification to AWS IoT Topic
if: ${{ success() }}
run: |
aws iot-data publish \
--topic <GITHUB_ORG>/github-builder \
--region <AWS_REGION> \
--cli-binary-format raw-in-base64-out \
--payload '{"status":"SUCCESS", "repo":"${{ github.repository }}", "commit":"${{ github.sha }}"}'
Push the code up and it should trigger a build that will fail and send a message to AWS IoT with the failure status.
Clean up
If you’d like to remove all the resources used in this blog post when you’re done, the following steps should be followed.
Start by heading to the AWS IoT console again and finding the github-builder thing you made. Click on the Certificates tab under the thing and open the certificate attached to the thing in a new tab.

We opened the certificate in a new tab just to make it easier to find. Head over to the certificate tab now and select Actions > Deactivate.
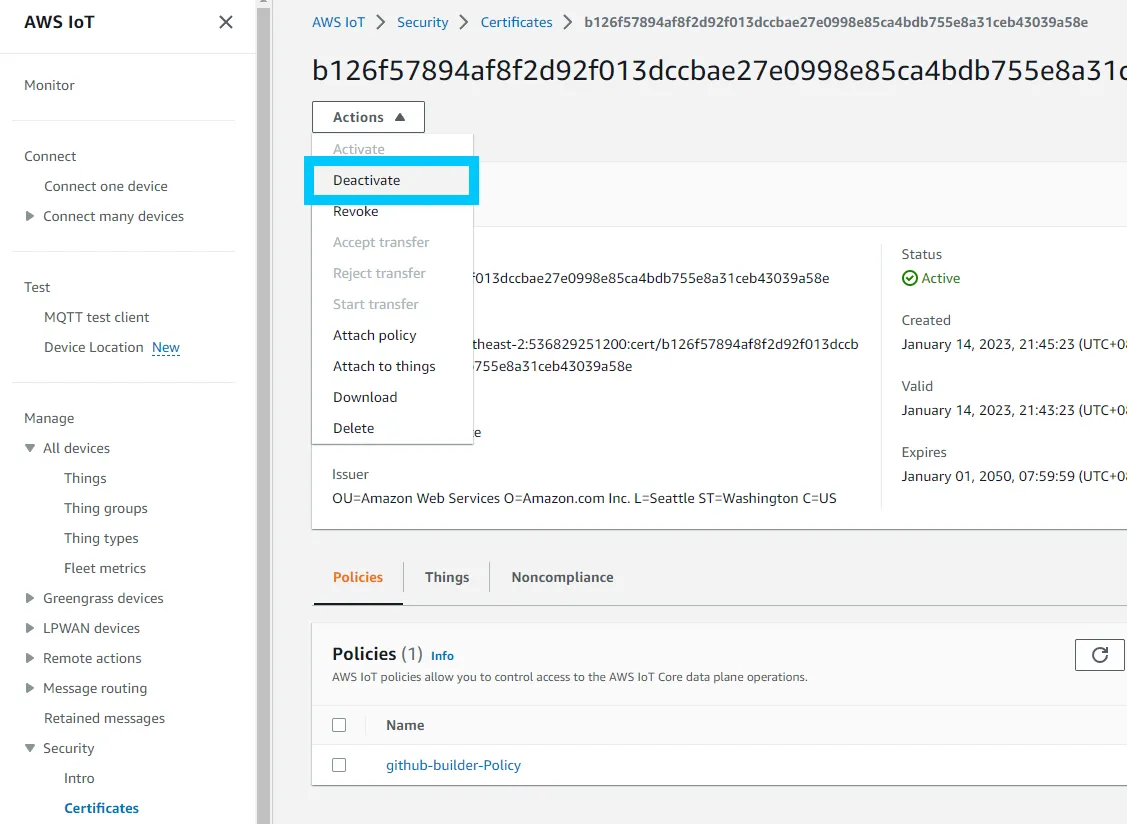
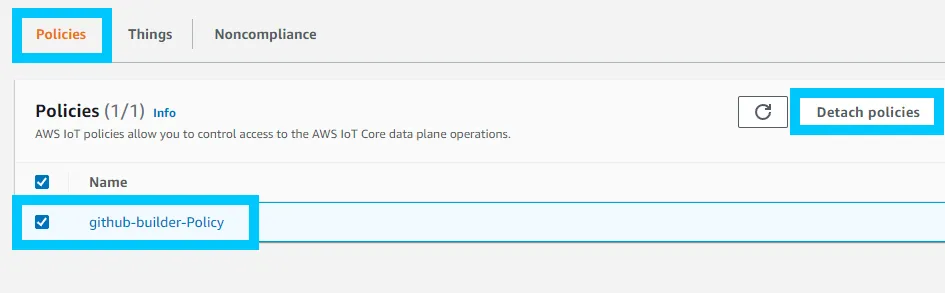
You will also need to detach the github-builder-Policy from the certificate under the Policies tab.
You can now click Actions > Delete on the certificate

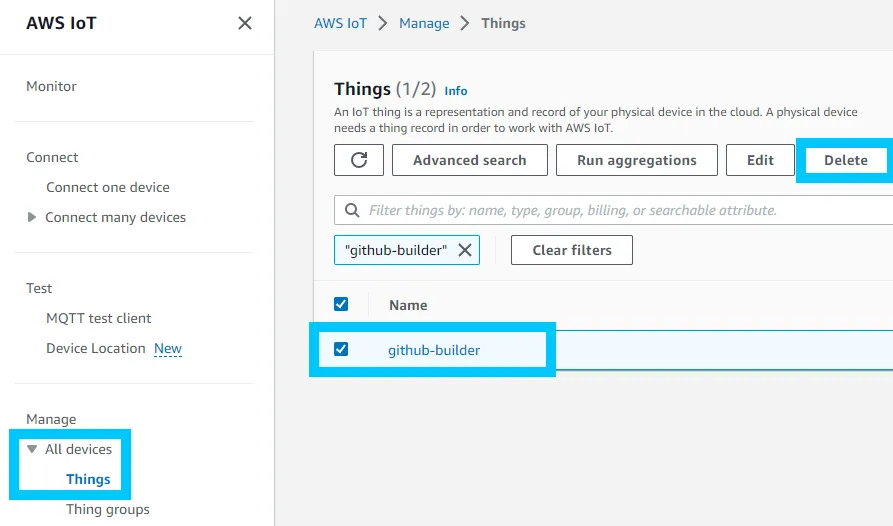
Head back over to your list of AWS IoT things and you can now delete the github-builder thing
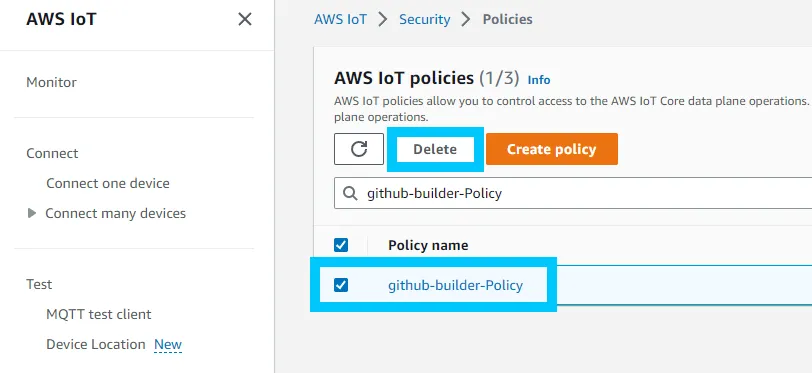
And finally, click Security > Policies and delete the github-builder-Policy
All the resources associated with this guide should now be deleted from your AWS Account.
Summary
I hope you enjoy this post on building an AWS IoT connected device that can be used to control an LED device on GitHub Actions build failures.
If you have any questions or think parts of this guide could be improved on, please reach out to me on Twitter @nathangloverAUS or via the contact page.