Migrating WordPress to GatsbyJS - Architecture & CI/CD
Table of Contents
- Migrating WordPress to GatsbyJS - Introduction
- Migrating WordPress to GatsbyJS - Blog Posts
- Migrating WordPress to GatsbyJS - Architecture & CI/CD
- Migrating WordPress to GatsbyJS - Search Engine Optimization
If you’ve lived with only WordPress for web development chances are your perception of how a website is hosted could be slightly bias toward the old way of thinking. Gone are the days of needing to run a dedicated server that you could FTP files onto in-order to serve up the latest content you’ve written.
In this post we are going to explore how to host a static website created with GatsbyJS, along with learning what benefits this new paradigms gives us. We will be deploying our site using AWS CDK to AWS, however your project can be hosted on any hosting provider you want.
Old vs. New
Remember back to our old architecture diagram for WordPress? We decided on using AWS EC2 to host an instance along with a database which had a total monthly cost of around $30. Due to the nature of PHP it has to run server-side code whenever someone navigates to it.
Below is an example of a reasonably cost effective way of running wordpress whilst also serving up static web content from S3. While this can improve performance by offloading the asset retrieval from S3 to the client,
it’s a band aid for the problem since server-side code still needs to be executed on most requests.
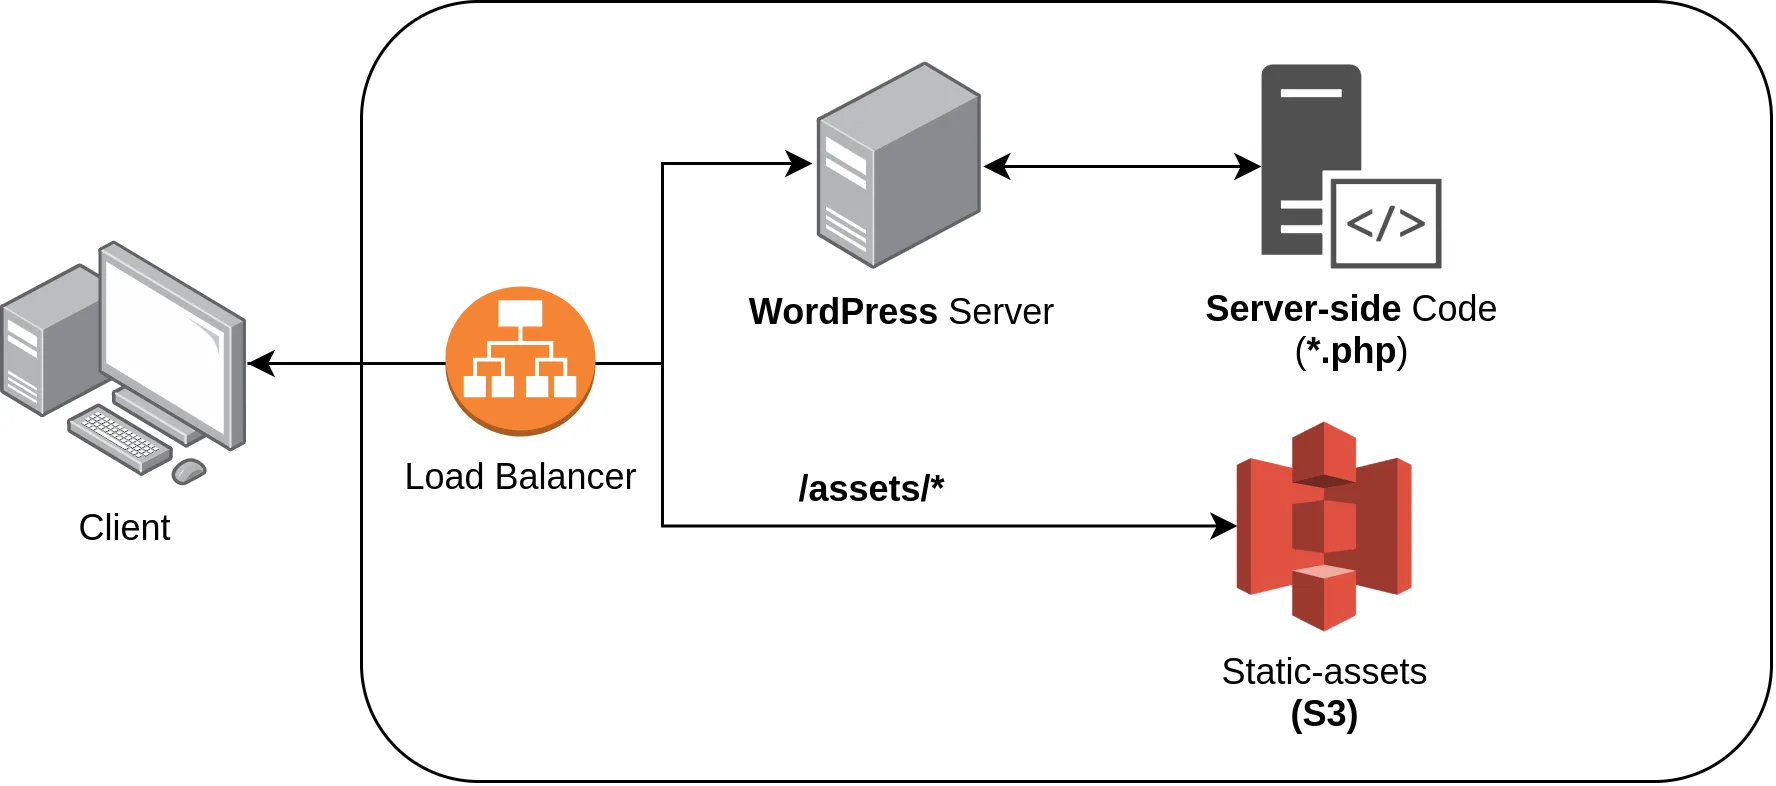
This is just due to the way PHP is executed, and unfortunately since WordPress is mostly PHP it immediately means your going to be required to run a server 24/7.
So what’s the alternative you might ask; how does GatsbyJS help with this problem? To answer that question take a look at the architecture diagram below. It highlights how we were running our website before (left) and after migrating (right).
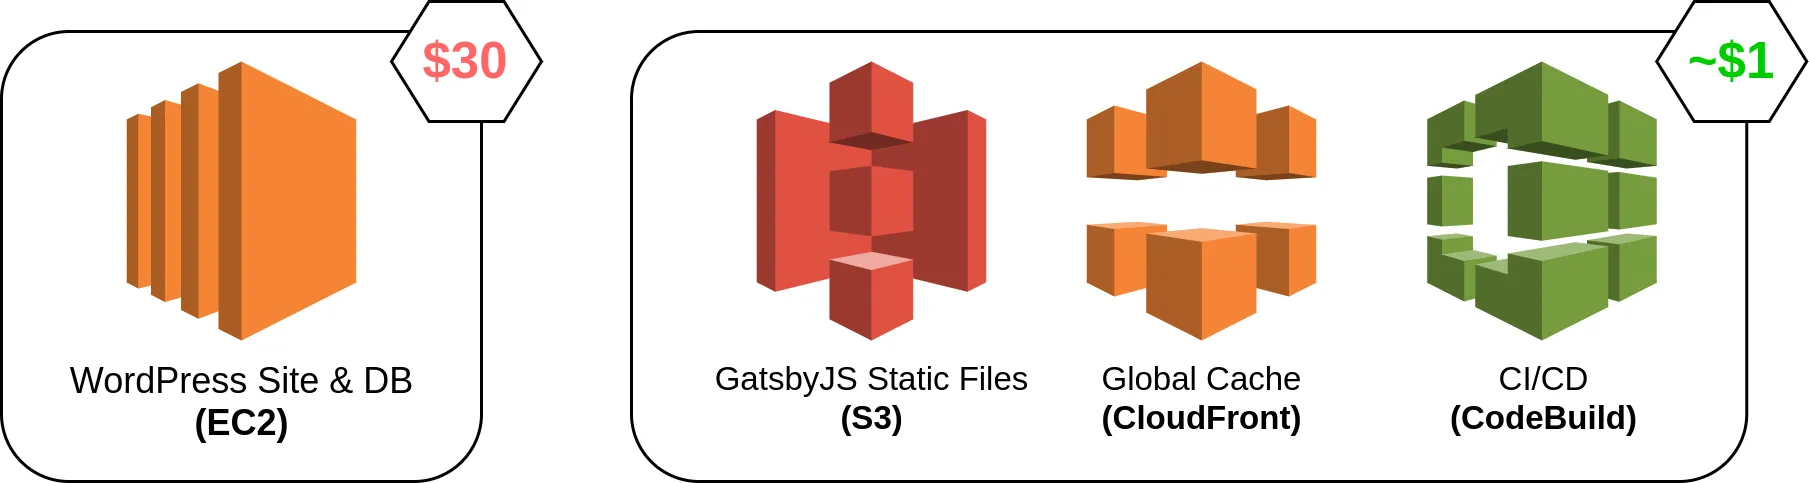
Since GatsbyJS is written in Javascript and packages all that code at build time, it can be served out to the client as static assets. This means that in theory all you require is a space to store and serve files to clients making requests to your site. In our case we’re using:
- Amazon S3 - object storage that can be used to hold all our website files
- CloudFront - global content delivery network (CDN) that caches copies of our S3 files in all regions globally
- CodeBuild - not specifically required, but it allows us to auto build and deploy our site when we check in code to GitHub or other source control.
Deployment
This is where I might lose some of you, but I want to share how I deploy all these AWS resources easily via AWS CDK.
You can find the production deployment code I am using (and referring to in this post) on GitHub under the cdk folder.
Setup CDK
Before getting started, you will need to install the CDK package to your systems node. Then if you are using a copy of the cdk folder from my project, navigate into it and install the dependencies.
# Install CDK globally
npm install -g aws-cdk

# Install dependencies (assumes you copied folder to your project)
cd cdk
npm install
CDK is a programmatic way of defining AWS resources that will be deployed and managed for you via CloudFormation under the hood. I’ll briefly describe what each piece of the code does within the context of the frontend website.
The file we will be referring to is devopstar.com/cdk/lib/cdk-stack.ts
An S3 bucket is created with the name devopstar.com. Note that bucket names need to be globally unique, so you will need to change this field for your own deployment.
const bucket = new s3.Bucket(this, 'bucket', {
  bucketName: 'devopstar.com'
});
Then a certificate is created using AWS Certificate Manager which again needs to be changed to your own personal domain. NOTE: This piece relies on your managing your domain through Route53.
const certificate = new certificatemanager.Certificate(this, 'certificate', {
  domainName: 'devopstar.com',
  subjectAlternativeNames: ['www.devopstar.com'],
  validationMethod: certificatemanager.ValidationMethod.DNS,
});
Skipping over the Lambda code (as we’ll explain the purpose of this in the next post) we get to the definition of our CloudFront distribution. Again replace the domain references and if you aren’t using the certificates defined above you won’t need to define the viewerCertificate portion of the code.
const distribution = new cloudfront.CloudFrontWebDistribution(this, 'cloudfront', {
  originConfigs: [{
    s3OriginSource: {
      s3BucketSource: bucket
    },
    behaviors: [{
      isDefaultBehavior: true,
      lambdaFunctionAssociations: [
        {
          eventType: LambdaEdgeEventType.ORIGIN_REQUEST,
          lambdaFunction: legacy_redirect_function_version
        },
        {
          eventType: LambdaEdgeEventType.ORIGIN_RESPONSE,
          lambdaFunction: cache_headers_function_version
        }
      ]
    }]
  }],
  errorConfigurations: [
    {
      errorCode: 403,
      responseCode: 404,
      errorCachingMinTtl: 0,
      responsePagePath: '/404.html'
    }
  ],
  viewerCertificate: cloudfront.ViewerCertificate.fromAcmCertificate(
    certificate,
    {
      aliases: ['devopstar.com', 'www.devopstar.com'],
      securityPolicy: cloudfront.SecurityPolicyProtocol.TLS_V1,
      sslMethod: cloudfront.SSLMethod.SNI,
    }
  ),
});
Skipping down to near the end of the code and you will find the CI/CD piece of the puzzle. Here we define details relating to what repository to point at (replace this with your own GitHub hosted code), along with rules indicating that code should only be deployed when pushing to master.
There is also a reference to a buildspec.yml file that we will need to include in our repository.
//
// Source - (GitHub_Source)
//
const gitHubSource = codebuild.Source.gitHub({
  owner: 't04glovern',
  repo: 'devopstar.com',
  webhookFilters: [
    codebuild.FilterGroup.inEventOf(codebuild.EventAction.PUSH).andBranchIs('master')
  ],
  reportBuildStatus: true,
  webhook: true
});

//
// CodeBuild - Build
//
const buildProject = new codebuild.Project(this, 'codebuild', {
  badge: true,
  projectName: 'devopstar-gatsby-build',
  buildSpec: codebuild.BuildSpec.fromSourceFilename('buildspec.yml'),
  source: gitHubSource,
  cache: codebuild.Cache.bucket(new s3.Bucket(this, 'codebuild-cache')),
  environment: {
    buildImage: codebuild.LinuxBuildImage.UBUNTU_14_04_NODEJS_10_14_1,
    environmentVariables: {
      CLOUDFRONT_DIST_ID: {
        type: codebuild.BuildEnvironmentVariableType.PLAINTEXT,
        value: distribution.distributionId
      },
      S3_BUCKET: {
        type: codebuild.BuildEnvironmentVariableType.PLAINTEXT,
        value: 'devopstar.com'
      }
    }
  },
});
CodeBuild Specification
The last piece we will need in order to setup our end to end deployment is a buildspec.yml file in the root of our repository. This file outlines the steps required to complete a build and deploy to our AWS resources.
version: 0.2

phases:
  install:
    commands:
      - npm install -g gatsby
  pre_build:
    commands:
      - mkdir -p /build-directory
      - cp -a ${CODEBUILD_SRC_DIR}/. /build-directory
      - cd /build-directory
      - npm install
  build:
    commands:
      - cd /build-directory
      - npm run build
  post_build:
    commands:
      - cd /build-directory
      - aws s3 sync './public/' s3://$S3_BUCKET --delete --acl public-read
      - aws cloudfront create-invalidation --distribution-id=$CLOUDFRONT_DIST_ID --paths "/*"
      - cp -a /build-directory/. ${CODEBUILD_SRC_DIR}
cache:
  paths:
    - 'node_modules/**/*'
    - 'public/**/*'
    - '.cache/**/*'
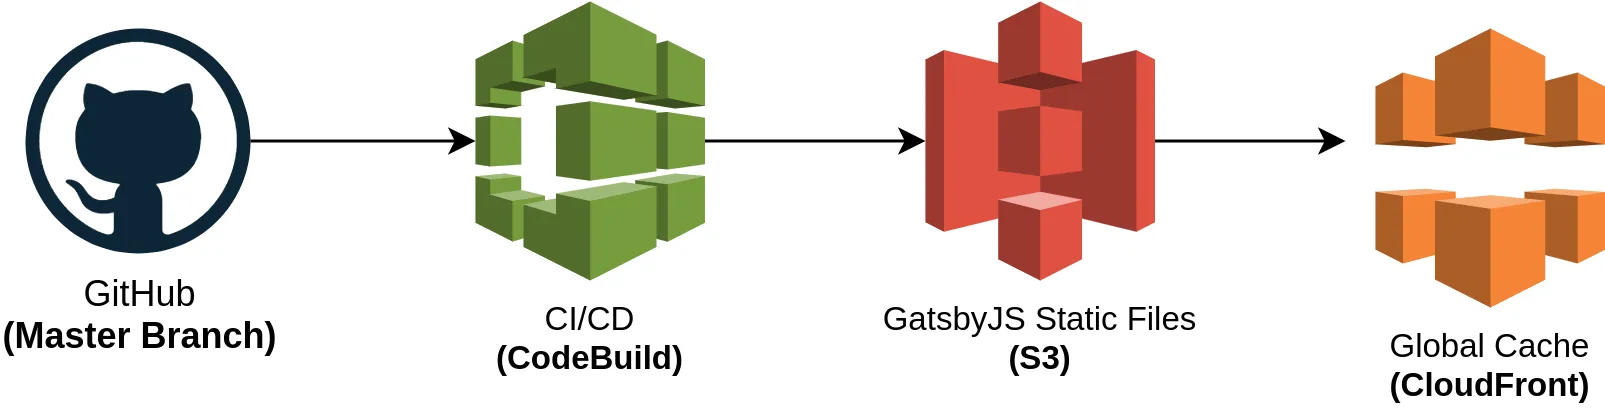
The overall flow is described best as:
- Code is pushed to master branch
- CodeBuild triggers, pulls down code and builds GatsbyJS site
- CodeBuild pushes built assets to Amazon S3
- CloudFront has its cache invalidating, which forces all clients to refresh cache
Summary
While it might seem like the process above is more complicated and uses for resources (therefore must be more expensive), it is actually much cheaper due to the serverless nature of the design. This means that you will only ever be charged when people actually make requests to your site and content is served.
This is a major improvement over the previously used, Always-On approach with WordPress, and you will find savings to be dramatic.
Join me in the next post where we look at Search Engine Optimization and why it is a crucially important thing to keep in mind when moving a website.