Selfie2Something - Building a UGATIT Model

Selfie2Anime was a successful use of Image-to-Image translation using UGATIT; a project by Junho Kim, Minjae Kim, Hyeonwoo Kang and Kwanghee Lee. This however isn't the only combination of images that could be swapped. The combinations are literally limitless, and in this post I'd like to describe how you can create your very own alternate variation.
The work that's required to train your own version of this project is described at a high level below:
Development Environment Setup
Base Requirements
You should be able to make use of either AWS SageMaker or Google Colab, however for people who are planning on training or performing inference locally the following requirements are good to have setup
- Clone the tutorial repository at t04glovern/selfie2anime-tutorial
- AWS CLI Setup and authenticated with an account (Optional)
- GCP SDK Setup and authenticated with a project (Optional)
- Python Environment:
- Anaconda is highly recommended. For more information on setup, checkout my post on Repeatable Data Science - Anaconda Environments
- Alternatively Pip with Python3.5 is advisable
- CUDA GPU is required for this tutorial.
- tensorflow-gpu will be installed as part of dependencies.
- Inference should work on CPU however training will not.
- Docker Community is also recommended a container deployment sounds awesome to you.
Requirement Install
The following steps cover each of the different variations of development environments you might be working with.
Local Environment [Requirements]
If you are running locally; open up a shell and run (one of) the following sets of commands.
NOTE: Depending on if you decided to use Anaconda or not will define what commands to use
# Anaconda
conda env create -f environment.yml
conda activate UGATIT

# Pip / Python3.5
pip3 install --upgrade pip
pip3 install -r requirements.txt
Dataset Collection & Preparation
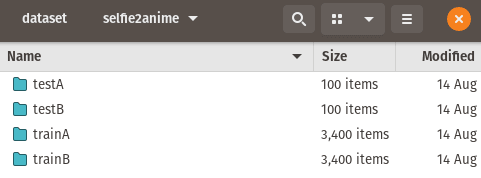
Collecting and preparing datasets for use is the most difficult part of this project. Let's take a look at what was used for the training of selfie2anime created with UGATIT:
- selfie2anime
- selfie - photos of females as training data and test data. The size of the training dataset is 3400, and that of the test dataset is 100, with the image size of 256 x 256.
- anime - selecting only female character images and removing monochrome images manually, collected two datasets of female anime face images, with the sizes of 3400 and 100 for training and test data respectively
- made use of nagadomi/lbpcascade_animeface to extract the faces
- horse2zebra
- training - 1,067 (horse), 1,334 (zebra)
- test - 120 (horse), 140 (zebra)
- photo2portrait
- training - 6,452 (photo), and 1,811 (vangogh)
- test - 751 (photo), and 400 (vangogh)
This gives us a lot of information about roughly how much data we should compile to get reasonably successful results.
Dataset Folder Structure
├── dataset
   └── DATASET_NAME
       ├── trainA
           ├── xxx.jpg (name, format does not matter)
           ├── yyy.png
           └── ...
       ├── trainB
           ├── zzz.jpg
           ├── www.png
           └── ...
       ├── testA
           ├── aaa.jpg
           ├── bbb.png
           └── ...
       └── testB
           ├── ccc.jpg
           ├── ddd.png
           └── ...
You need to ensure that images are cropped down to an appropriate size before using them. To do this programmatically, edit resize.py and ensure the DATASET_NAME matches your one
paths = [
    "dataset/DATASET_NAME/testA/"
    "dataset/DATASET_NAME/testB/"
    "dataset/DATASET_NAME/trainA/"
    "dataset/DATASET_NAME/trainB/"
]
Once you have images in the four folders above you can run the following python file to resize all the images down to 256*256.
python resize.pySelfie2Anime Example
Let's walk through an example of how the datasets for selfie2anime was compiled. We needed two datasets.
NOTE: I can't directly provide these datasets to use for Licensing reasons, however you are able to download them yourself from the links.
- Selfie Dataset - crcv.ucf.edu/data/Selfie
- Anime Dataset - gwern.net/Danbooru2018
These datasets are much bigger than was necessary so a portion of each were taken for each.
NOTE: An important thing to keep in mind is that only female anime characters were used. This means a lot of hand picked items had to be singled out. When deciding on what to use in your dataset ensure there's some level of consistency.
Model Training
We should now be in a good position to begin training out model. This process is very time consuming but rewarding.
To begin training the model we can run the following command:
python main.py \
    --dataset YOUR_DATASET_NAME \
    --phase train \
--light TrueNOTE: Including the light flag is really important here, as the algorithm was built to run on a very powerful system with lots of video memory. I'm certain that you'll not have the requirements to train without light however feel free to try.
There are a variety of different parameters that can also be passed in. They can be found at the top of main.py; however I've pasted a couple important ones below
parser.add_argument('--phase',      default='train',        help='[train / test]')
parser.add_argument('--light',      default=False,          help='[full version / light version]')
parser.add_argument('--dataset',    default='selfie2anime', help='dataset_name')
parser.add_argument('--epoch',      default=100,            help='The number of epochs to run')
parser.add_argument('--iteration',  default=10000,          help='The number of training iterations')
parser.add_argument('--batch_size', default=1,              help='The size of batch size')
parser.add_argument('--print_freq', default=1000,           help='The number of image_print_freq')
parser.add_argument('--save_freq',  default=1000,           help='The number of ckpt_save_freq')
parser.add_argument('--decay_flag', default=True,           help='The decay_flag')
parser.add_argument('--decay_epoch',default=50,             help='decay epoch')
Training should begin after a short period of time. You should see an output line the following indicating that the process is running.
# Total bytes of variables: 536148544
#  [*] Reading checkpoints...
#  [*] Failed to find a checkpoint
#  [!] Load failed...
# Epoch: [ 0] [    0/10000] time: 36.7933 d_loss: 10.07452965, g_loss: 4296.04980469
# Epoch: [ 0] [    1/10000] time: 37.4076 d_loss: 8.61443043, g_loss: 3150.35839844
# Epoch: [ 0] [    2/10000] time: 38.0224 d_loss: 8.07216549, g_loss: 3547.32763672
# Epoch: [ 0] [    3/10000] time: 38.6383 d_loss: 8.33526993, g_loss: 2290.56347656
# Epoch: [ 0] [    4/10000] time: 39.2726 d_loss: 7.67077017, g_loss: 2063.63549805
# Epoch: [ 0] [    5/10000] time: 39.9149 d_loss: 7.70433044, g_loss: 2031.88806152
# Epoch: [ 0] [    6/10000] time: 40.5567 d_loss: 7.72997952, g_loss: 1928.70324707
# Epoch: [ 0] [    7/10000] time: 41.2098 d_loss: 7.84641171, g_loss: 2091.36791992
# Epoch: [ 0] [    8/10000] time: 41.8431 d_loss: 8.77949142, g_loss: 2413.52807617
# Epoch: [ 0] [    9/10000] time: 42.4762 d_loss: 8.61334419, g_loss: 2224.50952148
# Epoch: [ 0] [   10/10000] time: 43.1270 d_loss: 8.99942780, g_loss: 2308.36425781
# Epoch: [ 0] [   11/10000] time: 43.7578 d_loss: 8.61170959, g_loss: 2720.20214844
# Epoch: [ 0] [   12/10000] time: 44.3873 d_loss: 8.42855263, g_loss: 2132.31250000
# Epoch: [ 0] [   13/10000] time: 45.0359 d_loss: 8.33146286, g_loss: 1888.32006836
After each 100 iterations, UGATIT will generate some samples that can be viewed in the samples folder. Obviously initial results aren't going to be fantastic, however the samples allows you to view progress while the training occurs.
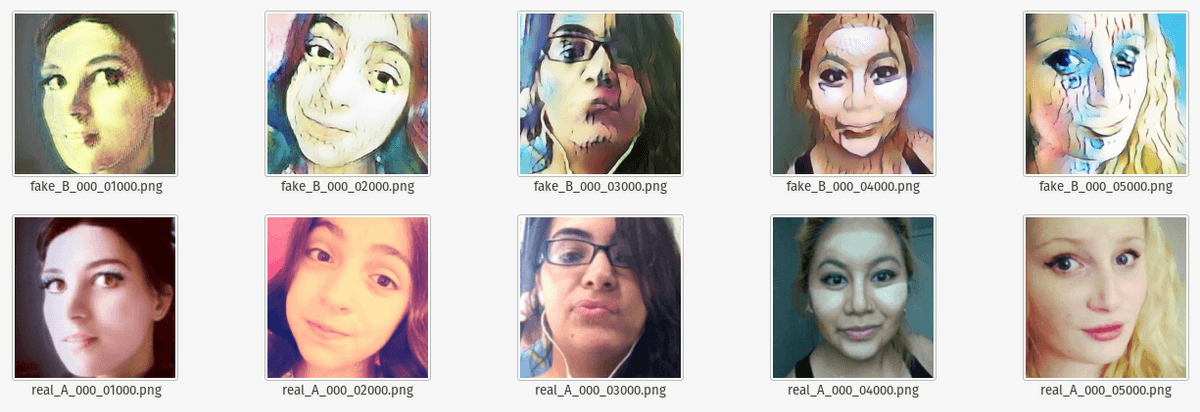
With the settings above a checkpoint is created every 1000 iterations as well. A checkpoint is a state that inference can be performed on, or resumed from.
Resume Training
If you need to resume training, or potentially you'd like to try transfer learning and continuing to train an existing model; then the process of resuming training is very simple.
Re-run the training command with the same parameters as before. You'll notice that if you change parameters then the folder name within the checkpoint, samples, results and logs folder all change.
Example of light vs non-light training:
Light - UGATIT_light_selfie2anime_lsgan_4resblock_6dis_1_1_10_10_1000_sn_smoothing
Non-Light - UGATIT_selfie2anime_lsgan_4resblock_6dis_1_1_10_10_1000_sn_smoothing NOTE: You can obviously get around this by just copying in the existing checkpoint files to the new folder (with new parameters) if you need to.
Model Inference
Let's pretend you've spent a bunch of time training your model and now you'd like to perform inference against it. The process for doing this can be kicked off with a command similar to the one below:
python main.py \
    --dataset YOUR_DATASET_NAME \
    --phase test \
    --light True
Your parameters are going to define which folder will be checked for a matching checkpoint, so ensure it's the same as the training parameters.
The test will use the images in the dataset/DATASET_NAME/testA and testB folders.
Selfie to Anime at 100 Epochs
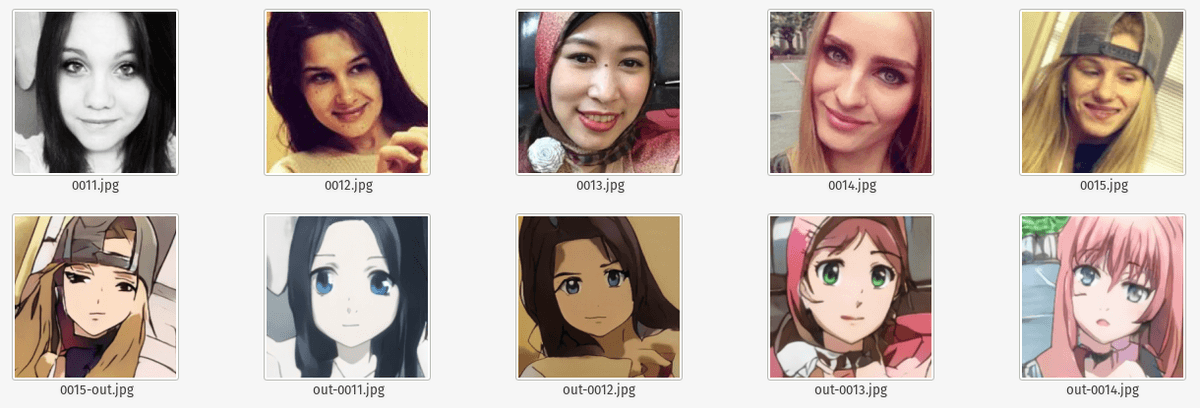
Anime to Selfie at 100 Epochs

Running in the Cloud
For people who haven't got access to a desktop system or server with a GPU, then there are a couple other options that are available to you.
Let's walk through how you can use either of these solutions for training and (or) running inference.
Google Colab Inference Only
Google Colab is the easiest to get started with however it's likely only going to be useful for inference. This is because it's designed for prototyping and the GPU/TPU that is attached to the instance might not always be around. This isn't preferable given we want to train for long periods of time.
To open the sample notebook.ipynb, open the following:
Confirm that the runtime is setup as Python 3 and when you are ready to train / test, also add a GPU.
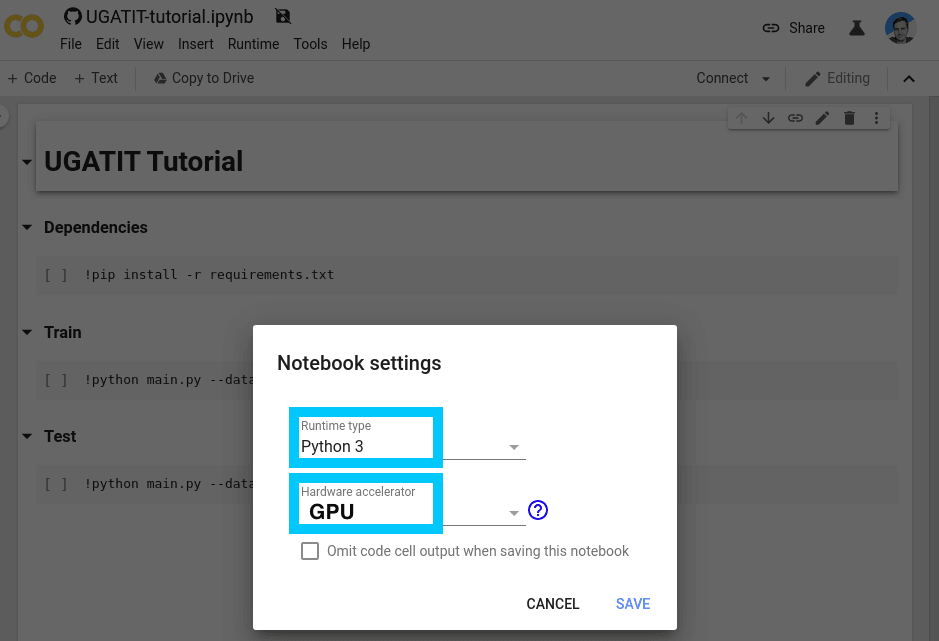
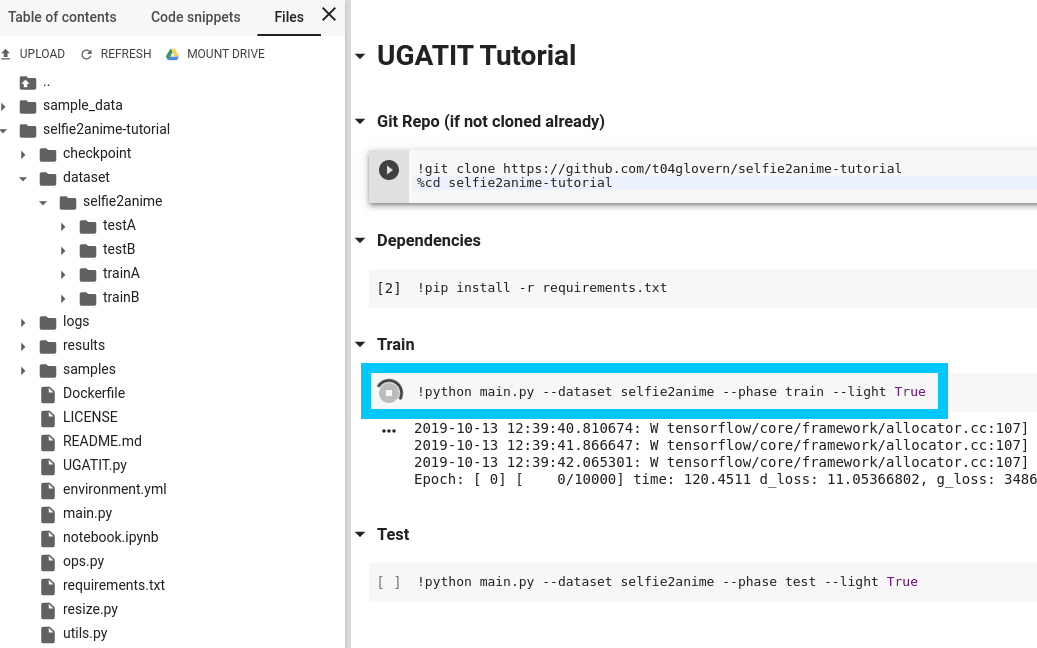
Following the guide above, copy in your dataset and be sure to change the reference DATASET_NAME in the command before running them. When ready, execute all the cells down the page up until Train. When you're ready to go, start training.
The results when running the training can be seen below.
AWS SageMaker
AWS SageMaker is a platform for running Notebooks. We'll quickly go through the process of setting up a new notebook with permissions to an S3 bucket that might contain a dataset or a model.
Navigate to the SageMaker portal and create a new notebook. It will prompt you for a number of settings:
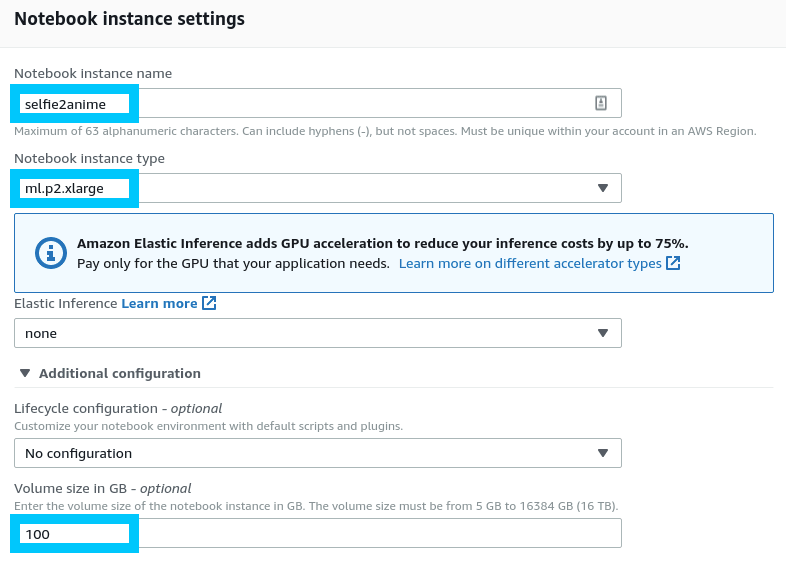
Notebook instance settings
Start off defining a name and Notebook instance type. The cost for different types differs based on requirements however you'll need an ml.pX instance that supports Accelerated computing.
More information about pricing can be found here.
Also ensure that you increase the Volume size so that the model actually fits on the instance.
NOTE: You might also need to enable the use of GPU compute through a support request ticket. There is no way around this unfortunately; wait times can vary.
Permissions and encryption
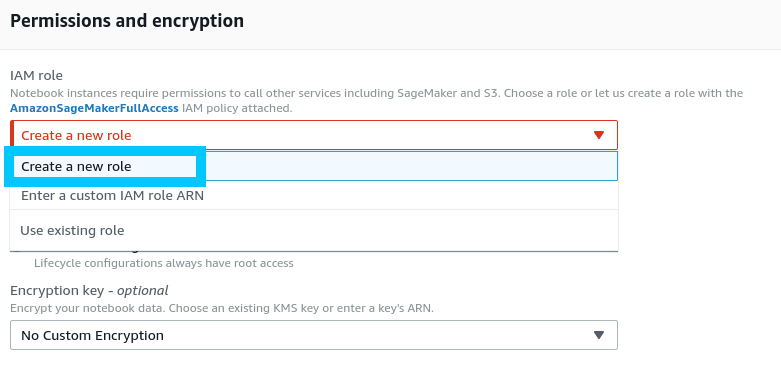
Permissions can be setup for the notebook using IAM. Click create new Role to get started defining a new custom role.
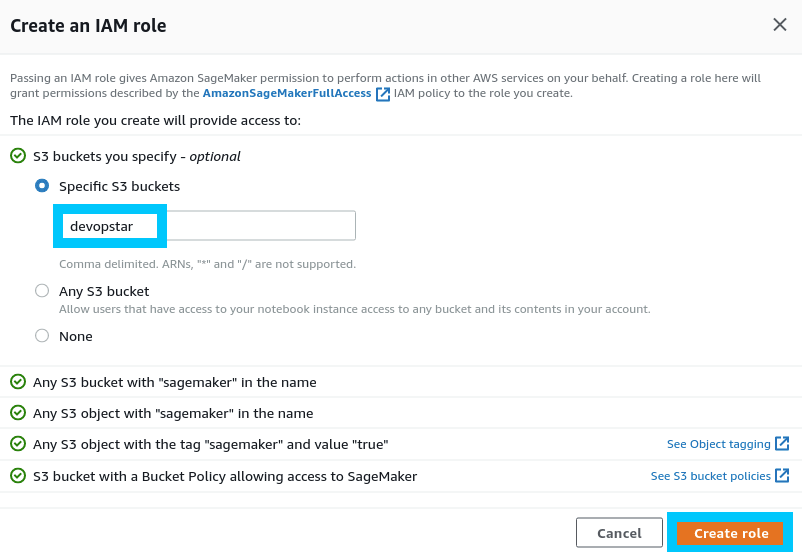
The custom role here states that the bucket devopstar will be available to the notebook. This is a bucket that I own with some of my datasets in it.
Notebook Git Repositories
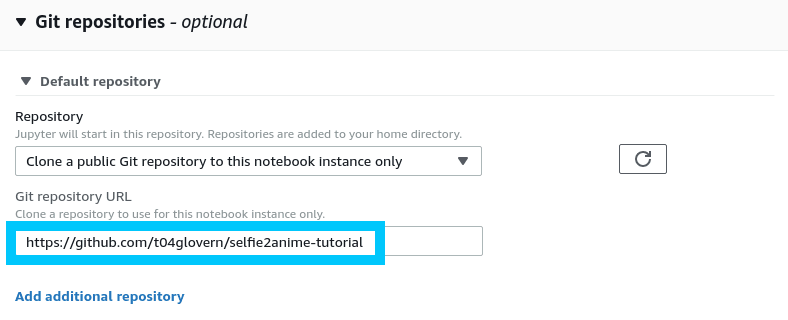
Finally we can define the Git Repo that should be pulled down and available within the instance on boot.
We specify the repository: t04glovern/selfie2anime-tutorial
Once the notebook instance is created, open it in JupyterLab and select notebook.ipynb.

When you open the notebook.ipynb you will be prompted for the kernel. Select conda_tensorflow_p36:
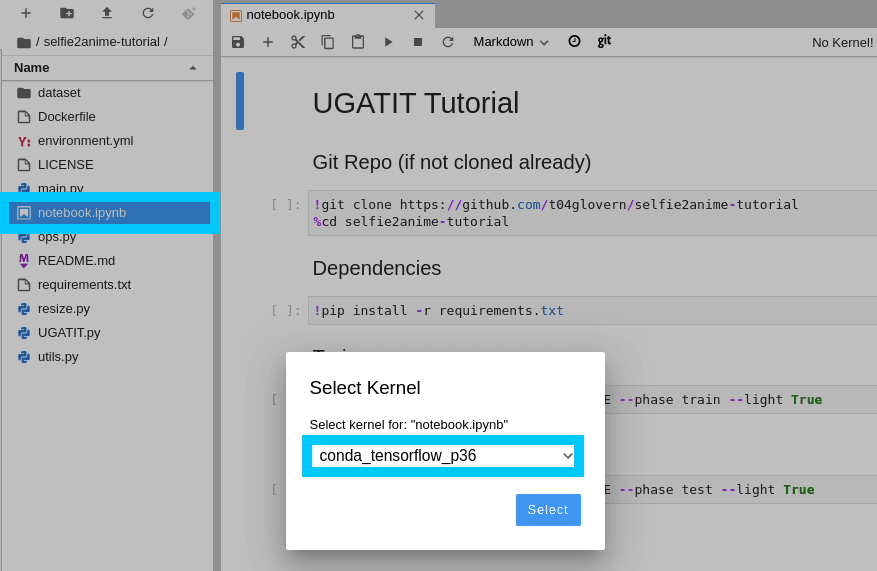
When the kernel is connected you can begin to use the Notebook.
NOTE: When running this notebook, you will not need to Git Repo clone (the first new commands).
IMPORTANT: When you are done using the Notebook, make sure to stop it and delete it. This can be done from the Notebook Instance screen. The cost of running these notebooks is US$329.84 monthly, $0.452 hourly.
Google AI Platform Notebooks
Google AI Platform has its very own Notebook instances that can be used to run our notebooks. To get started navigate to the Notebook Instance console and create a new instance.
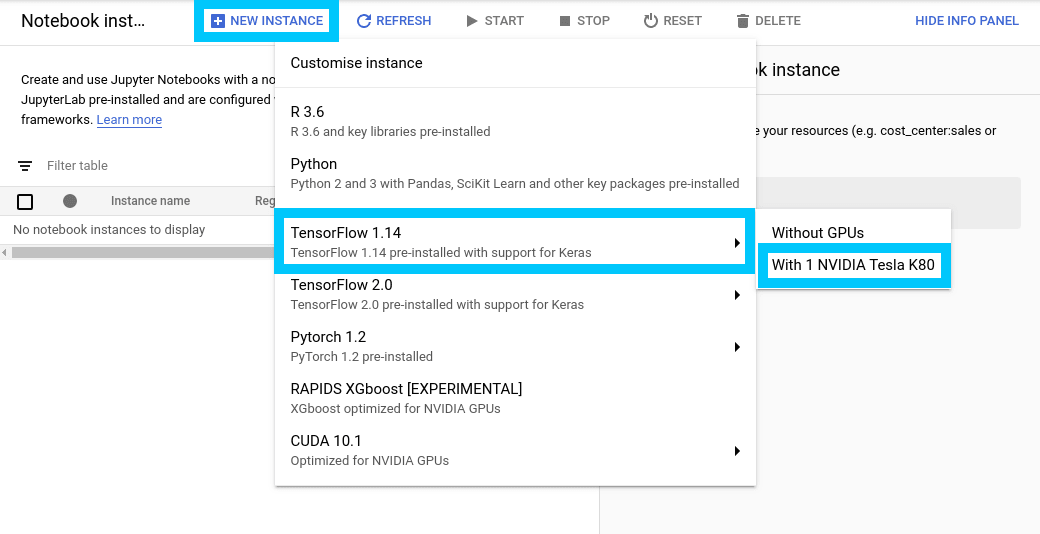
Ensure to create a TensorFlow 1.14 (not TensorFlow 2.0) notebook with a Tesla K80 attached.
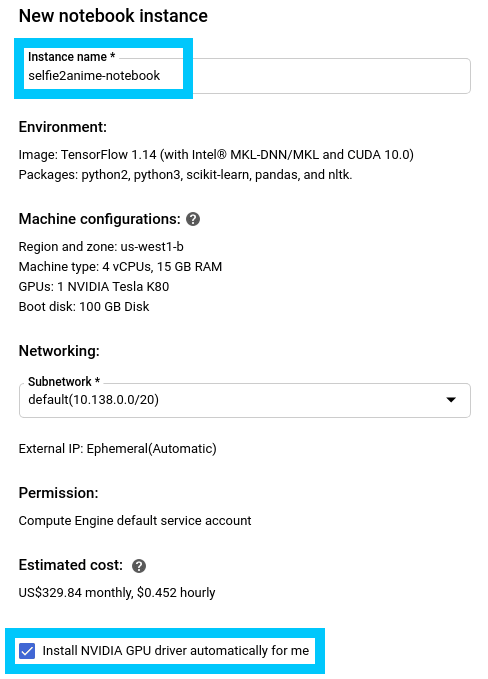
When customising the notebook also make sure that the checkbox for Installing NVIDIA GPU Drivers is checked.
Once the notebook is ready, you can open up the instance by clicking Open JupyterLab.

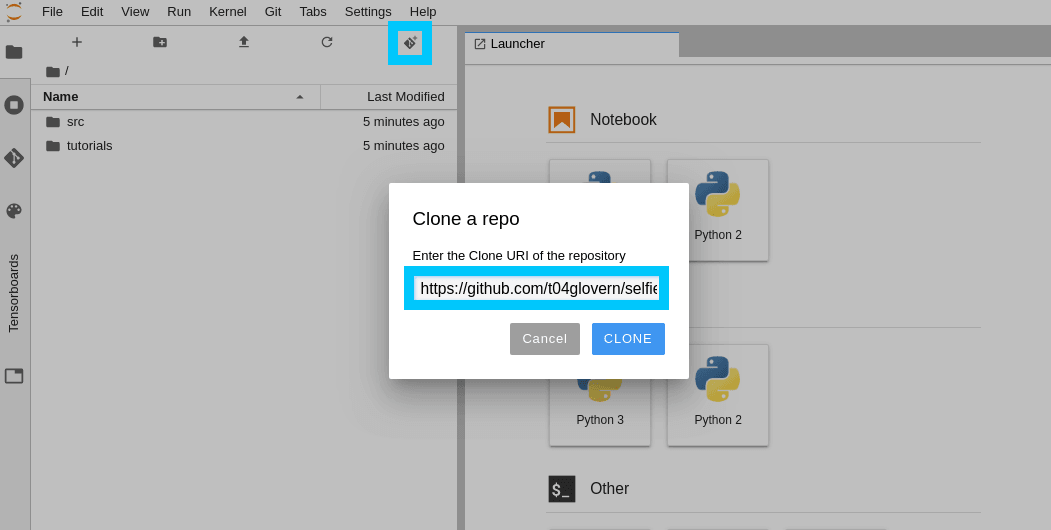
Then click the Git symbol in the navbar and put in the repo you want to clone into the workspace. In this case it's t04glovern/selfie2anime-tutorial
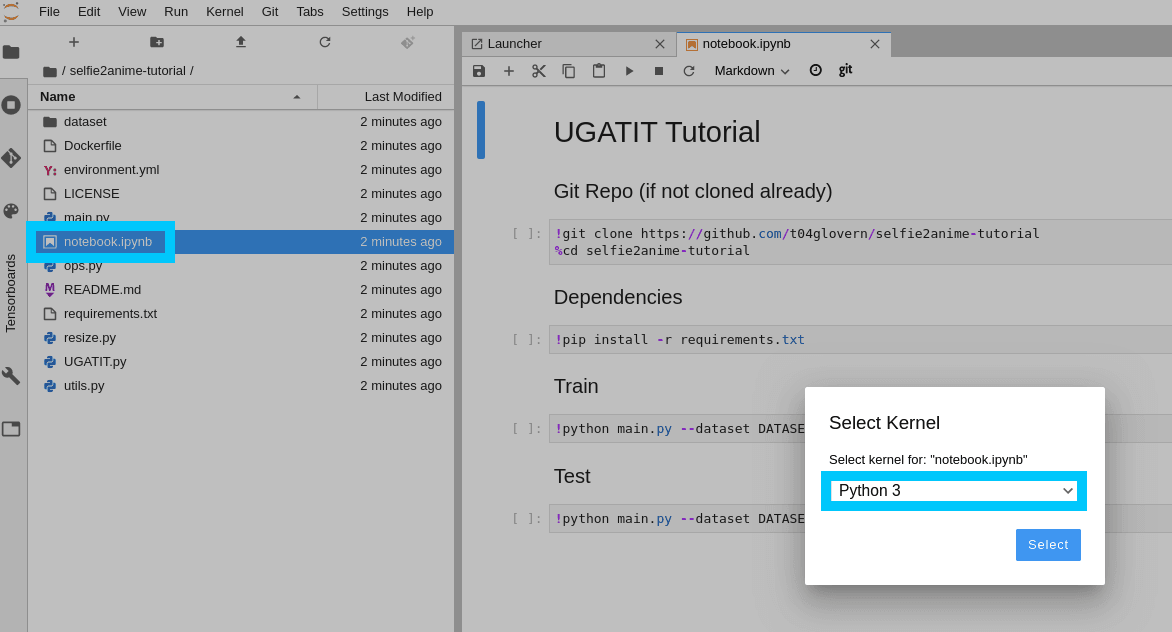
Finally open notebook.ipynb in the cloned repo and select Python 3 as the kernel.
NOTE: When running this notebook, you will not need to Git Repo clone (the first new commands).
IMPORTANT: When you are done using the Notebook, make sure to stop it and delete it. This can be done from the Notebook Instance screen.