Building Selfie2Anime - Iterating on an Idea
On the 17th of August 2019 myself and Rico Beti hit the launch button selfie2anime.com. The week that followed was a whirl wind of good and bad experiences technical experiences with trying to scale. I wanted to write this blog to lay out some of my own experiences and point out a few pitfalls I had along the way.
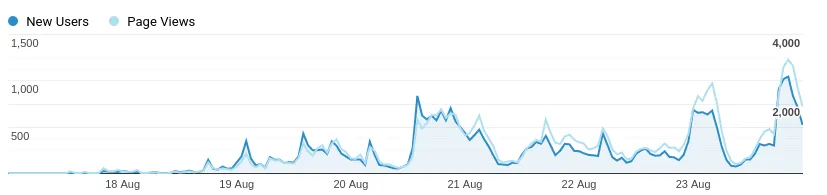
Right now we’re averaging well over 100 concurrent users and have spikes of traffic that reach upwards of 1000.
Background
Selfie2Anime is a web application built on-top of the amazing work done by Junho Kim and Minjae Kim and Hyeonwoo Kang and Kwanghee Lee in their paper U-GAT-IT: Unsupervised Generative Attentional Networks with Adaptive Layer-Instance Normalization for Image-to-Image Translation. In the past I’ve been really interested in data-science; specifically GANs; so when I noticed this project pop up It appealed to be straight away.
The original source code can be found on GitHub under taki0112/UGATIT. Throughout this post I’ll be referring to code in a number of repositories that I’ll outline here for your convenience.
- Original Source Code (UGATIT) - Primary source of the algorithm used to train the selfie2anime model used behind the website
- Selfie2Anime Backend Services - Backend services that also include a fork of UGATIT with functionality allowing for it to be a processing worker
- Selfie2Anime Frontend Site - Frontend website code for selfie2anime.com
In the Beginning
Before Selfie2Anime was a website I first began training my own model. I started off training using very little methodology combined with the following data sets.
- Selfie Data Set - https://www.crcv.ucf.edu/data/Selfie/
- Danbooru2018 anime image dataset - https://www.gwern.net/Danbooru2018
After 18 hours of training on my RTX 2080 Ti I was able to produce the following results.
At this point although results we’re bad, it was clear that continued training wasn’t going to make much difference. The other concern was the amount of time and computation that was required in order to get decent results. Because of these factors I decided I would reset with more thought on data sets and where I was training.
I published the trained model to Kaggle to mark the milestone at t04glovern/ugatit-selfie2anime-pretrained.
GCP Notebooks
On order to train a model faster and repeatably I opted to try GCP notebooks. The decision was made with my wallet. I’d picked up a stack of promotional credits to use on the Google platform.
All the code and process below can be carried out on any Cloud provider that supports Buckets and managed GPU computation.
To train the model I first span up a notebook using Deployment Manager
# Pull Repo
git clone https://github.com/t04glovern/UGATIT
cd UGATIT/gcp

# Deployment Manager Create
./deploy.sh {project_id} {resource} {action}

# Create Example
./deploy.sh {project_id} iam create
./deploy.sh {project_id} iam notebook
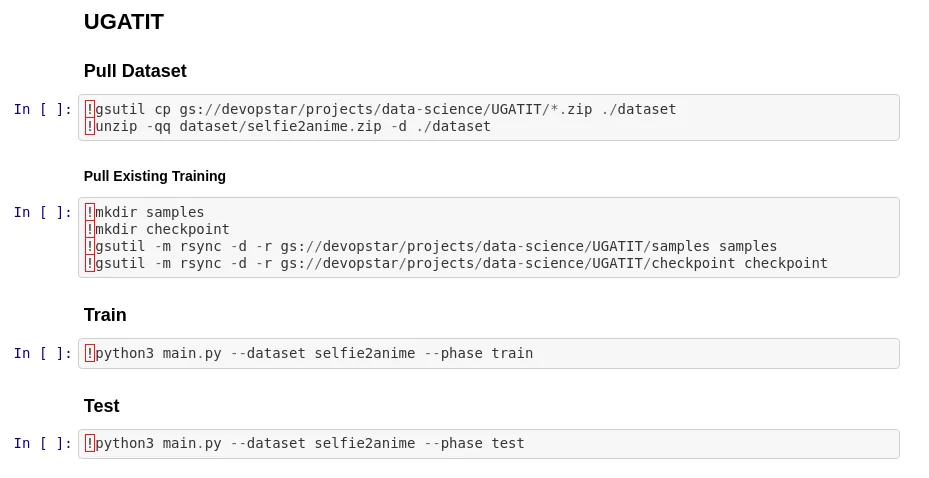
You could then navigate to your notebook instance and pull in the UGATIT repository again, then open the train.ipynb file in the root. The notebook would allow me to pull down the existing model checkpoints and continue training or perform inference using some simple interfaces.
Web Interface v0.1
This was the point where we had a well trained model but no easy way of exposing that functionality to the world. The goal posts shifted to build a simple web interface allowing myself and other to upload images for processing.
I spent the good part of a day hacking away at the front-end and back-end components for this functionality. Although it doesn’t look very impressive most of the hard work to perform inference on the model was now written.
Some simple code can be seen below that outlines how this was achieved. I should preface it with a note that this code has since been improved
if request.method == 'POST':
    file_obj = request.files
    for f in file_obj:
        file = request.files.get(f)

        # convert string of image data to uint8
        nparr = np.fromfile(file, np.uint8)
        # decode image
        img = cv2.imdecode(nparr, cv2.IMREAD_COLOR)

        # parse arguments
        args = parse_args()
        if args is None:
            exit()

        # open session
        with tf.Session(config=tf.ConfigProto(allow_soft_placement=True)) as sess:
            gan = UGATIT(sess, args)

            # build graph
            gan.build_model()

            # show network architecture
            show_all_variables()

            # do some fancy processing here....
            fake_img = gan.test_endpoint(img)

            # save the file with to our photos folder
            filename = str(uuid.uuid1()) + '.png'
            cv2.imwrite('uploads/' + filename, fake_img)
            # append image urls
            file_urls.append(photos.url(filename))
In an attempt to make the process easier for other I also published a Docker container with the working front-end and model baked in at t04glovern/selfie2anime-ugatit.
Selfie2Anime Version 1.0
Finally at this point I was ready to develop the first version of Selfie2Anime for release. A couple of considerations needed to be addressed before It could become a usable project however.
Newer Front-end
I’ll paraphrase the work done by Rico Beti in Checking out the Web App.
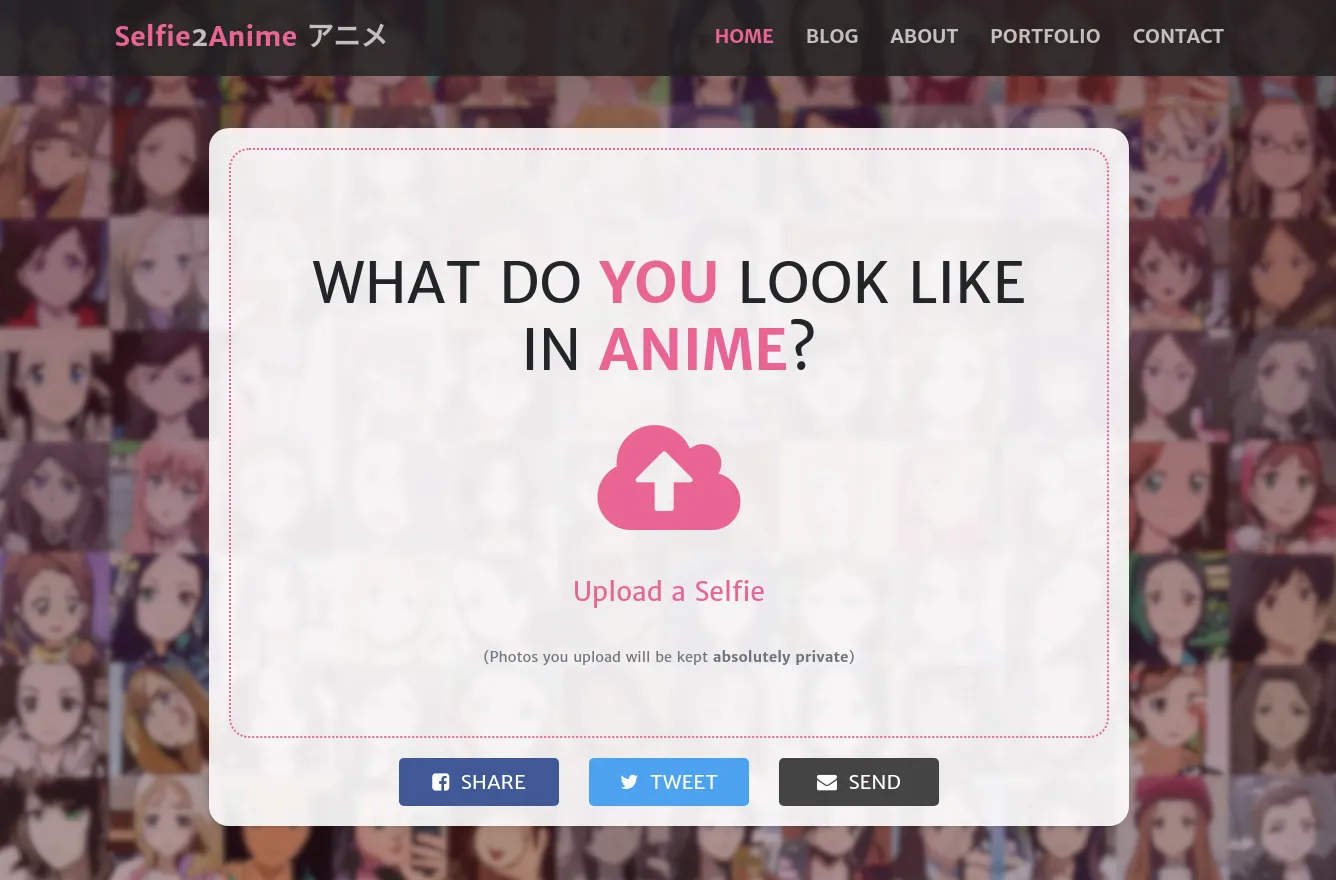
The website is based on VueJS, a lightweight, progressive front-end framework that was ideal for getting this site up as quickly as possible. Using VueCLI, a command-line tool that comes with Vue, allowed us to bootstrap the build-process with Webpack and set up a development environment quickly.
Designed as a single-page app, we managed to set up a working prototype of the front-end in a few hours time. If you checkout the source code on Github, you’ll notice that the content has largely been placed directly into the HTML of the site. While this is by far not an optimal way to structure a web app, it made it possible to focus on the widget at the top of the site, which lets our users pick a selfie, crop it to the right size (cheers to Croppr.js for a lightweight VanillaJS solution), and upload it to our back-end.
Building the website with VueCLI/Webpack through NodeJS and running a few customizations (mainly generation of the portfolio and auto-optimization of images) will produce a standalone app that can be hosted independently of the back-end and is completely client-side rendered, allowing us to disconnect the front-end from the back-end and only communicate through a dedicated and stateless RESTful API. Quote from https://selfie2anime.com/blog/checking-out-the-web-app/
Parallelism of Workflow
The back-end system architecture can be seen in the image below. Note that this is a slightly earlier version of what is currently deployed.
The project was stood up using Serverless framework and consists of a group of resources that provide the following workflow.
- User submits an image to selfie2anime.com via the web form.
- POST data is sent through API Gateway to a processing Lambda.
- This data includes the crop region to be used when performing the inference against UGATIT.
- Image is placed Privately in S3 and an SQS Item is created for the users request
- This Queue is processed one at a time by a worker which pulls down an image, crops it and then generates the Anime equivalent.
- An email is crafted and sent back to the users email with a link to the generated Image.
- This link has a signed access key for the S3 item in question.
Outcome
The initial release of Selfie2Anime went really well, and we were really happy with the way the service was presented.
There are a number of things that I’ve purposely left out of this post around scaling certain services; and I plan on doing a follow up very soon explaining some of the points below:
- CloudFront Costs and best practices to save money
- Dockerizing and deploying workers to scale
- Reducing costs through frontend smarts
If you have any questions about this project please do reach out on Twitter @nathangloverAUS / @RicoBeti.