Object Detecting Facebook Messenger Bot
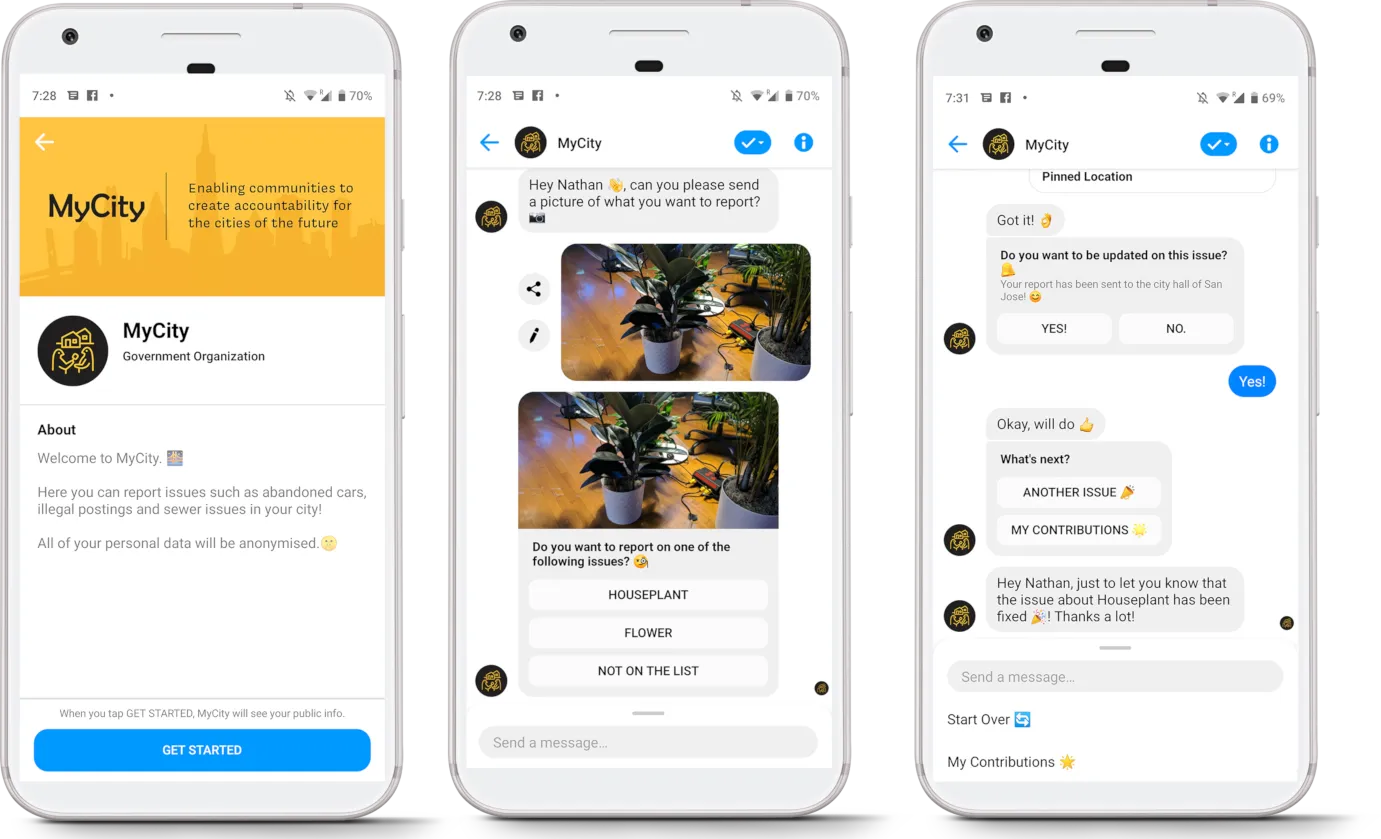
Recently I was invited along to F8, Facebook’s yearly conference and got the incredible opportunity to also compete in the Hackathon portion of the event. Our team worked on a solution called MyCity which used Facebook Messenger to ingest data related to a a problem in the community. The bot would receive images, location data and general descriptions before passing it to a back-end database.
Overview
In this post we’ll walk through the general steps required to create your own Facebook messenger bot that can analyse images and describe what’s in them. To accomplish this we’ll make use of the following:
- Facebook Messenger - Interaction medium to take images and text from the user without needing to install any apps.
- AWS Fargate - Host and scale our webhook code
- Amazon Rekognition - Image labelling as a service
- AWS CloudFormation - Infrastructure as code to manage our container cluster and network
All the code outlined can be found at https://github.com/t04glovern/waanimals-fb-bot. Note that the version in the repo might be slightly newer then this post if you’re reading in the future.
What You’ll Need
For the sake of this tutorial you’ll need a few things in order to follow along. Note that it’s totally fine if you don’t have everything (specifically a domain).Domain in Route53 - We use a domain in Route53 to front the webhook used in this tutorial
- ACM Certificate - Attached to the domain in Route53 (we’ll briefly go over how to add one).
- Facebook Page - We’ll be adding an app to it
- Facebook Developer Account - Simply signing in at https://developers.facebook.com/apps/ works.
- Docker Community - Installed and setup
- AWS CLI - Installed and authorised (if you plan on deploying to AWS)
Creating the Webhook
To begin with we’re going to setup the webhook that Facebook Messenger will interact with when a message comes into messenger for our page. Start by creating a new NodeJS project and install the various dependencies that will be used.
mkdir messenger-bot   ## Creates a project directory
cd messenger-bot      ## Navigates to the new directory
touch app.js          ## Creates empty app.js file
npm init              ## Creates package.json. Accept default for all questions.

## Install Dependencies
npm install express body-parser dotenv aws-sdk image-to-base64 request --save
Within the package.json that gets created, make sure to add the script entry for starting the app.
...
  "scripts": {
    "start": "node app.js"
  },
...
Also while we’re in the mood for setting up the project, go ahead and create a file in the root folder called .env and populate it with the following. Don’t worry about filling these fields out yet, we’ll come back to it later.
VERIFY_TOKEN='YOUR_VERIFY_TOKEN' # Random String
PAGE_ACCESS_TOKEN='YOUR_PAGE_ACCESS_TOKEN'
AWS_REGION='us-east-1'
Webhook Routes
The webhook is going to be using Express in order to manage various routes into the app. Create a file called apiController.js within a new folder called controllers.
mkdir controllers
touch apiController.js
This file is going to handle our three routes, for now stub out the contents and we’ll add each one in the sections below:
const messengerService = require('../service/messengerService');

const VERIFY_TOKEN = process.env.VERIFY_TOKEN;

/**
 *
 * Webhook Verification GET
 *
 */
function handleVerifyServer(req, res) {

}

/**
 *
 * Webhook POST handler
 *
 */
function handleWebhookEvent(req, res) {

}

/**
 *
 * Health Endpoint
 *
 */
function handleHealthEndpoint(req, res) {

}

module.exports = {
  handleVerifyServer: handleVerifyServer,
  handleWebhookEvent: handleWebhookEvent,
  handleHealthEndpoint: handleHealthEndpoint
}
handleVerifyServer
handleVerifyServer validates your webhook with the Messenger Platform by comparing the random token you supply in the code with the one loaded in the Facebook console (we’ll do this soon).
function handleVerifyServer(req, res) {
  // Parse the query params
  let mode = req.query['hub.mode'];
  let token = req.query['hub.verify_token'];
  let challenge = req.query['hub.challenge'];

  // Checks if a token and mode is in the query string of the request
  if (mode && token) {

    // Checks the mode and token sent is correct
    if (mode === 'subscribe' && token === VERIFY_TOKEN) {

      // Responds with the challenge token from the request
      console.log('WEBHOOK_VERIFIED');
      res.status(200).send(challenge);

    } else {
      // Responds with '403 Forbidden' if verify tokens do not match
      res.sendStatus(403);
    }
  }
}
handleWebhookEvent
handleWebhookEvent takes a POST payload from the Messenger platform when a message or event comes through and needs to be processed. You can think of this as the entry point to the bot logic.
function handleWebhookEvent(req, res) {
  let body = req.body;

  // Checks this is an event from a page subscription
  if (body.object === 'page') {

    // Iterates over each entry - there may be multiple if batched
    body.entry.forEach(function (entry) {

      // Gets the message. entry.messaging is an array, but
      // will only ever contain one message, so we get index 0
      let webhook_event = entry.messaging[0];
      console.log(webhook_event);

      // Get the sender PSID
      let sender_psid = webhook_event.sender.id;
      console.log("Sender PSID: " + sender_psid);

      // Check if the event is a message or postback and
      // pass the event to the appropriate handler function
      if (webhook_event.message) {
        messengerService.handleMessage(sender_psid, webhook_event.message);
      } else if (webhook_event.postback) {
        messengerService.handlePostback(sender_psid, webhook_event.postback);
      }
    });

    // Returns a '200 OK' response to all requests
    res.status(200).send('EVENT_RECEIVED');
  } else {
    // Returns a '404 Not Found' if event is not from a page subscription
    res.sendStatus(404);
  }
}
handleHealthEndpoint
handleHealthEndpoint is purely an endpoint for us to use to verify the service is up and running when we deploy it to AWS.
function handleHealthEndpoint(req, res) {
  res.status(200).send("Health endpoint successful!");
}
Messenger Services
If you have a keen eye you probably noticed that we’re referencing a file that doesn’t exist yet at the top called messengerService. There are also references to functions that don’t exist yet called handleMessage and handlePostback. To start with we’ll create the folder and files that will contain this logic.
mkdir service
touch messengerService.js
Stubbing out the logic for these new functions should also be done before moving forward.
const request = require("request");
const ImageAnalyser = require('../util/imageAnalyser');

const PAGE_ACCESS_TOKEN = process.env.PAGE_ACCESS_TOKEN;

/**
 *
 * Handler Message
 *
 */
async function handleMessage(sender_psid, received_message) {

}

/**
 *
 * Handler Postback
 *
 */
async function handlePostback(sender_psid, received_postback) {

}

/**
 *
 * Messenger Send API
 *
 */
function callSendAPI(sender_psid, response) {

}

module.exports = {
  handleMessage: handleMessage,
  handlePostback: handlePostback
}
The way this file works is that we’ll either receive a message directly from the user of the bot, or a postback. The postback will be a reply to a previous event. Finally the callSendAPI is a standard function for sending a structured message back to the user in the chat.
handleMessage
You might also notice there’s some code referencing image analysis, we’ll come back to it in a second.
async function handleMessage(sender_psid, received_message) {
  let response;

  // Checks if the message contains text
  if (received_message.text) {
    // Create the payload for a basic text message, which
    // will be added to the body of our request to the Send API
    response = {
      "text": `You sent the message: "${received_message.text}". Now send me an attachment!`
    }
  } else if (received_message.attachments) {
    // Get the URL of the message attachment
    let attachment_url = received_message.attachments[0].payload.url;

    console.log("payload url");
    console.log(JSON.stringify(received_message.attachments[0].payload));
    console.log("attachment_url: " + attachment_url);
    let imageLabels = await ImageAnalyser.getImageLabels(attachment_url);
    let labels = ImageAnalyser.getImageLabelArray(imageLabels);

    response = {
      "attachment": {
        "type": "template",
        "payload": {
          "template_type": "generic",
          "elements": [{
            "title": "What best describes your image?",
            "subtitle": "Tap a button to answer.",
            "image_url": attachment_url,
            "buttons": [{
                "type": "postback",
                "title": labels[0],
                "payload": labels[0],
              },
              {
                "type": "postback",
                "title": labels[1],
                "payload": labels[1],
              }
            ],
          }]
        }
      }
    }
  }

  // Send the response message
  callSendAPI(sender_psid, response);
}
handlePostback
async function handlePostback(sender_psid, received_postback) {
  console.log('ok')
  let response;
  // Get the payload for the postback
  let payload = received_postback.payload;

  // Set the response based on the postback payload
  if (payload === 'yes') {
    response = {
      "text": "Thanks!"
    }
  } else if (payload === 'no') {
    response = {
      "text": "Oops, try sending another image."
    }
  } else {
    response = {
      "text": "Cool! I love " + payload + "'s"
    }
  }
  // Send the message to acknowledge the postback
  callSendAPI(sender_psid, response);
}
callSendAPI
function callSendAPI(sender_psid, response) {
  // Construct the message body
  let request_body = {
    "recipient": {
      "id": sender_psid
    },
    "message": response
  }

  // Send the HTTP request to the Messenger Platform
  request({
    "uri": "https://graph.facebook.com/v2.6/me/messages",
    "qs": {
      "access_token": PAGE_ACCESS_TOKEN
    },
    "method": "POST",
    "json": request_body
  }, (err, res, body) => {
    if (!err) {
      console.log('message sent!')
    } else {
      console.error("Unable to send message:" + err);
    }
  });
}
Image Analysis
For image labelling we’ll be using AWS Rekognition so that we’re totally on one cloud provider (eliminating the requirements of managing credential / access policies). We’ll include this image analysis logic in a new file
mkdir util
touch imageAnalyser.js
I won’t go into too much detail here, however note a couple things:
- const AWS = require(‘aws-sdk’); - used to interact with other AWS services; specifically Rekognition
- We receive an image URL back from facebook that points to the image that a user uploads, however the Rekognition library needs base64 to work effectively.
- A limit of 2 labels are returned to the webhook with a minimum confidence of 50%
- There labels become buttons for the user to click on
const AWS = require('aws-sdk');
const image2base64 = require("image-to-base64");

const rek = new AWS.Rekognition({
  region: process.env.AWS_REGION
});

const downloadUrlImageBase64 = async url => {
  return await image2base64(url) // you can also to use url
    .then(response => {
      return response;
    })
    .catch(error => {
      console.log("error base64");
      console.log(error); //Exepection error....
    });
};

class ImageAnalyser {

  static getImageLabelArray(labels) {
    var listOfLabels = [];
    labels.forEach(function (label) {
      listOfLabels.push(label.Name);
    });
    return listOfLabels;
  }

  static async getImageLabels(url) {
    let base64Image = await downloadUrlImageBase64(url);
    const params = {
      Image: {
        Bytes: new Buffer.from(base64Image, 'base64')
      },
      MaxLabels: 2,
      MinConfidence: 50,
    };
    return new Promise((resolve, reject) => {
      rek.detectLabels(params, (err, data) => {
        if (err) {
          reject(new Error(err));
        }
        resolve(data.Labels);
      });
    });
  }
}

module.exports = ImageAnalyser;
Deploying the Webhook
The webhook code is now complete and now we just need to deploy it somewhere. We’ll be using AWS Fargate to host the webhook however there are a number of services that can achieve this for you.
NOTE: If you aren’t looking to deploy to AWS I would recommend checking out this tutorial on deploying to Heroku
Dockerizing
We’re going to deploy a containerized version of the webhook. For this we’ll need a Dockerfile within the messenger-bot folder
touch Dockerfile
Within this file add the following
FROM node:8

# Create app directory
WORKDIR /usr/src/app

# Install app dependencies
# A wildcard is used to ensure both package.json AND package-lock.json are copied
# where available (npm@5+)
COPY package*.json ./

RUN npm install
# If you are building your code for production
# RUN npm install --only=production

# Bundle app source
COPY . .

EXPOSE 1337
CMD [ "npm", "start" ]
CI/CD Prep (Optional)
If you’d like to support CI/CD and have your service deploy automatically on changes to GitHub, then add a file called buildspec.yml to messenger-bot
version: 0.2

phases:
  pre_build:
    commands:
      - cd messenger-bot
      - echo Logging in to Amazon ECR...
      - dockerd-entrypoint.sh
      - $(aws ecr get-login --no-include-email --region $AWS_DEFAULT_REGION)
  build:
    commands:
      - echo Build started on `date`
      - echo Building the Docker image...
      - docker build -t $IMAGE_REPO_NAME .
      - docker tag $IMAGE_REPO_NAME:$IMAGE_TAG $AWS_ACCOUNT_ID.dkr.ecr.$AWS_DEFAULT_REGION.amazonaws.com/$IMAGE_REPO_NAME:$IMAGE_TAG
  post_build:
    commands:
      - echo Build completed on `date`
      - echo Pushing the Docker image...
      - docker push $AWS_ACCOUNT_ID.dkr.ecr.$AWS_DEFAULT_REGION.amazonaws.com/$IMAGE_REPO_NAME:$IMAGE_TAG
      - aws ecs update-service --cluster $FARGATE_CLUSTER --service $FARGATE_SERVICE --force-new-deployment
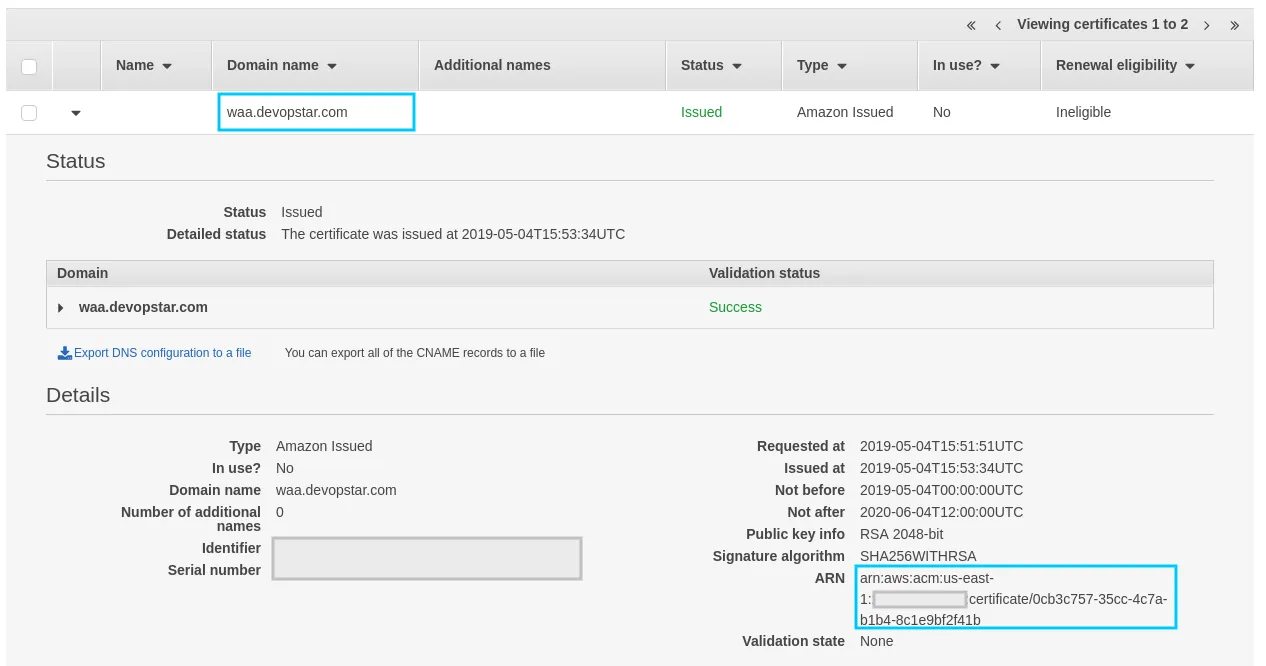
ACM Certificate
You will need an issued certificate through ACM to integrate SSL into the endpoint correctly. This can be done through the ACM console for a domain you manage. When complete make sure to grab the ARN
CloudFormation
All the infrastructured used is going to be managed by CloudFormation. Grab a copy of the files within the cloudformation folder in the git repo. It’s also worth grabbing the cloudformation_deploy.sh and container_push.sh files. The folder should look as follows
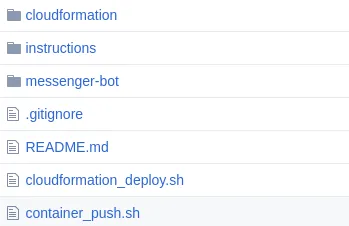
You need to make a couple changes to the files you just copied in.
cloudformation_deploy.sh
Change the bucket name to something unique to you. The prefix is just the path within the bucket that the files will be placed
BUCKET_NAME=devopstar
BUCKET_PREFIX='resources/waanimals-fb-bot'
container_push.sh
Any references to waanimals-fb-bot-webhook can be changed if you feel like it. Pre-warning that you need to make sure you remember what you change it to for the next step.
#!/bin/sh

# Create ECR (if not already existing)
aws ecr create-repository --repository-name "waanimals-fb-bot-webhook"

ACCOUNT_ID=$(aws sts get-caller-identity |  jq -r '.Account')
$(aws ecr get-login --no-include-email --region us-east-1)

docker build -t waanimals-fb-bot-webhook ./messenger-bot/
docker tag waanimals-fb-bot-webhook:latest $ACCOUNT_ID.dkr.ecr.us-east-1.amazonaws.com/waanimals-fb-bot-webhook:latest
docker push $ACCOUNT_ID.dkr.ecr.us-east-1.amazonaws.com/waanimals-fb-bot-webhook:latest
deployment-params.json
The file deployment-params.json in cloudformation needs to be slightly adjusted based on your requirements. Specifically the fields:
- BucketName - Your bucket name from the changes in the bash script
- BucketPrefix - Your bucket prefix from the changes in the bash script
- CodeRepositoryURL - Your own GitHub repo where this project is stored for CI/CD
- ContainerName - If you changed the container name in the bash script
- CertificateArn - From previous ACM step
- FbVerifyToken - The Random string you want to use to authenticate with facebook
- FbPageAccessToken - We’ll get this in a second
[
    { "ParameterKey":"ProjectName",             "ParameterValue":"WAAnimalsBot" },
    { "ParameterKey":"BucketName",              "ParameterValue":"devopstar" },
    { "ParameterKey":"BucketPrefix",            "ParameterValue":"resources/waanimals-fb-bot" },
    { "ParameterKey":"ClassB",                  "ParameterValue":"160" },
    { "ParameterKey":"ClusterName",             "ParameterValue":"waanimals-fb-bot-cluster" },
    { "ParameterKey":"CodeRepositoryURL",       "ParameterValue":"https://github.com/t04glovern/waanimals-fb-bot" },

    { "ParameterKey":"ServiceName",             "ParameterValue":"waanimals-fb-bot-webhook" },
    { "ParameterKey":"ContainerName",           "ParameterValue":"waanimals-fb-bot-webhook" },
    { "ParameterKey":"ContainerPort",           "ParameterValue":"1337" },
    { "ParameterKey":"ContainerCpu",            "ParameterValue":"256" },
    { "ParameterKey":"ContainerMemory",         "ParameterValue":"512" },
    { "ParameterKey":"DesiredCount",            "ParameterValue":"1" },
    { "ParameterKey":"HealthEndpoint",          "ParameterValue":"/healthy" },
    { "ParameterKey":"CertificateArn",          "ParameterValue":"CERTIFICATE_ARN" },

    { "ParameterKey":"BuildspecLocation",       "ParameterValue":"messenger-bot/buildspec.yml" },
    { "ParameterKey":"EnvironmentType",         "ParameterValue":"LINUX_CONTAINER" },
    { "ParameterKey":"ComputeType",             "ParameterValue":"BUILD_GENERAL1_SMALL" },
    { "ParameterKey":"BuildImage",              "ParameterValue":"aws/codebuild/ubuntu-base:14.04" },

    { "ParameterKey":"FbVerifyToken",           "ParameterValue":"VERIFY_TOKEN" },
    { "ParameterKey":"FbPageAccessToken",       "ParameterValue":"PAGE_ACCESS_TOKEN" }
]
Facebook Page Setup
With the basic bot now complete it’s time to setup the Facebook page and tie it to our webhook. this second is based heavily on Setting Up Your Facebook App.
Add the Messenger Platform to your Facebook app
Select PRODUCTS and then setup Messenger
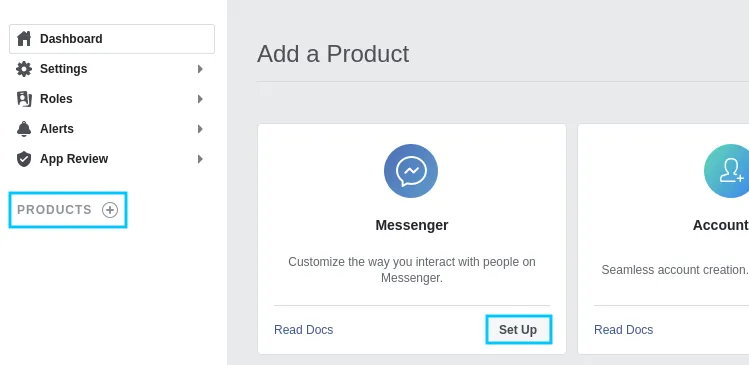
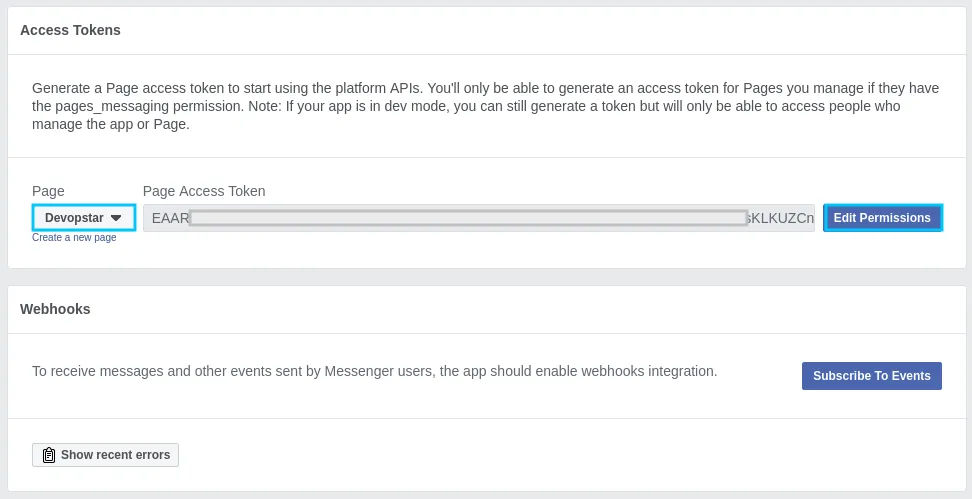
Create an access token for your selected page
CloudFormation Deploy
With the Page Access Token you should now be able to deploy with CloudFormation. Place the Access token in the previous file we were editing deployment-params.json. When you’re ready to deploy run the following
# Push Containers
./container_push.sh

# Push CloudFormation templates
./cloudformation_deploy.sh

# Create Stack
aws cloudformation create-stack \
    --stack-name "waanimals-fb-bot" \
    --template-body file://cloudformation/deployment.yaml \
    --parameters file://cloudformation/deployment-params.json \
    --capabilities CAPABILITY_IAM \
    --region us-east-1
Route53
If you had a custom domain you’ll need to point the A record that was used to register the ACM certificate with the Application load balancer that was created during the deployment

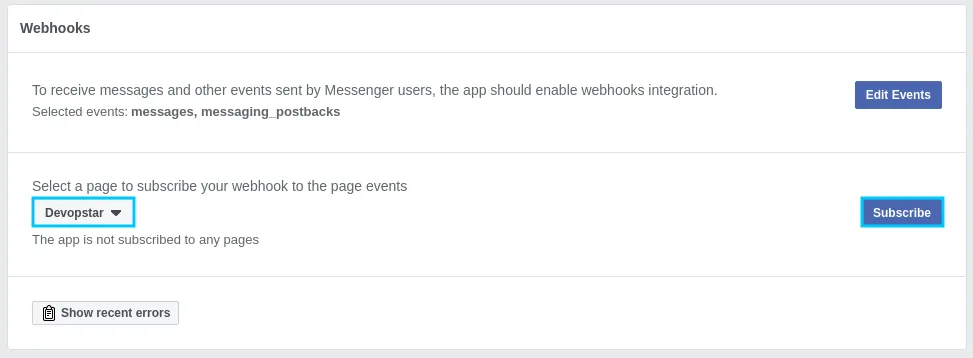
Facebook Webhook Integration
With the webhook setup and exposed we’re now able to complete the bot. Head back to the Facebook page under https://developers.facebook.com/apps/ and edit the permissions on the previously created Page Access Token
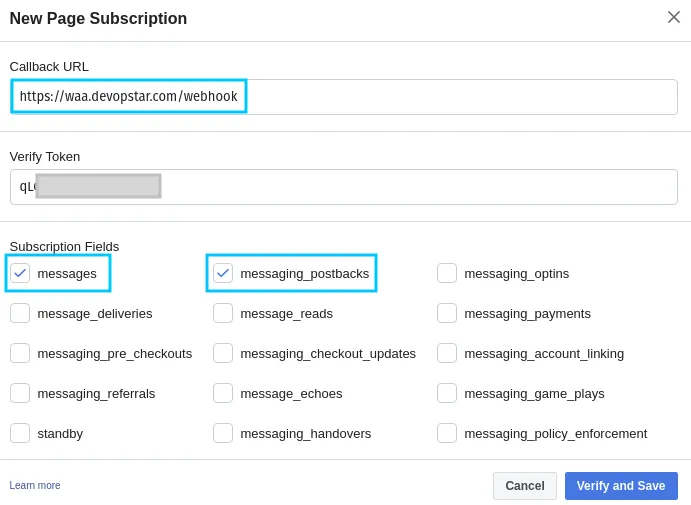
Then subscribe to the new event using the Facebook page
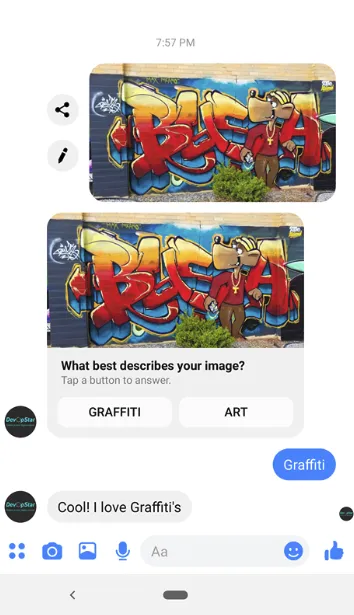
Testing
Open up a chat with your new bot and send it an image of your choosing. You should find it’ll return options to select from based on what it analyses in the image.