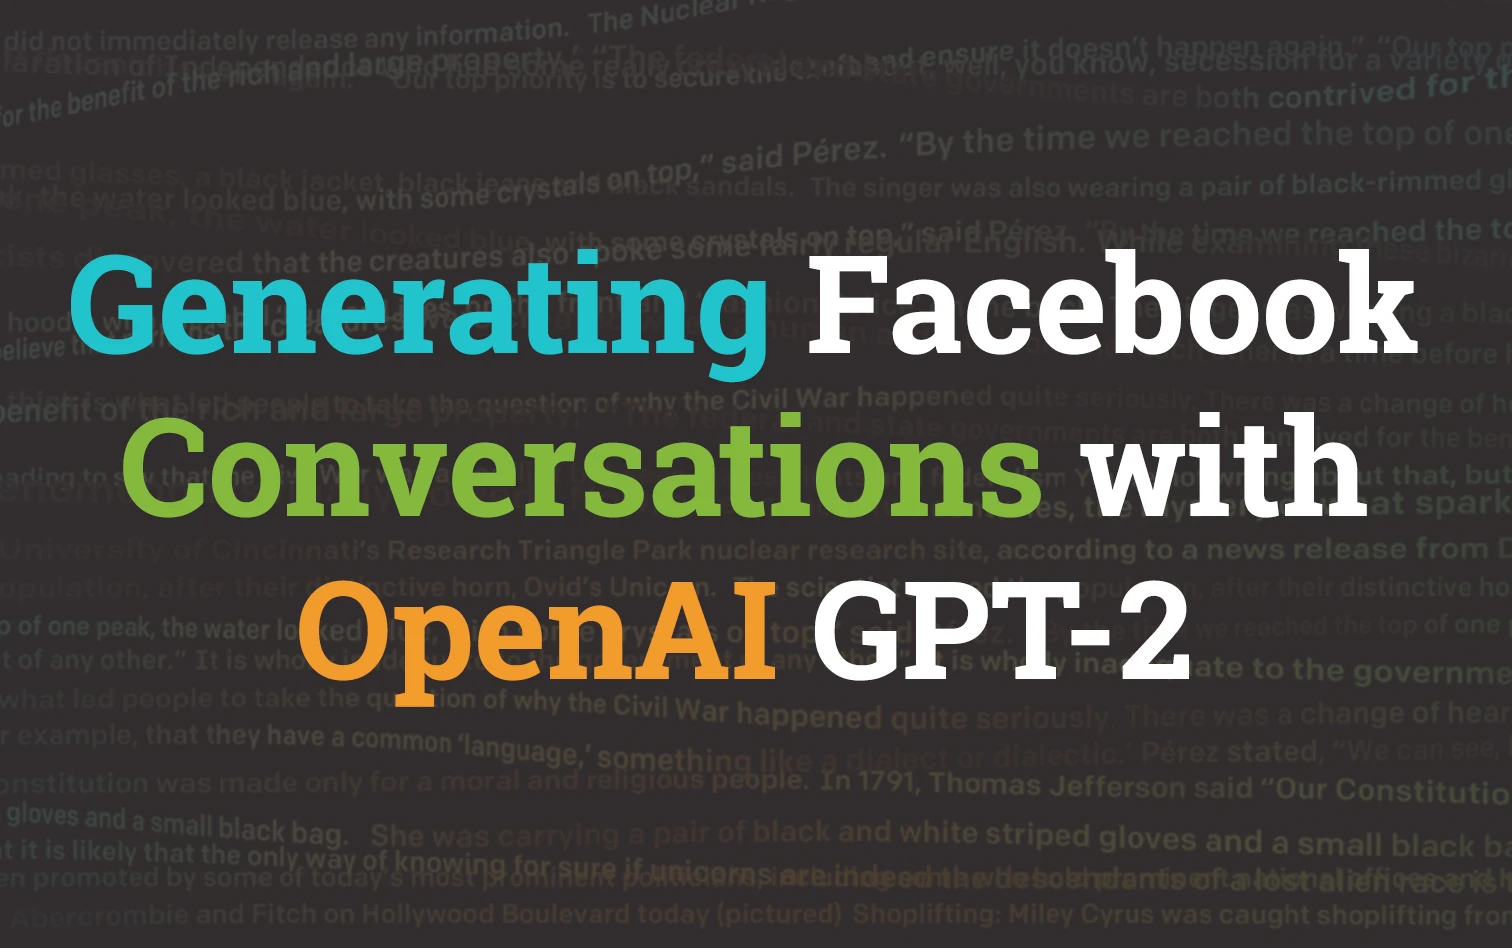
Fake Facebook conversations using OpenAI GPT-2
This conversation never happened
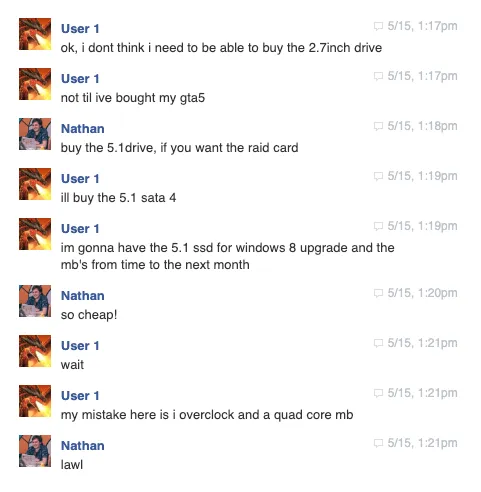
The dialogue seen above never occurred. It was generated using OpenAI’s GPT-2 and trained on a dataset comprised entirely from Facebook Messenger conversations from my old account (roughly 10 years of conversational dialogue).
GPT-2 is a large transformer-based language model with 1.5 billion parameters, trained on a dataset of 8 million web pages. GPT-2 is trained with a simple objective: predict the next word, given all of the previous words within some text. The diversity of the dataset causes this simple goal to contain naturally occurring demonstrations of many tasks across diverse domains. GPT-2 is a direct scale-up of GPT, with more than 10X the parameters and trained on more than 10X the amount of data.
Better Language Models and Their Implications - Feb 14, 2019
Outcome
The goal of this post is to summarise and guide the process needed to build your very own conversations based entirely on your own messenger data. We will:
- Download our Facebook message data
- Setup AWS SageMaker with a GPU instance using CloudFormation
- Process our Facebook data
- Train our customised version of GPT-2
- Generate Facebook conversations between a number of our friends
The code and generalised workflow for this is based heavily on the fantastic work by u/Tenoke who published Generating Fake Conversations by fine-tuning OpenAI’s GPT-2 on data from Facebook Messenger. At the time of writing this he site appears to be down (along with the process), I would highly recommend checking it out if it does come back up!
Facebook Message Data
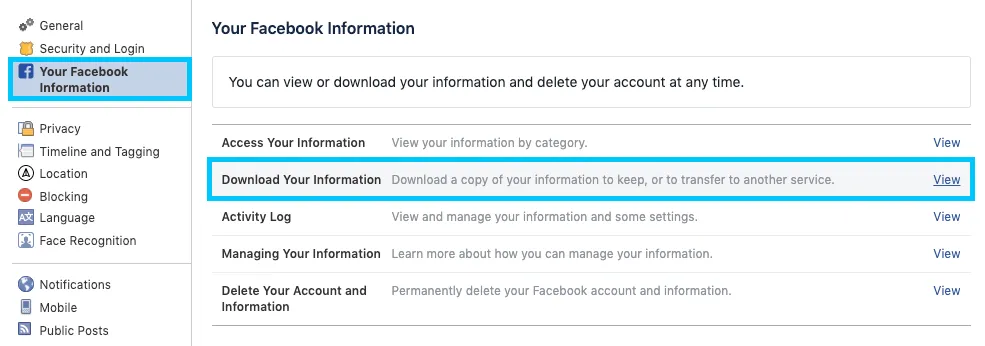
Before getting to stuck into it, we’ll start by downloading our Facebook message data as it can be the most time consuming part. Navigate to your Facebook account settings and click Your Facebook Information > Download Your Information.
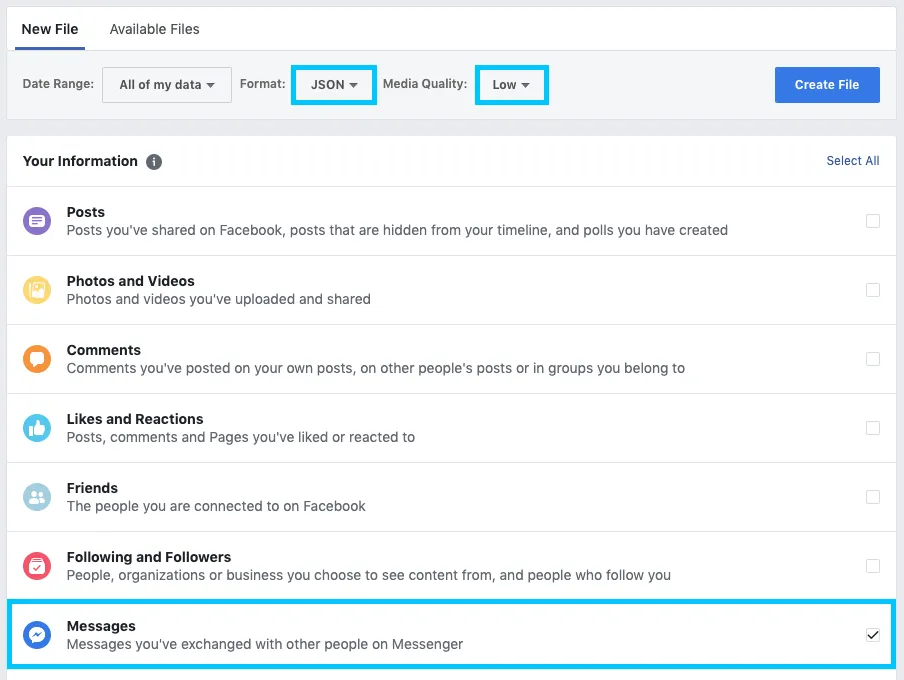
Select only Messages as the information Type with a Format of JSON and Media Quality Low. We set the media quality low because we don’t have any need for it currently. Click Create File
The process of generating your data can take anywhere from a couple of minutes to a number of hours. Be patient, and feel free to progress without it to get your head around the rest of the setup. Once you have access to download it, you’ll be able to get it from the same Download Your Information screen under Available Files.
We will store the data in an AWS S3 bucket for easier access from AWS SageMaker. Create a bucket (either from the UI or the CLI) that we can use for the remainder of the tutorial. I will be using one called devopstar.
aws s3 cp facebook.zip s3://devopstar/resources/fbmsg-analysis-gpt-2/facebook.zip
It doesn’t matter too much where in your bucket the zip file is place, just remember where you put it for later on.
AWS SageMaker Notebook
In order to tweak the GPT-2 model we’ll need some serious compute! Luckily SageMaker gives us access to relatively cheap GPU instances at a cost of roughly $1.26 per hour.
NOTE: The following actions will create you _ml.p2.xlarge_ compute. The cost of this resource is fixed to roughly $1.26 per hour as mentioned above, however if you leave that instance running for a long period of time it will start to add up. Be sure to remove (or turn off) the instance if you do not finish working with it in one sitting.
I’ve created a small CloudFormation template that can be used to setup the base permissions for our SageMaker instance. To use it you will need to pull down the repository that has been setup for this tutorial by running the following:
git clone https://github.com/t04glovern/fbmsg-analysis-gpt-2.git
SageMaker Execution Policy
The run the following command from within the root folder of the project you just pulled down. Ensure you change the reference to my bucket (devopstar) to your own.
aws cloudformation create-stack \
    --stack-name "fb-msg-gpt2-sagemaker-role" \
    --template-body file://cloudformation/sagemaker_role.yaml \
    --parameters ParameterKey=S3BucketName,ParameterValue=devopstar \
    --capabilities CAPABILITY_IAM
Once the role has been created successfully, retrieve the ARN for the use later on. It will look something like arn:aws:iam::XXXXXXXXXXXX:role/fb-msg-gpt2-sagemaker-role-ExecutionRole-PZL3SA3IZPSN.
aws cloudformation describe-stacks --stack-name "fb-msg-gpt2-sagemaker-role" \
    --query 'Stacks[0].Outputs[?OutputKey==`MLNotebookExecutionRole`].OutputValue' \
    --output text
SageMaker Code Repository
Removing as much manual work as possible for the deployment of this pipeline is important, and one of the steps that introduces a lot of overhead once the notebook is deployed is the pulling down of the repository.
Luckily this process can be included during the startup of the notebook by passing in a code repository. Create a new notebook repository by running the following command:
aws sagemaker create-code-repository \
    --code-repository-name "t04glovern-gpt-2" \
    --git-config '{"Branch":"master", "RepositoryUrl" : "https://github.com/t04glovern/fbmsg-analysis-gpt-2" }'
SageMaker Notebook Instance
Now that everything is ready and prepared, we can create a new notebook instance passing in a couple parameters we have collected from the previous steps.
- notebook-instance-name: The name you want to give your notebook
- instance-type: Based on the pricing, select a instance type (with GPUs) to launch
- role-arn: Retrieved from the previous setup where we created the Execution role with CloudFormation
- default-code-repository: Name of the repository created in the previous step.
aws sagemaker create-notebook-instance \
    --notebook-instance-name "fbmsg-gpt-2" \
    --instance-type "ml.p2.xlarge" \
    --role-arn "arn:aws:iam::XXXXXXXXXXXXX:role/fb-msg-gpt2-sagemaker-role-ExecutionRole-PZL3SA3IZPSN" \
    --default-code-repository "t04glovern-gpt-2"
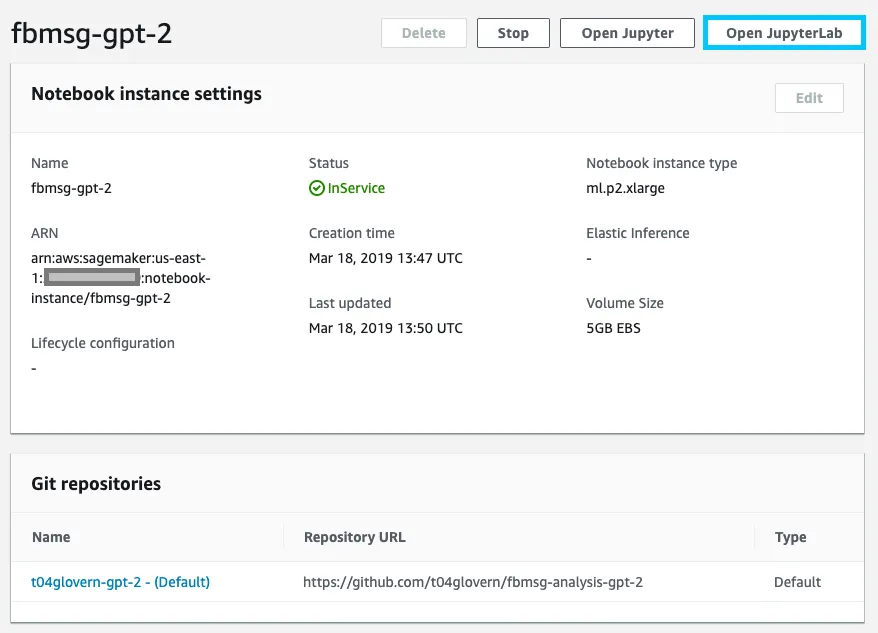
Open up the list of Notebook instances in the Amazon SageMaker console and confirm the new instance has been created correctly. Open up the instance with JupyterLab
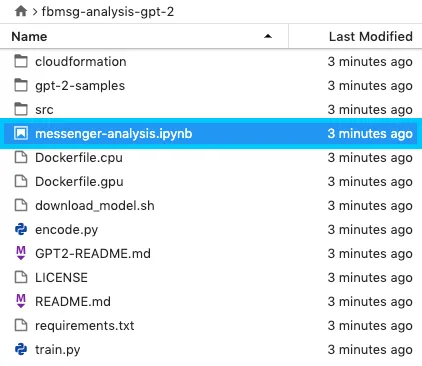
When the notebook opens on the left you will see a list of files within the fbmsg-analysis-gpt-2 repository that was pulled down automatically for you as part of the setup. Open up messenger-analysis.ipynb
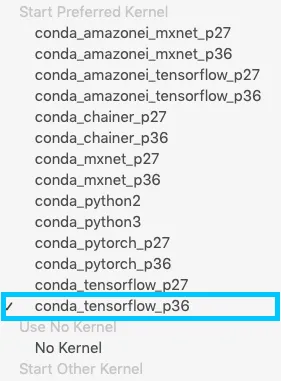
Once opened, confirm or select the preferred kernel to be conda_tensorflow_p36.
Check the notebook for the lines of code where the bucket and data_key is setup. Replace the values with the ones generated in the previous step where we uploaded the facebook.zip file.
role = get_execution_role()
bucket='devopstar' # Change me
data_key = 'resources/fbmsg-analysis-gpt-2/facebook.zip' # Change me

s3 = boto3.resource('s3')
with open('facebook.zip', 'wb') as data:
    s3.Bucket(bucket).download_fileobj(data_key, data)
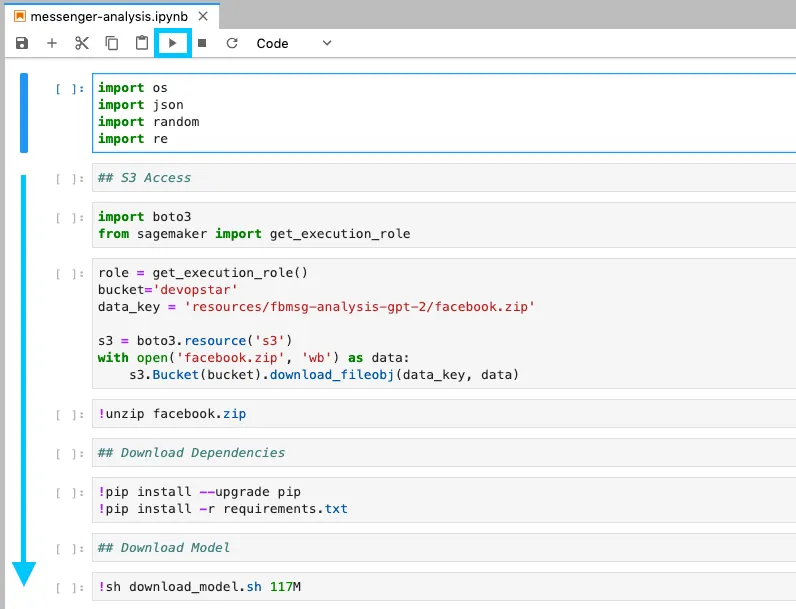
Finally click the little Go arrow at the top of the notebook (ensure that your cursor starts on the very top most cell). and continue to execute each line down to and including sh download_model.sh 117M.
To confirm the result of this, check the file browser on the left and you should notice three new files / directories show up.
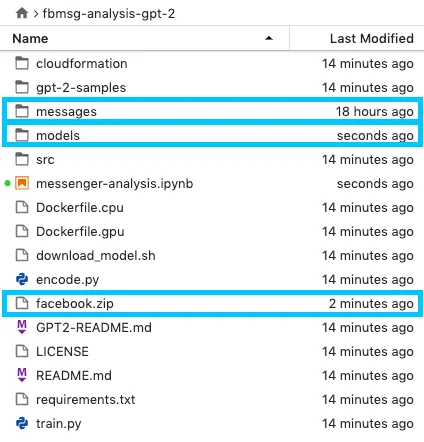
These are:
- Facebook zip file
- Unzipped messages directory from Facebook zip
- Models directory with the GPT-2 model
Tweak GPT-2 Model
The environment is now setup and ready to be used to train / tweak the GPT-2 model. The following steps are just going to require us to step through using the Go arrow at the top of the notebook. However we will briefly go over each block to describe what’s happening.
Parse Messages
files = []
for p, d, f in os.walk('messages/inbox'):
    for file in f:
        if file.endswith('message.json'):
            files.append(f'{p}/{file}')

len(files)
Each conversation folder is turned into a list by exploring the message/inbox directory. Then a couple helper functions are loaded into memory whose job it is to assist with parsing the Facebook message format.
Two versions of the following function are also loaded in (create_file, create_specific_file). Each of these functions can be used to parse the text corpus in a slightly different manner.
def create_file(files=files):
    text_corpus = ''
    banned_names = ()
    for file in files:
        with open(file, 'r') as f:
            try:
                msgs = json.load(f)['messages']
                msgs.reverse()
            except:
                pass
            else:
                if not test_mostly_cyrilic(msgs) and not any(bn in file for bn in banned_names):
                    for msg in msgs:
                        try:
                            content = fix_encoding(msg['content'])
                            to_add  = f"({msg['timestamp_ms']}) {msg['sender_name']}: {content}\n"
                            if not find_cyrilic(to_add):
                                text_corpus += to_add
                        except KeyError:
                            pass
                    print(file)

    text_corpus += '\n\n'
    with open('fb-cleaned.txt', 'w') as f:
          f.write(text_corpus)
Running the following line will generate the fb-cleaned.txt file which contains a massive list of all the sentences within the message folders.
NumPy Encode
Encoding the cleaned data into a NumPy data structure will help speed up the training process. This is done by running the following line
!PYTHONPATH=src ./encode.py --in-text fb-cleaned.txt --out-npz fb-cleaned.txt.npz
Train & Sample
Begin training the tweaked model by running the following line
!PYTHONPATH=src ./train.py --dataset fb-cleaned.txt.npz --sample_every=250 --learning_rate=0.0001 --stop_after=251
The training process will go on for a very long time, however after every 250 cycles we’ll receive a sample output. This sample can assist us in understanding how the model is progressing as we train; giving us the option to stop when we are happy with the current results.
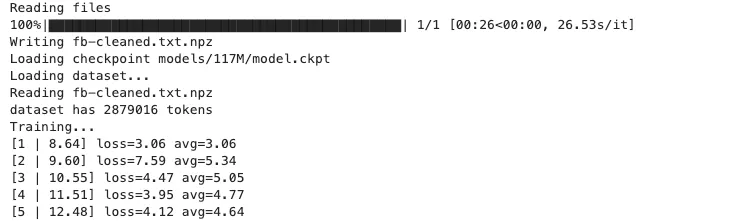
It’s likely that the first sample sets will result is nonsensical outputs!

500 cycles
Give it some time and you’ll slowly notice it improving.

Re-run on trained model
If you would like to run the model against your trained model after finishing training, simply run the remaining commands (seen below). This will copy in the checkpoints to the 117M model folder and then sample based on those files.
mv checkpoint/run1/* models/117M/
!python3 src/generate_unconditional_samples.py --top_k 40 --temperature 0.9
SageMaker Cleanup [IMPORTANT]
Once finished with the notebook its extremely important that you shut it down or delete everything so you aren’t paying the $1.20+ per hour cost.
Notebook Instance Cleanup
Simply shutdown and optionally delete the notebook from the SageMaker UI. Alternatively you can run the following aws-cli command to remove the notebook
aws sagemaker delete-notebook-instance \
    --notebook-instance-name "fbmsg-gpt-2"
Code Repository Cleanup
Optionally delete the code repository using the SageMaker UI. Alternatively you can run the following aws-cli command to remove the repository
aws sagemaker delete-code-repository \
    --code-repository-name "t04glovern-gpt-2"
Execution Role Cleanup
Run the following aws-cli command to remove the stack created for the Execution role for SageMaker
aws cloudformation delete-stack \
    --stack-name "fb-msg-gpt2-sagemaker-role"