Amazon Alexa controlled IoT Traffic Lights
NOTE: This project ended up with a slightly more complex architecture than I’d initially envisioned. Due to this, I’ve purposely excluded some of the tutorials in the interest of time. The full instructions for the entire project can be found in the Git repo if you would like to get more context as to why and how some parts of the final product come together the way they do.
Overview
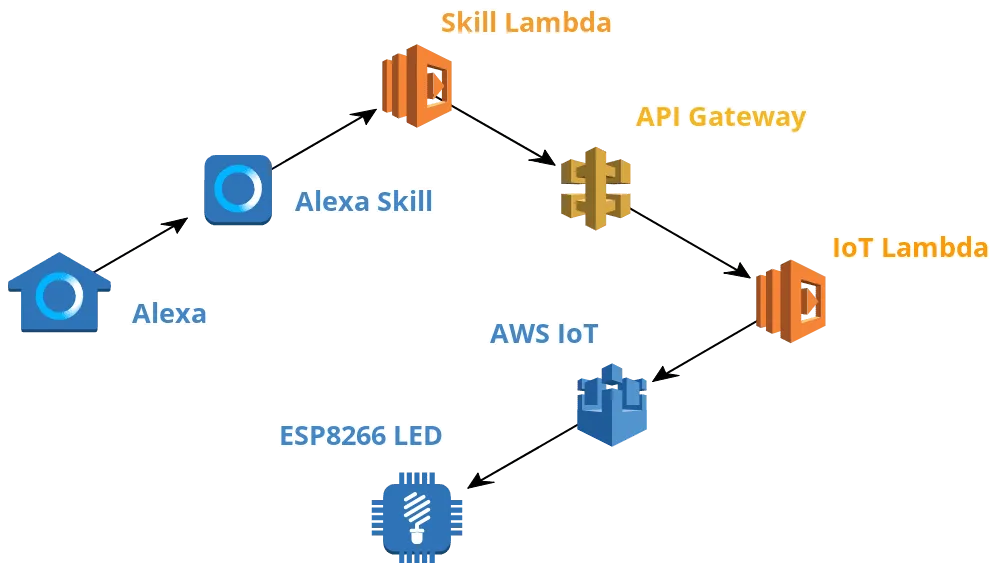
The following post outlines the process followed to develop a simple Alexa skill using the ASK SDK. This skill is triggered when a user utters a colour to be displayed on the traffic light system implemented on an ESP8266 and connected to AWS IoT over MQTT. To ensure security, this colour change functionality is controlled over a Serverless API.
Alexa Skill Kit
The Alexa Skill Kit (ASK SDK) is NodeJS, Java and Python based framework for building out engaging Alexa skills more easily by abstracting out a lot of the boilerplate code. The benefits of ASK aren’t super apparent until you’ve gone through the process of building complex skill trees from scratch (which I don’t recommend anyone doing).
Project Creation
To start building a new Alexa skill using the ASK SDK first install the ask-cli using npm, then initialize the ask toolchain and authenticate it with your AWS Account.
npm install -g ask-cli
ask init
Create a new project by running the following
ask new
Enter the details below to initialize the project with the same settings used throughout the tutorial.
- Please select the runtime: Node.js V8
- List of templates you can choose: Hello World
- Please type in your skill name: alexa-iot-traffic-lights
Project Restructure
For now, ignore all the various files created for you and jump straight into the lambda folder. This is the skills backend logic that gets run when Alexa is called for your skill. The default structure for the project also has all the logic blobbed into one file index.js. I Hate this! If it was done this way to reduce complexity for newcomers I believe it has the opposite effect. Go ahead and create a new set of folders and files for each of the intents we’ll have in the project.
.
├── lambda
├──── custom
├────── intents
├──────── base
├────────── Errors.js
├────────── Help.js
├────────── Launch.js
├────────── SessionEnd.js
├────────── Stop.js
├──────── LightChange.js
├────── index.js
The process then has us moving each of the Intents within the index.js to its respective file, placing the two functions from each one inside a block like the following
"use strict";

module.exports = {
  canHandle(handlerInput) {
    // Code
  },
  handle(handlerInput) {
    // Code
  }
}
An example of this can be seen below with the Error handler being moved to intents/base/Errors.js
"use strict";

module.exports = {
  canHandle() {
    return true;
  },
  handle(handlerInput, error) {
    console.log(`Error handled: ${error.message}`);

    return handlerInput.responseBuilder
      .speak('Sorry, I can\'t understand the command. Please say again.')
      .reprompt('Sorry, I can\'t understand the command. Please say again.')
      .getResponse();
  }
}
Within the original index.js we’re now able to simply pull in the intents from their modularised locations and add them to the .addRequestHandler() builder function under a shorter name.
/* eslint-disable  func-names */
/* eslint-disable  no-console */

const Alexa = require('ask-sdk-core');

// Base Intent Handlers
const Errors = require('./intents/base/Errors');
const Help = require('./intents/base/Help');
const Launch = require('./intents/base/Launch');
const SessionEnd = require('./intents/base/SessionEnd');
const Stop = require('./intents/base/Stop');

// Custom Intents
const LightChange = require('./intents/LightChange');

const skillBuilder = Alexa.SkillBuilders.custom();

exports.handler = skillBuilder
  .addRequestHandlers(
    Help,         // Base intents
    Launch,
    SessionEnd,
    Stop,
    LightChange   // Custom Intents
  )
  .addErrorHandlers(Errors)
  .lambda();
NOTE: The original HelloWorldIntent is just being renamed LightChangeIntent.
In the Interest of Time
We’re not going to be going over every line of code for this project here. Instead, I recommend you copying across the contents of the following directories/files into your project.
.
├── lambda/
├── models/
├── .editorconfig
├── .gitconfig
├── sim.sh
├── skill.json
If you’re really keen to learn and understand what each line of code does, I highly recommend checking out my course Alexa Skills Kit: Practical Chatbot Development.

Content Covered:
- Localisation for various translations
- DynamoDB Persistence layer
- Attribute management for local and persistent state
- Dialogue prompting when information is required from users
Alexa Skill Deploy
Skill deployment with ASK SDK is extremely easy and can be done with one command run from the top level folder (the one with skill.json in it).
ask deploy
Once deployed you’re able to test the skill easily by using the simulate tool that ships with ASK CLI.
ask simulate -t "open traffic light changer"  -l "en-US"  --force-new-session
ask simulate -t "set lights to blue"          -l "en-US"
This is however likely to fail due to there being a missing piece of code from the final skill that we’ll have to go back and populate later. Hint, its within the _utils.js_ file
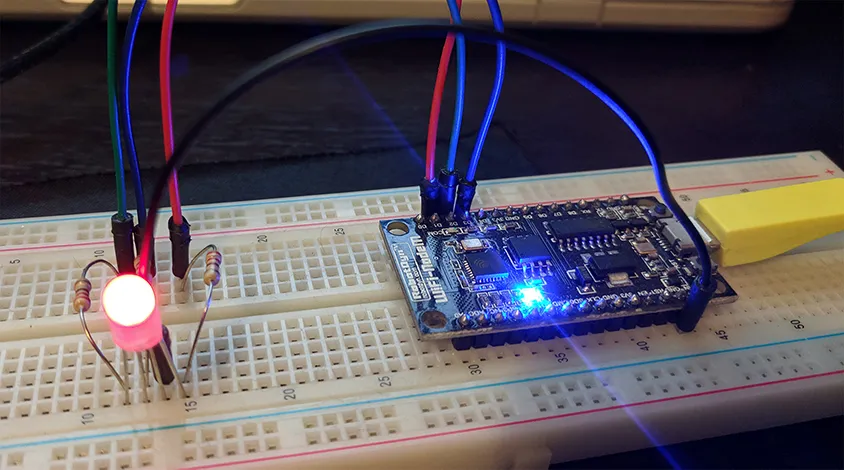
IoT Device
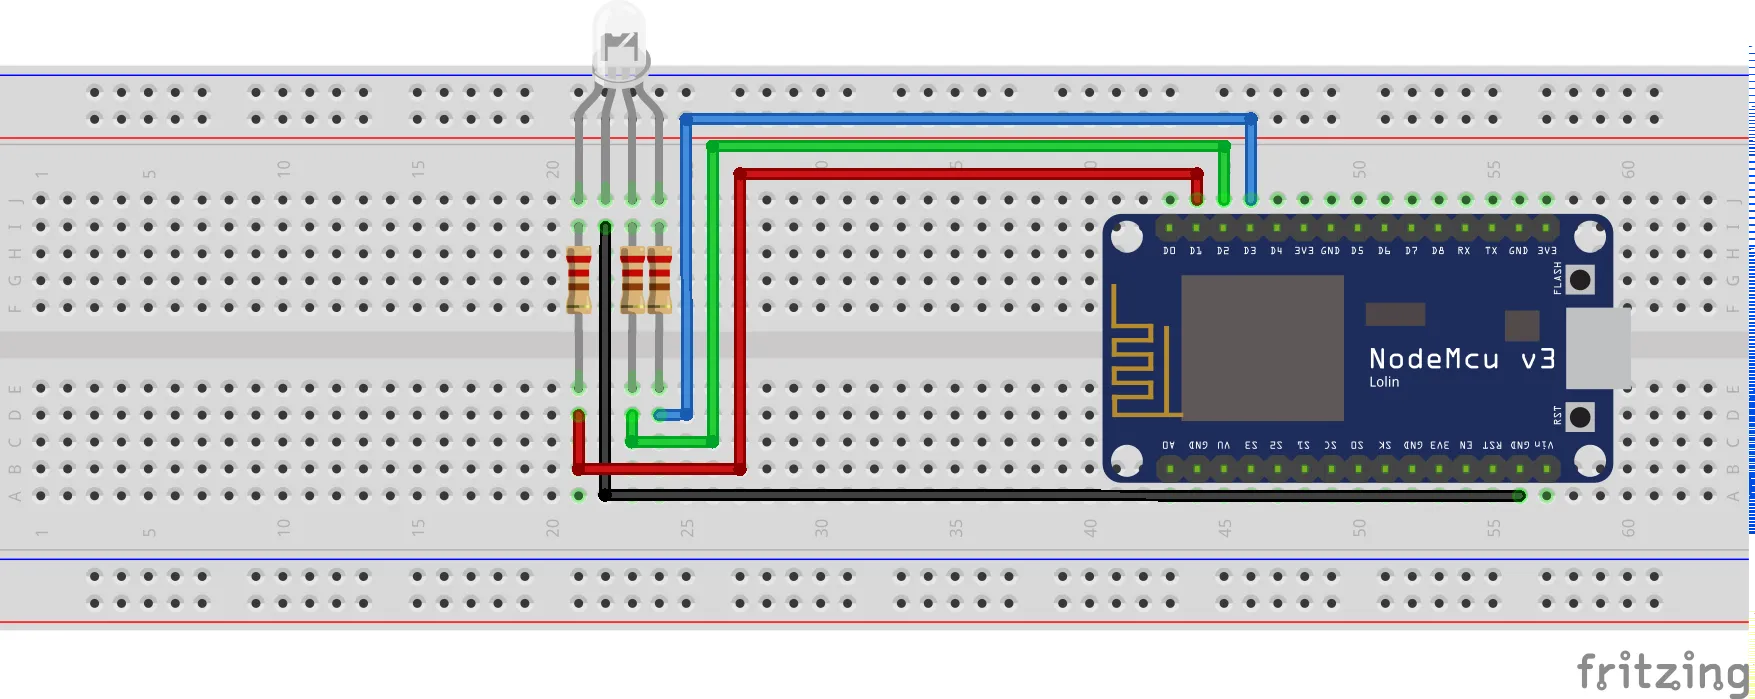
The IoT device that we will be controlling today is an ESP8266 NodeMCU. If you’ve read my previous post AWS Sumerian Magic Cube then you might be aware that these little embedded devices are my go-to for IoT. Below is the circuit diagram for the project
Certificate Vending Machine
This project makes use of the IoT Certificate Vending Machine. Rather than repeat myself I would recommend checking out a previous blog post Create a Private VPN using AWS IoT Button, SNS & CloudFormation where we go over in detail how to set it up. Once set up you’ll have certificates that will be used in the flashing of the firmware piece of the project.
Firmware Flashing
The specific details for flashing the board will not be covered in this post, however, checking the README within the GitHub project will overview the specifics. At a high level, you will need to perform the following steps
- Download PlatformIO for VSCode
- Update/Create backend/aws-iot-rgb/src/main.h with your AWS MQTT Endpoint, client / thing name, PubSub topics & WiFi details
#ifndef MAIN_H

// Wifi Details
const char* ssid = "WiFi SSID";
const char* password = "wifi-pass";

const String thing_id = "devopstar-led-01";

// AWS MQTT Details
const char* aws_mqtt_server = "xxxxxxxxxxxx.iot.us-east-1.amazonaws.com";
const char* aws_mqtt_thing_topic_pub = "devopstar/alexa/devopstar-led-01";
const char* aws_mqtt_thing_topic_sub = "devopstar/alexa/esp8266-group";

#endif
- Upload Certificates to the ESP8266
## create the cert files based on the output from the Cert vending machine
openssl x509 -in aws/certs/certificate.pem.crt -out data/cert.der -outform DER
openssl rsa -in aws/certs/private.pem.key -out data/private.der -outform DER
openssl x509 -in aws/certs/root-CA.pem -out data/ca.der -outform DER
## Then upload the certificates using SPIFFS
pio run -t uploadfs
- Build and Compile code to the device
Once you have these steps completed you should be able to manually publish to the devopstar/alexa/esp8266-group AWS IoT topic and have the RGB LED light up based on whether it receives an R, G or B.
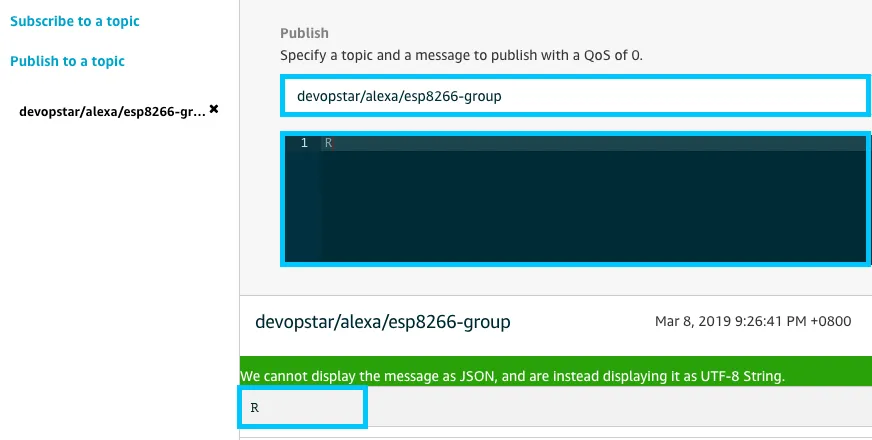
The results of the published payload should result in the RGB LED changing to the Red colour.
AWS IoT API (Serverless)
The final piece of the puzzle to get everything interconnected now is to deploy a Serverless API that will be responsible for receiving a POST request from our Alexa skill and then publishing it to the AWS IoT topic on Alexa’s behalf.
Serverless Setup
We’ll be performing a really similar process to the one outlined in the previous post Dyson Fan Control over MQTT via Serverless. First ensure that the serverless CLI tools are installed, then initialize a brand new project making use of the aws-nodejs template
## Serverless CLI install
npm install -g serverless
serverless config credentials --provider aws --key $ACCESS_KEY_ID --secret $SECRET_KEY

## Project Setup
mkdir aws-iot-api
cd aws-iot-api
serverless create --template aws-nodejs --name aws-iot-api
Move onto the serverless.yml file next within the created folder and add the following to it
service: aws-iot-api

provider:
  name: aws
  iamRoleStatements:
    - Effect: "Allow"
      Action:
        - "iot:Publish"
      Resource:
        Fn::Join:
          - ":"
          - - "arn:aws:iot"
            - Ref: "AWS::Region"
            - Ref: "AWS::AccountId"
            - "topic/devopstar/alexa/esp8266-group"
  runtime: nodejs8.10
  environment:
    IOT_ENDPOINT: xxxxxxxxxxxxx.iot.us-east-1.amazonaws.com
    IOT_TOPIC: devopstar/alexa/esp8266-group

functions:
  lights:
    handler: handler.lights
    events:
      - http:
          path: lights
          method: post
The provides the foundation for securing API access to our AWS IoT topic. It also includes the definitions for a POST API endpoint called lights that needs to be defined and set up to handle the incoming payload containing a Colour and publish the colour code for us to AWS IoT. To achieve this update the handler.js file to include the following.
'use strict';

const AWS = require('aws-sdk');

const iotEndpoint = process.env.IOT_ENDPOINT;
const iotTopic = process.env.IOT_TOPIC;

const iotdata = new AWS.IotData({
  endpoint: iotEndpoint
});

const colorMap = {
  "red": "R",
  "blue": "B",
  "green": "G"
};

module.exports.lights = (event, context, callback) => {
  var body = JSON.parse(event.body)
  var color = body['color'];
  var params = {
    topic: iotTopic,
    payload: colorMap[color],
    qos: 0
  };

  return iotdata.publish(params, function (err, data) {
    var response;
    if (err) {
      console.log(err);
      response = {
        "statusCode": 200,
        "body": JSON.stringify({
          "message": 'IoT Publish failed: ' + err,
          "status": 'failure'
        }),
        "isBase64Encoded": false
      };
    } else {
      response =  {
        "statusCode": 200,
        "body": JSON.stringify({
          "message": 'Publish Successful of color: ' + color,
          "status": 'success'
        }),
        "isBase64Encoded": false
      };
    }
    callback(null, response);
  });
};
Deploy & Test
To deploy your new serverless API simply run the following:
serverless deploy
Take note of the output from the successfully deployed API specifically the endpoint as this will need to be updated in the Alexa skill shortly.
Service Information
service: aws-iot-api
stage: dev
region: us-east-1
stack: aws-iot-api-dev
resources: 10
api keys:
  None
endpoints:
  POST - https://xxxxxxxxxx.execute-api.us-east-1.amazonaws.com/dev/lights
functions:
  lights: aws-iot-api-dev-lights
layers:
  None
Serverless: Removing old service artifacts from S3...
Testing the endpoint can be done with the serverless command below:
serverless invoke -f lights --data '{ "color":"blue" }'
Alexa Skill Update
Wrapping this tutorial up now we have to go back to utils.js within the lambda/custom/ folder and update the POST endpoint with the newly created one from the previous step
"use strict";

const request = require("request");

module.exports = {
  changeLightColor: function (color, callback) {

    var options = {
      method: 'POST',
      url: 'https://xxxxxxxxxx.execute-api.us-east-1.amazonaws.com/dev/lights',
      headers: {
        'cache-control': 'no-cache',
        'Content-Type': 'application/json'
      },
      body: {
        'color': color
      },
      json: true
    };

    request(options, function (error, response, body) {
      if (error) {
        callback();
      }
      callback(body.status);
    });
  }
}
Alexa Testing
Redeploy the updated Alexa skill and test the functionality by running the following commands
ask deploy

ask simulate -t "open traffic light changer"  -l "en-US"  --force-new-session
ask simulate -t "set lights to blue"          -l "en-US"
The output presented in your console should look like the following
"invocationResponse": {
  "body": {
    "version": "1.0",
    "response": {
      "outputSpeech": {
        "type": "SSML",
        "ssml": "Color changed to blue."
      },
      "reprompt": {
        "outputSpeech": {
          "type": "SSML",
          "ssml": "Want to change the color of the lights? Say: set lights to blue"
        }
      },
      "shouldEndSession": false,
      "type": "_DEFAULT_RESPONSE"
    },
    "sessionAttributes": {},
    "userAgent": "ask-node/2.4.0 Node/v8.10.0"
  }
}
The LED on the ESP8266 IoT circuit should also change to Blue. Check the demo below for an example of the completed skill.