This is part 2 of a 2 part series on AWS S3 Access Grants. If you haven't read the first part, I recommend you do so before continuing with this post: Let's Try - AWS S3 Access Grants.
I want to start with a scenario - You have a client application that needs to access data in S3. The client application is used by multiple groups of users, each group requiring access to different data in S3. Typically, you would have designed a solution like one of the following:
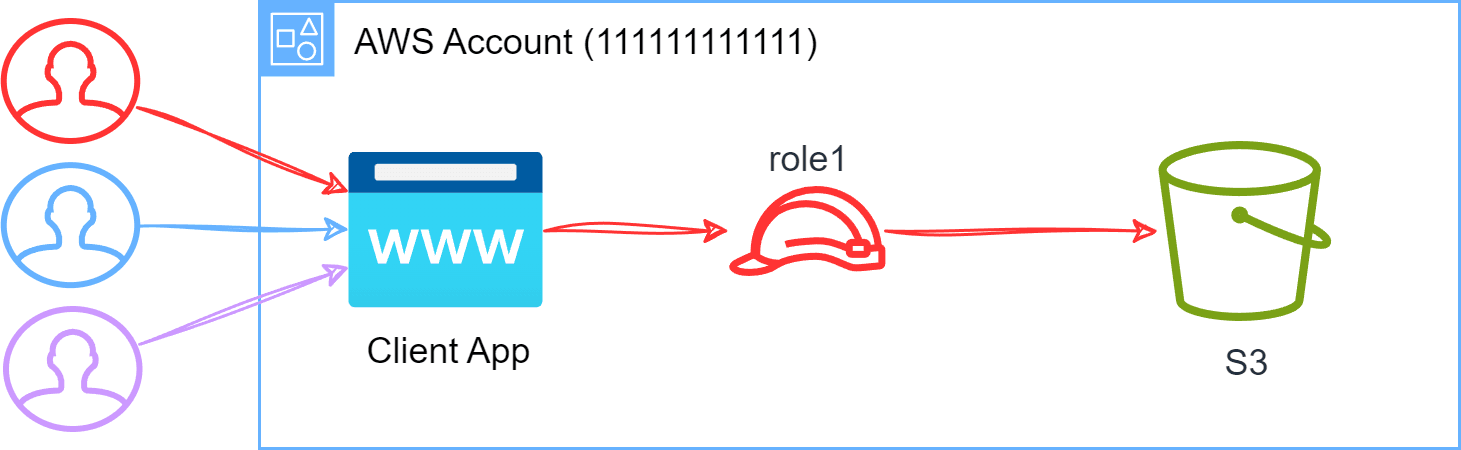
Single IAM Role for S3 Access: The clients authenticate with the application, and the application uses a single IAM role to access S3 data. This solution likely resorts to handling access control to different data in S3 within the application itself - while the actual IAM role used has broad access to all data in the bucket.
A client application using a single IAM role for S3 access
Pros:
Simple to understand and implement.
Cons:
Broad access to all data in S3.
Puts the onus on the application to manage access control to different data in S3.
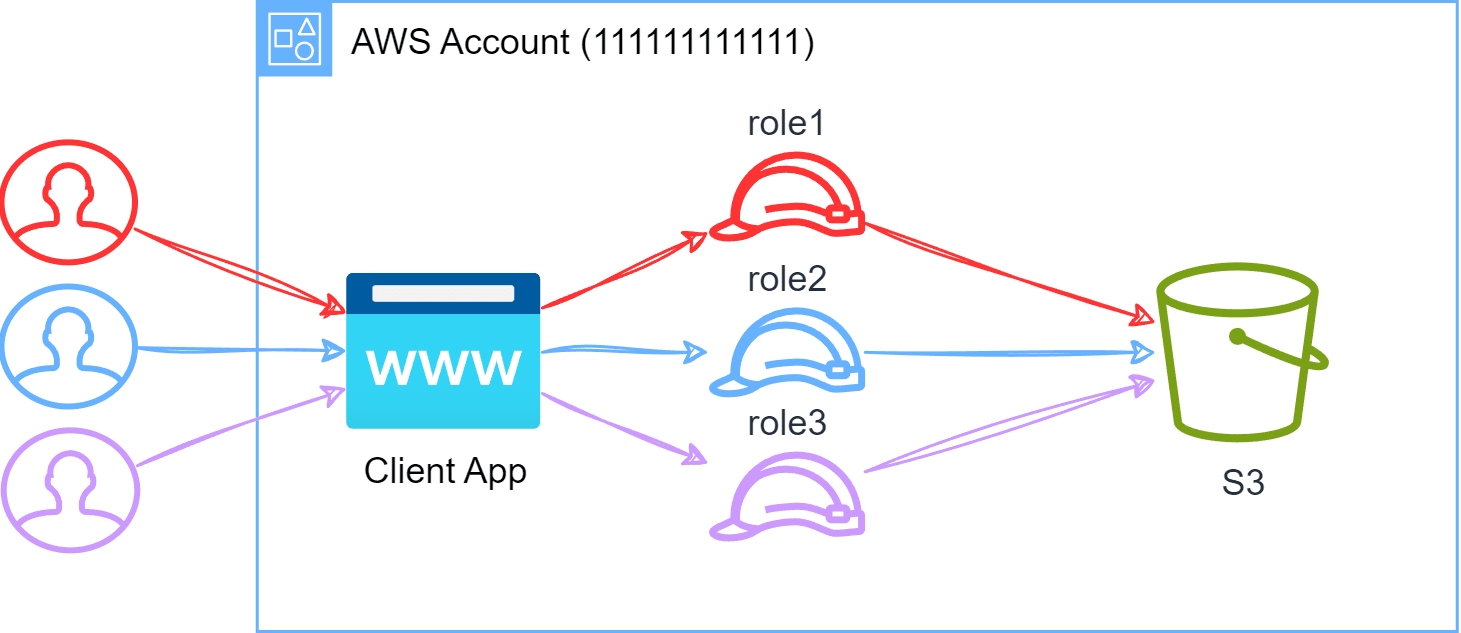
Multiple IAM Roles for S3 Access: The clients authenticate with the application, and based on the group they belong to, they assume a role either via web identity federation or the application performs the role assumption on their behalf. This solution is more secure than the previous one as it allows for more granular access control to different data in S3. It however means that the permissions for data need to be managed in roles coupled with the application or bucket resource policies.
A client application using multiple IAM roles for S3 access
Pros:
This solution allows for more granular access control
Cons:
It however means that the permissions for data need to be managed in roles coupled with the application
If other applications in the organization access data in the same way for the same users, then multiple roles need to be managed.
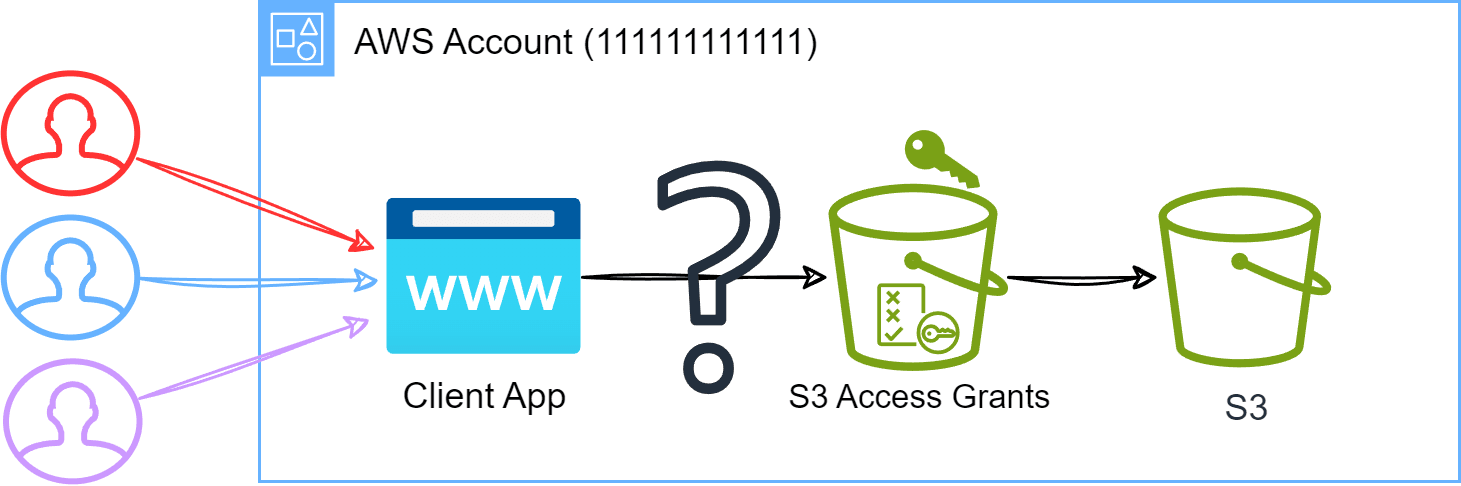
In the previous post, I introduced the concept of S3 Access Grants and how they can be used as a way of mapping user/group-based permissions to S3 data in a centralized way that can be reused across multiple client applications and AWS services. For this, we would need a way to map our users who authenticate with the client application to the S3 Access Grants!
Client application leveraging S3 Access Grants for S3 access in some way
Thanks to S3 Access Grants combined with IAM Identity Center Trusted Identity Propagation this is now possible! Trusted Identity Propagation is all about getting a user's identity from an external identity provider (IdP) into AWS, and then having services in AWS provide access based on who the user is.
📖
IdP
An Identity Provider (IdP) manages user identities outside of AWS and grants them permissions to access AWS resources. This allows organizations to use their existing identity systems, such as corporate directories, for managing AWS access without creating IAM users in AWS.
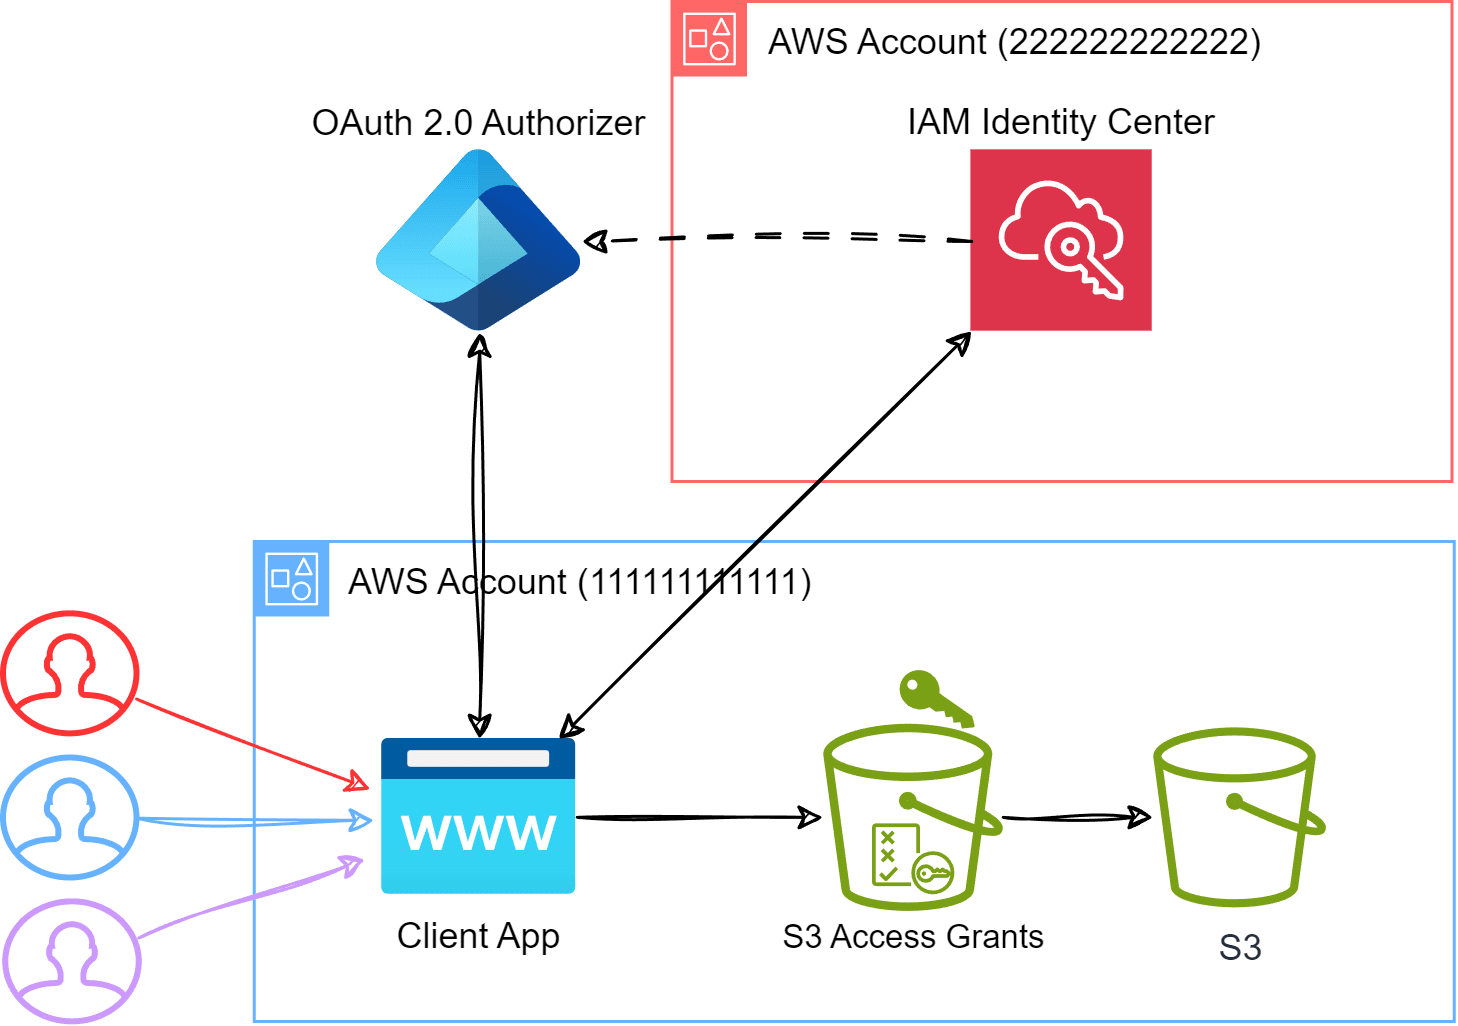
In this post, we will work towards setting up the solution as shown below:
Client application leveraging AWS IAM Identity Center Trusted identity propagation
The outcome of the setup outlined above is that when an authenticated user accesses data through a client application there is a clear audit trail of who accessed what data in S3 and not just the role that was assumed. This is a huge deal for governance and audit purposes.
You will need the following AWS accounts to follow along with this guide
I have created the following badges to help you keep track of which accounts should be used for different steps in this guide.
An AWS IAM Identity Center (IIC) account
🔑
Please run this step with the following account
AWS IAM Identity Center (222222222222)
An account where AWS S3 Access Grants can be set up (preferably not in your AWS IAM Identity Center account)
🔑
Please run this step with the following account
AWS S3 Access Grants (111111111111)
Setting up an OAuth 2.0 Authorizer
📖
OAuth 2.0
OAuth 2.0 (Open Authorization 2.0) is a protocol for authorization, allowing third-party applications to access user resources without sharing login credentials. It enables secure access to resources such as APIs by using access tokens.
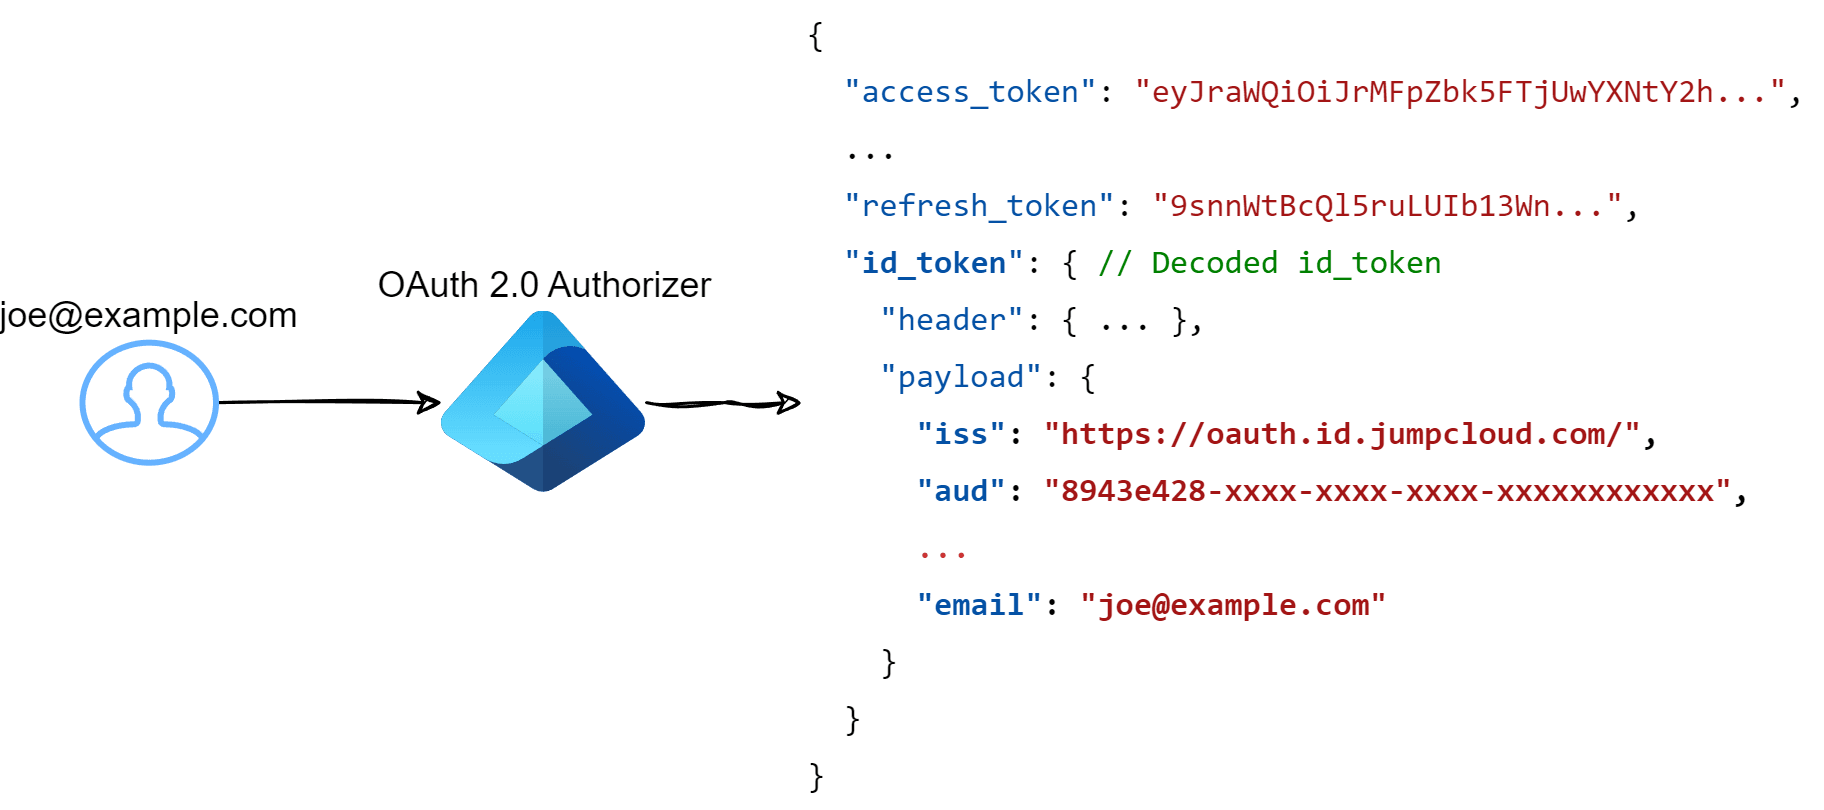
A Prerequisite for this setup is to have an OAuth 2.0 authorizer of some kind. Ultimately this can be any OAuth 2.0 provider, but for this example, I will be using JumpCloud (because it's free and easy to set up). In most cases, you will probably be using something like Entra ID (Azure), Okta, or something else.
As long as the OAuth 2.0 provider can provide a JWT token with the user's email address in the claims, then it should work for this guide.
OAuth 2.0 authorization token flow
AWS IAM Identity Center user setup
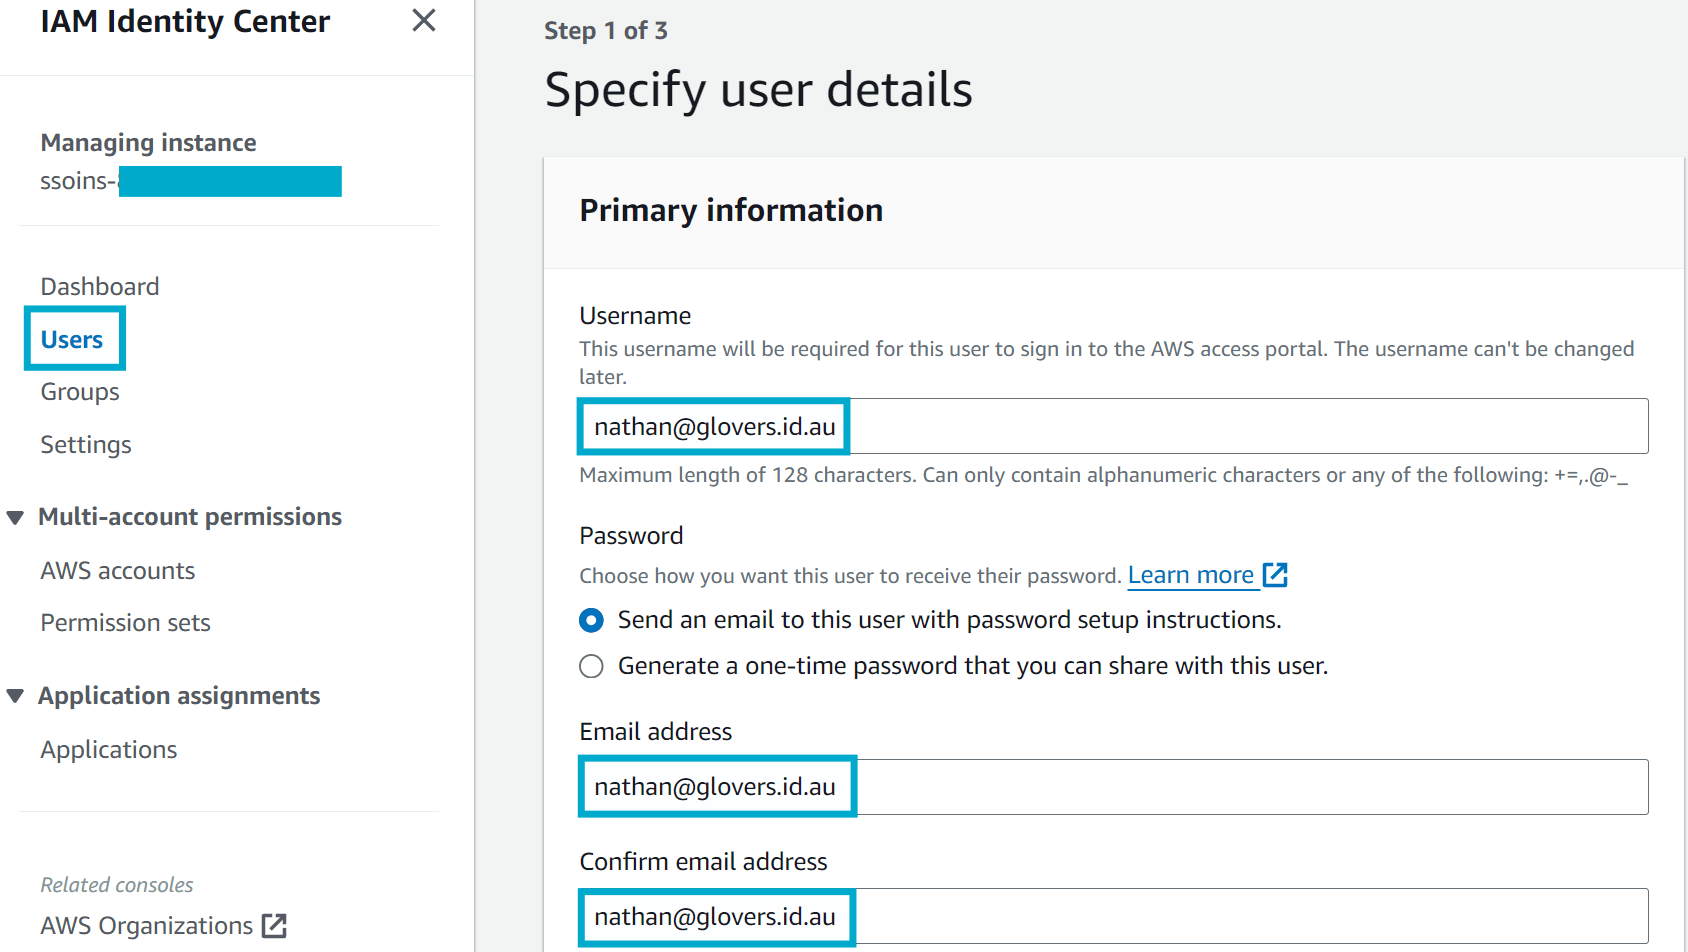
For this guide, we will need to have a user in AWS IAM Identity Center that matches the email address of the user in JumpCloud. Typically you would set up your IdP to automatically provision users (SCIM) in AWS IAM Identity Center, but for this guide, we will manually create a user.
Note: If you are bringing your own IdP (not necessarily JumpCloud) there is a good chance you already have automatic provisioning setup - if this is the case, you can skip this step.
🔑
Please run this step with the following account
AWS IAM Identity Center (222222222222)
Log in to the AWS IAM Identity Center account and navigate to the Users section. Click Add User and create a user with the same email address as the user in JumpCloud.
Create a user in AWS IAM Identity Center
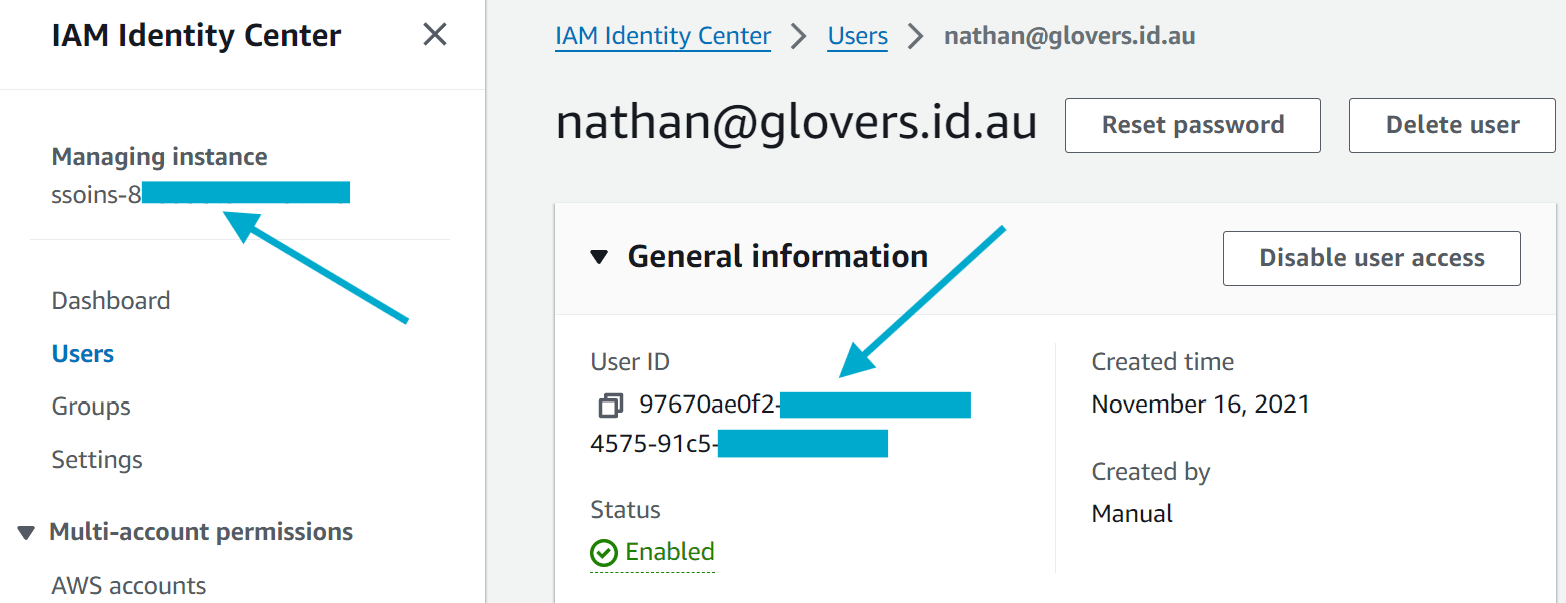
Once the user is created, you will notice that under General information your user has a User ID. There are two things on this page that you should take note of for later:
User ID: This is the user's unique identifier in the AWS IAM Identity Center.
IAM Identity Center ID: This is the unique identifier for the AWS IAM Identity Center account. (top left of the page)
AWS IAM Identity Center user details
Deploy S3 Access Grants federation with Terraform
In the previous post, we set up S3 Access Grants in the AWS S3 Access Grants account. In this post are are going to build on that solution and set up trusted identity propagation between our AWS IAM Identity Center account and the AWS S3 Access Grants account.
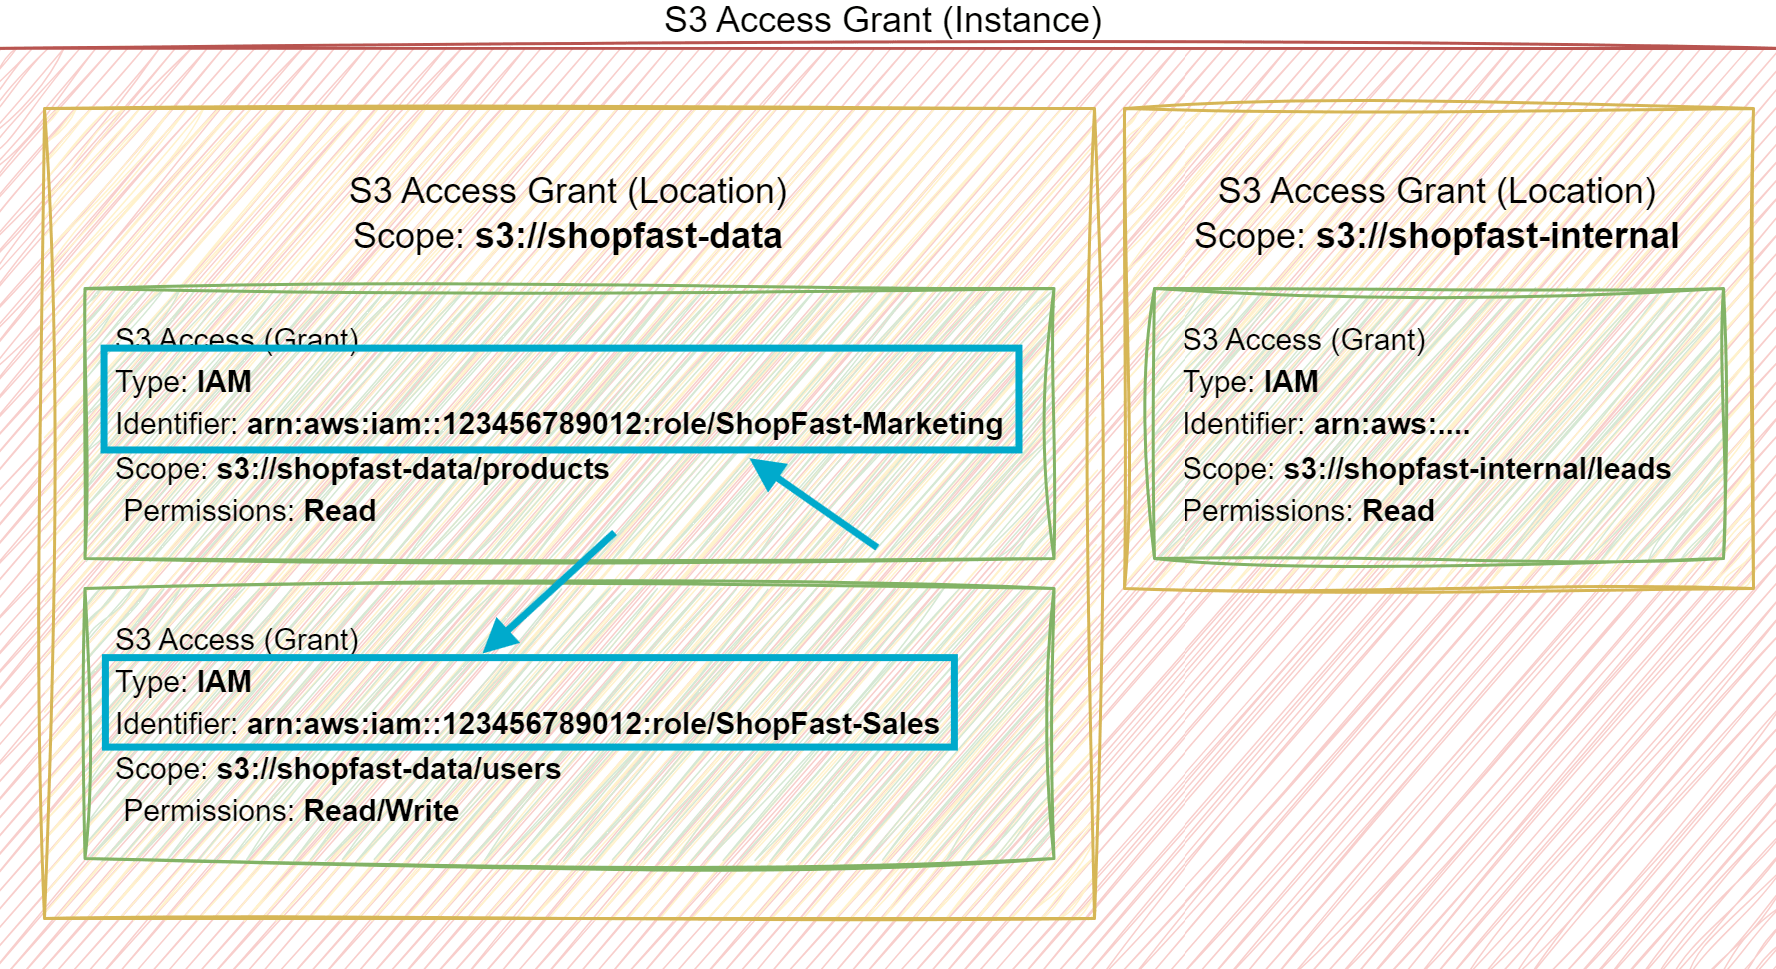
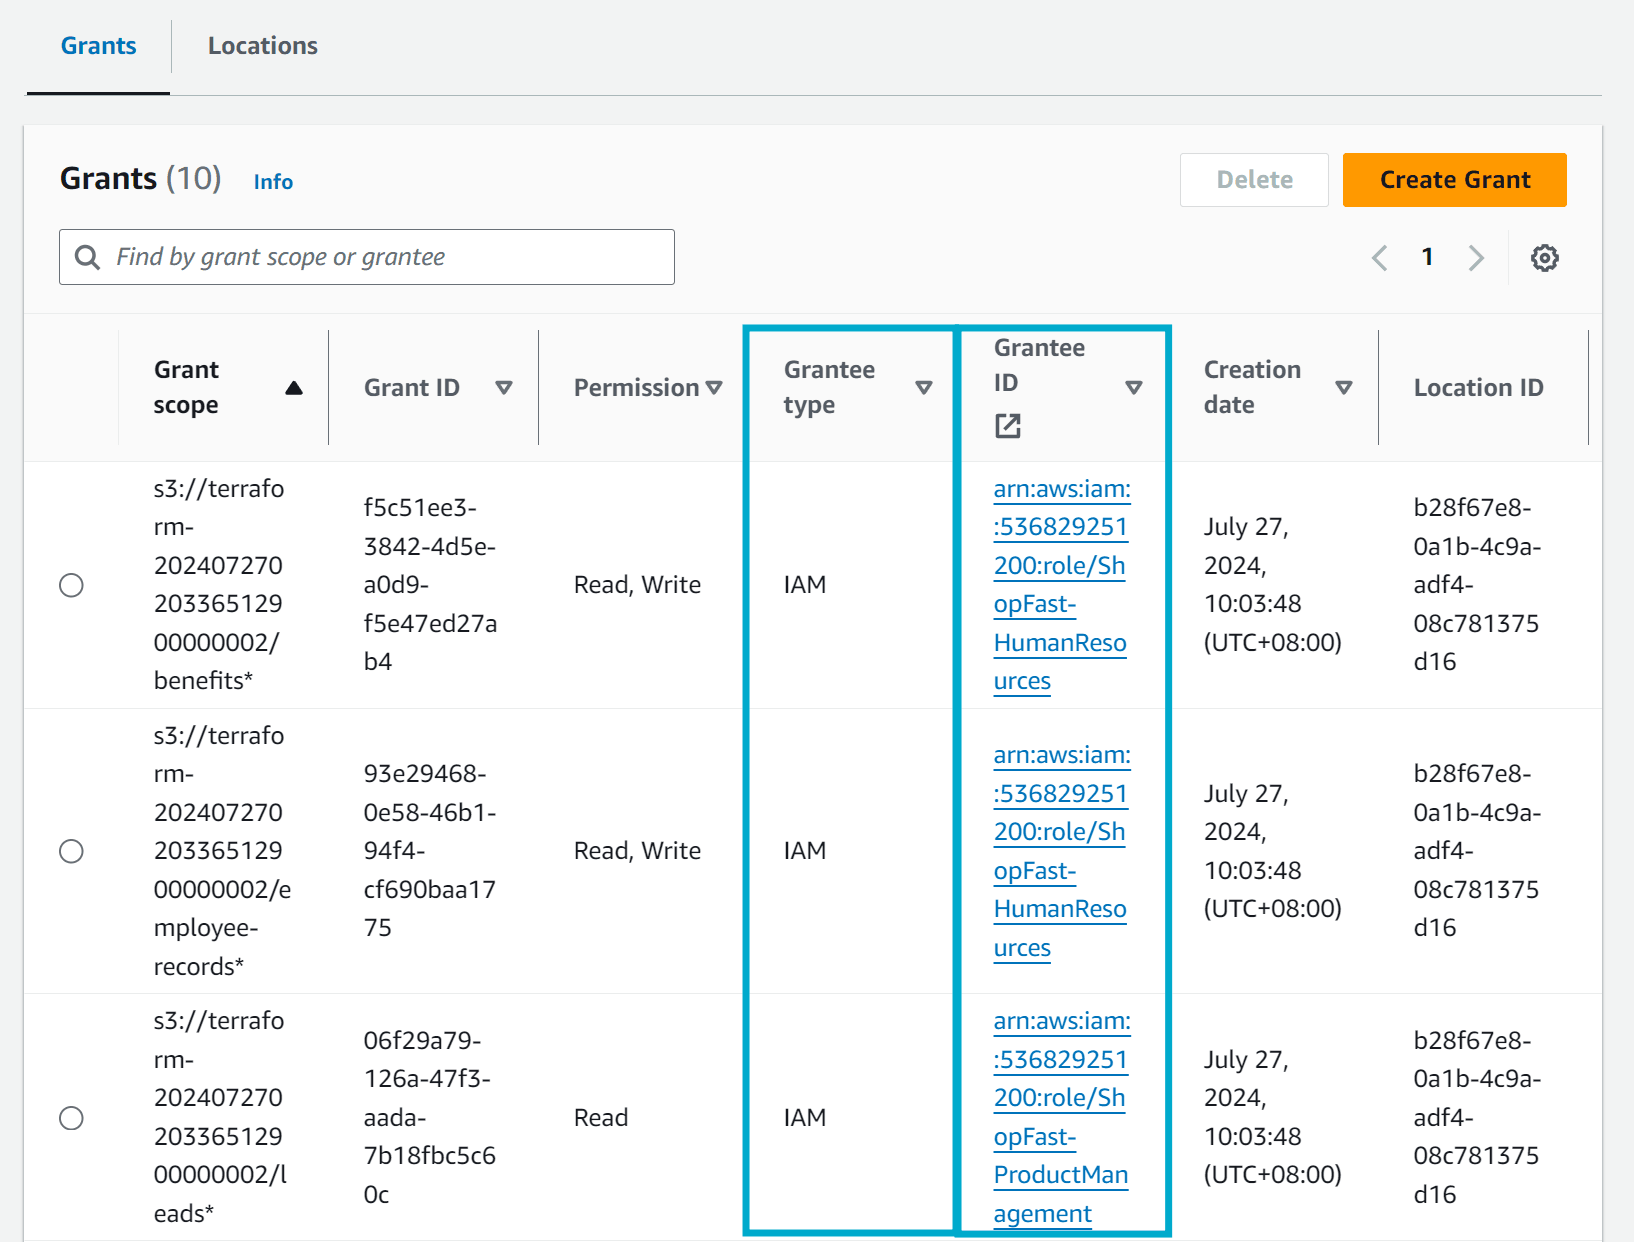
If we take a look back a the original setup, we had the following - notice that the type of grant is IAM and the grantee is an IAM role. The idea was that a given role was being assigned permissions to the S3 Access grant.
S3 Access Grant setup without federation
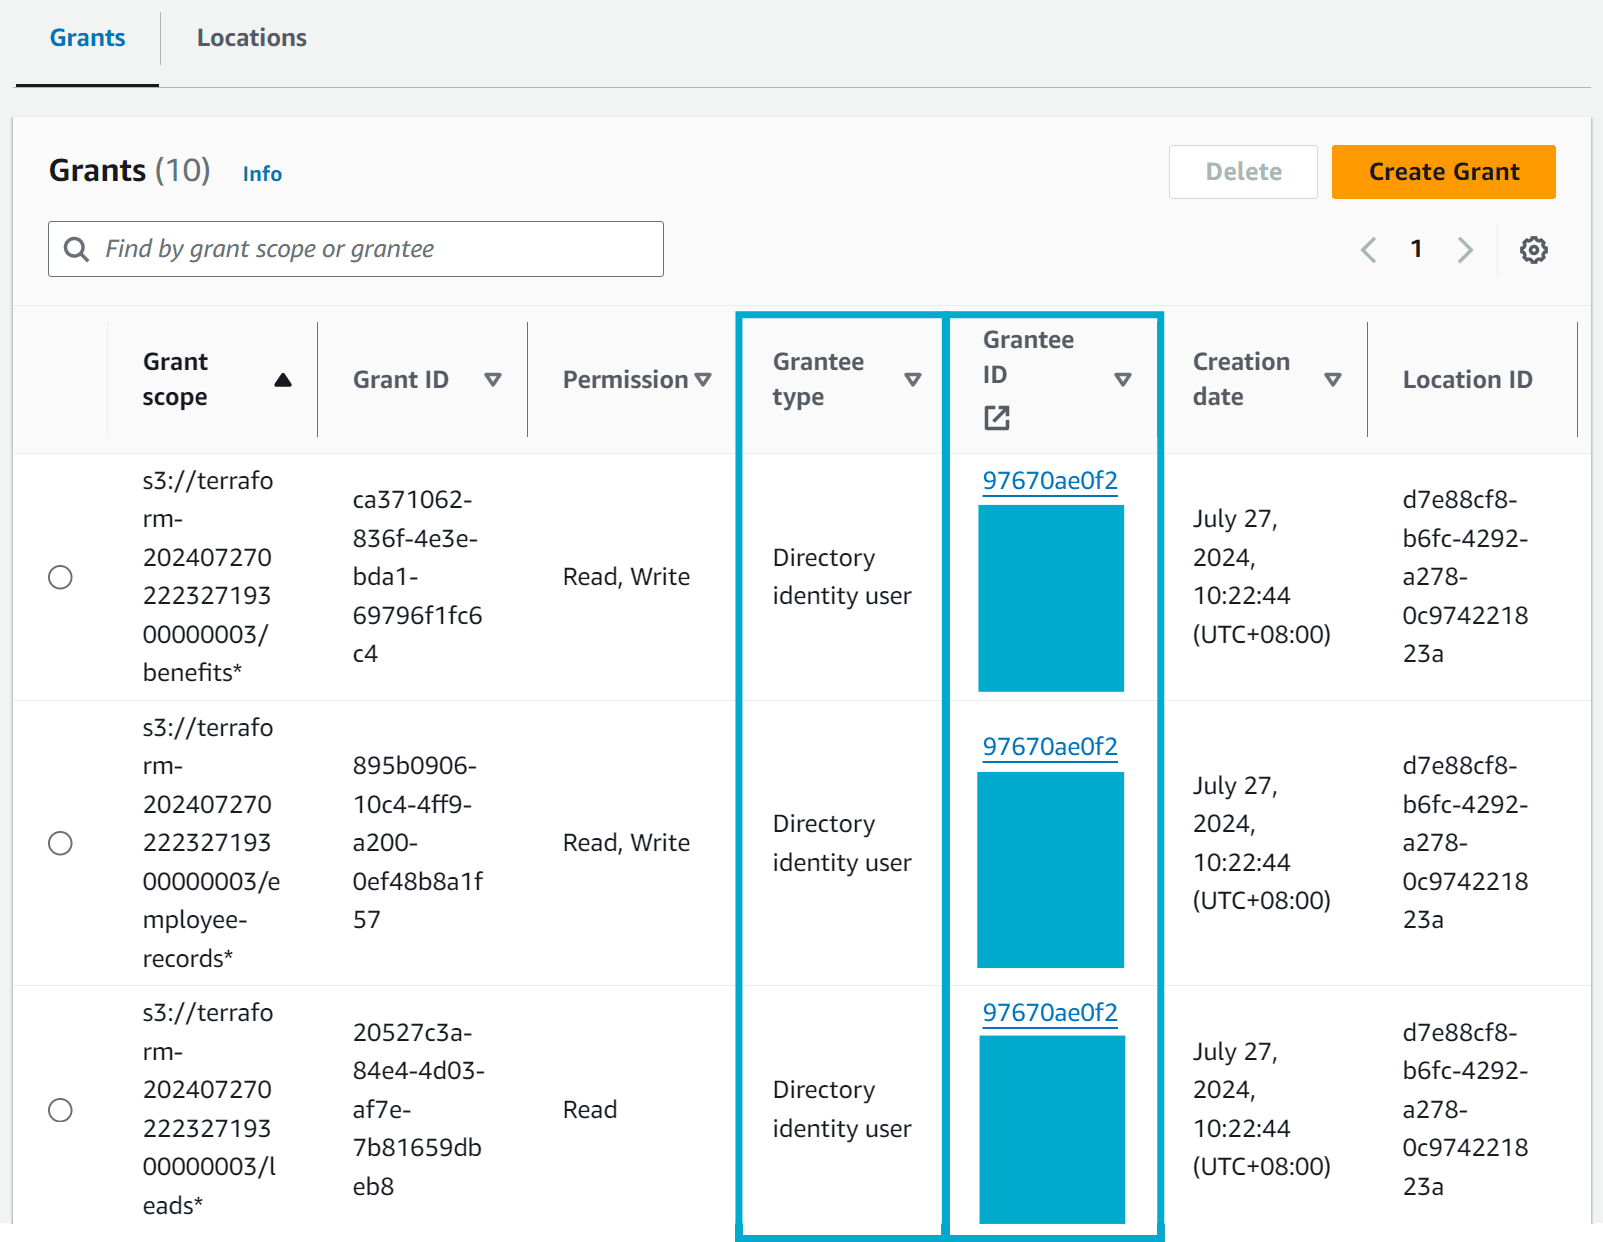
In the new setup, we are going to change the grant type to DIRECTORY_USER and the grantee will be set to the User ID of our newly created user in AWS IAM Identity Center.
Note: S3 Access Grants also support DIRECTORY_GROUP grants, which is a more pratical way of managing access to S3 data for multiple users - however for this guide we are going to keep it simple and use DIRECTORY_USER grants.
A point worth noting is that the process of setting up trusted identity propagation with S3 Access Grants is a one-time deal. Once the following core infrastructure is in place, all future configuration is just handled by the S3 Access Grants service in the form of grants and grantee mappings - so the complexity is somewhat front-loaded.
Start by cloning the following repository (if you haven't already) - this is the same repository we used in the previous post. If you haven't deployed the stack from the previous post, you can do so now.
🔑
Please run this step with the following account
AWS S3 Access Grants (111111111111)
git clone https://github.com/t04glovern/terraform-aws-s3-access-grants
cd terraform-aws-s3-access-grants

terraform init
terraform apply
Once deployed, log in to the AWS S3 Access Grants account and navigate to the S3 Access Grants console to confirm that you can see the IAM grants/grantees that were created in the previous post.
S3 Access Grants console with IAM grant
Now we can move on to modifying the terraform stack to instead use the User ID of the user in AWS IAM Identity Center as the grantee. Create a terraform.tfvars file in the root of the repository with the following content:
sso_instance_id="ssoins-YYYYYYYYYYYYYYYYY"# Your IAM Identity Center IDsso_grantee={"type": "DIRECTORY_USER",
"id": "97670ae0f2-XXXXXXXX-XXXX-XXXX-XXXX-XXXXXXXXXXXX"# Your IAM Identity Center User ID}
Note: If you decide to use a different grantee type (e.g. DIRECTORY_GROUP) you can modify the sso_grantee object accordingly - just make sure the id is the correct ID for a group in IAM Identity Center.
Run terraform destroy (due to an eventual consistency issue with S3 Grant locations, right now we have to delete), then apply to update the grants with the new grantee.
terraform destroy
terraform apply
Once again, navigate to the S3 Access Grants console and confirm that you can see the IAM grants/grantees that were created in the previous post.
S3 Access Grants console with directory user grant
Now we need to set up the trusted identity propagation between the AWS IAM Identity Center account and the AWS S3 Access Grants account. Before we do this, however, we should export some environment variables to make our lives easier later on.
We are going to store the following environment variables in a .env file so that they can be easily loaded into our shell environment later on.
To deploy trusted identity propagation, we need to authenticate with the AWS IAM Identity Center account and then run the following commands to deploy a second terraform stack.
🔑
Please run this step with the following account
AWS IAM Identity Center (222222222222)
Note: If you are using a different IdP, you should create a terraform.tfvars file in the federation directory with the following content: issuer_url = "<YOUR_ISSUER_URL>"
# Authenticate with the AWS IAM Identity Center accountexportAWS_ACCESS_KEY_ID=XXXXXXXXXXXX
exportAWS_SECRET_ACCESS_KEY=YYYYYYYYYYYYYYYYYYYYYYYYYYYYYYYY
exportAWS_SESSION_TOKEN=ZZZZZZZZZZZZZZZZZZZZZZZZZZZZZZZZZZZZ
cd federation
terraform init
terraform apply
There are a few resources that currently have no Terraform support, so we need to manually create them. The following resources have open issues about getting support, so eventually, we should be able to automate this process.
Also, export the AWS_IIC_APPLICATION_AUTHORIZED_AUDIENCE with the Client ID of the JumpCloud application. If you are using a different IdP, this is pretty consistent across all IdPs - Entra ID client ID on an application for example.
echo"export AWS_IIC_APPLICATION_AUTHORIZED_AUDIENCE=71424d00-xxxx-xxxx-xxxx-xxxxxxxxxxxx">> .env
echo"export AWS_DEFAULT_REGION=ap-southeast-2">> .env # Set the region to the region your IAM Identity Center is in
Then source all the variables into your shell environment.
source .env
Create an Application Grant
Run the following command to create an application grant.
The client application is a simple Python Flask app that will interact with all the configurations we have done so far. To run the application, we need to first install the dependencies.
cd web
# Optional - create a virtual environment
python3 -m venv .venv
source .venv/bin/activate
# Install the dependencies
pip install-r requirements.txt
Create a copy of the client_secrets.json.example and rename it to client_secrets.json then update the client_id and client_secret with values from your IDP (in our case, JumpCloud).
Note: If you are using a different IdP, you will also need to update the auth_uri, token_uri, issuer and userinfo_uri values accordingly.
Then set up credentials for the S3 Access Grants account before running the application.
🔑
Please run this step with the following account
AWS S3 Access Grants (111111111111)
# Authenticate with the AWS S3 Access Grants accountexportAWS_ACCESS_KEY_ID=XXXXXXXXXXXX
exportAWS_SECRET_ACCESS_KEY=YYYYYYYYYYYYYYYYYYYYYYYYYYYYYYYY
exportAWS_SESSION_TOKEN=ZZZZZZZZZZZZZZZZZZZZZZZZZZZZZZZZZZZZ
# Assume the S3 Access Grant roleCREDENTIALS_JSON=$(aws sts assume-role --role-arn $AWS_S3_ACCESS_GRANT_CLIENT_APP_ROLE_ARN --role-session-name s3-access-grants)exportAWS_ACCESS_KEY_ID=$(echo $CREDENTIALS_JSON | jq -r'.Credentials.AccessKeyId')exportAWS_SECRET_ACCESS_KEY=$(echo $CREDENTIALS_JSON | jq -r'.Credentials.SecretAccessKey')exportAWS_SESSION_TOKEN=$(echo $CREDENTIALS_JSON | jq -r'.Credentials.SessionToken')# Run the client application
python3 jumpcloud.py
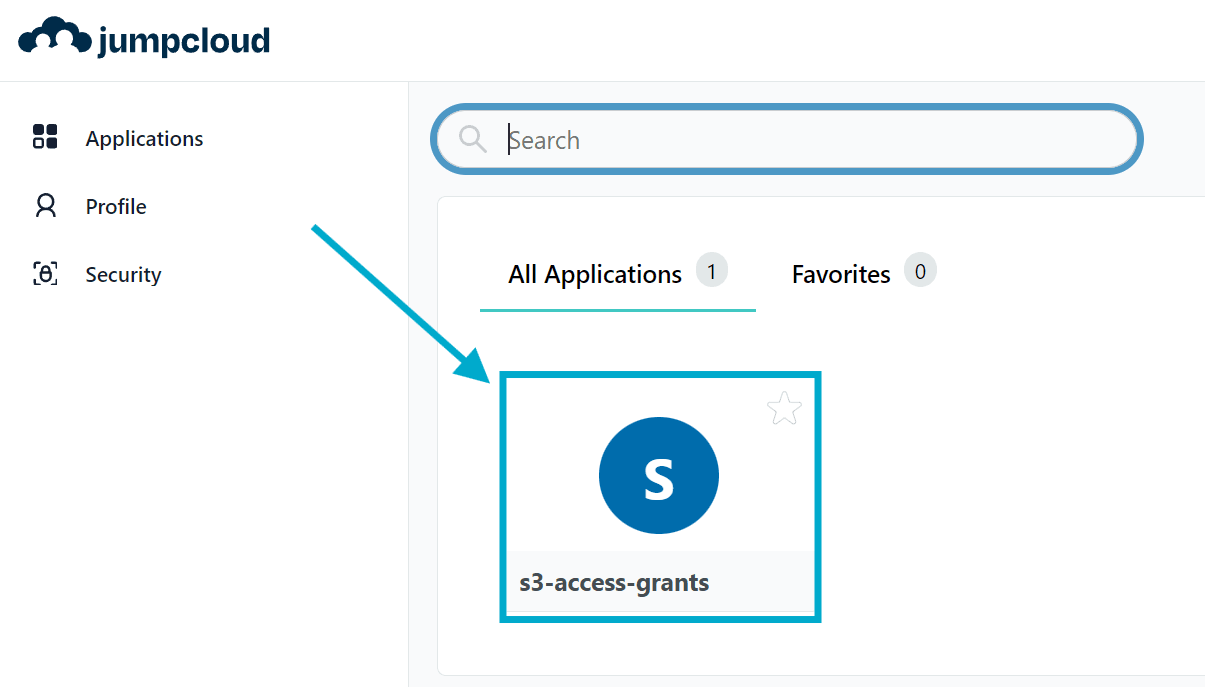
Open a browser and navigate to http://localhost:5000/login - you should be redirected to the JumpCloud login page (or your IdP login page) where you can log in with the user you created earlier. Click on the s3-access-grants application and you should be redirected back to the client application.
Client application login page
You can tell the application is working if you see the following message.
Client application success message
Click Get S3 Data to be redirected to the http://localhost:5000/get-s3-data page and to validate that the federated authentication using S3 Access Grants is working as expected.
Client application get-s3-data page
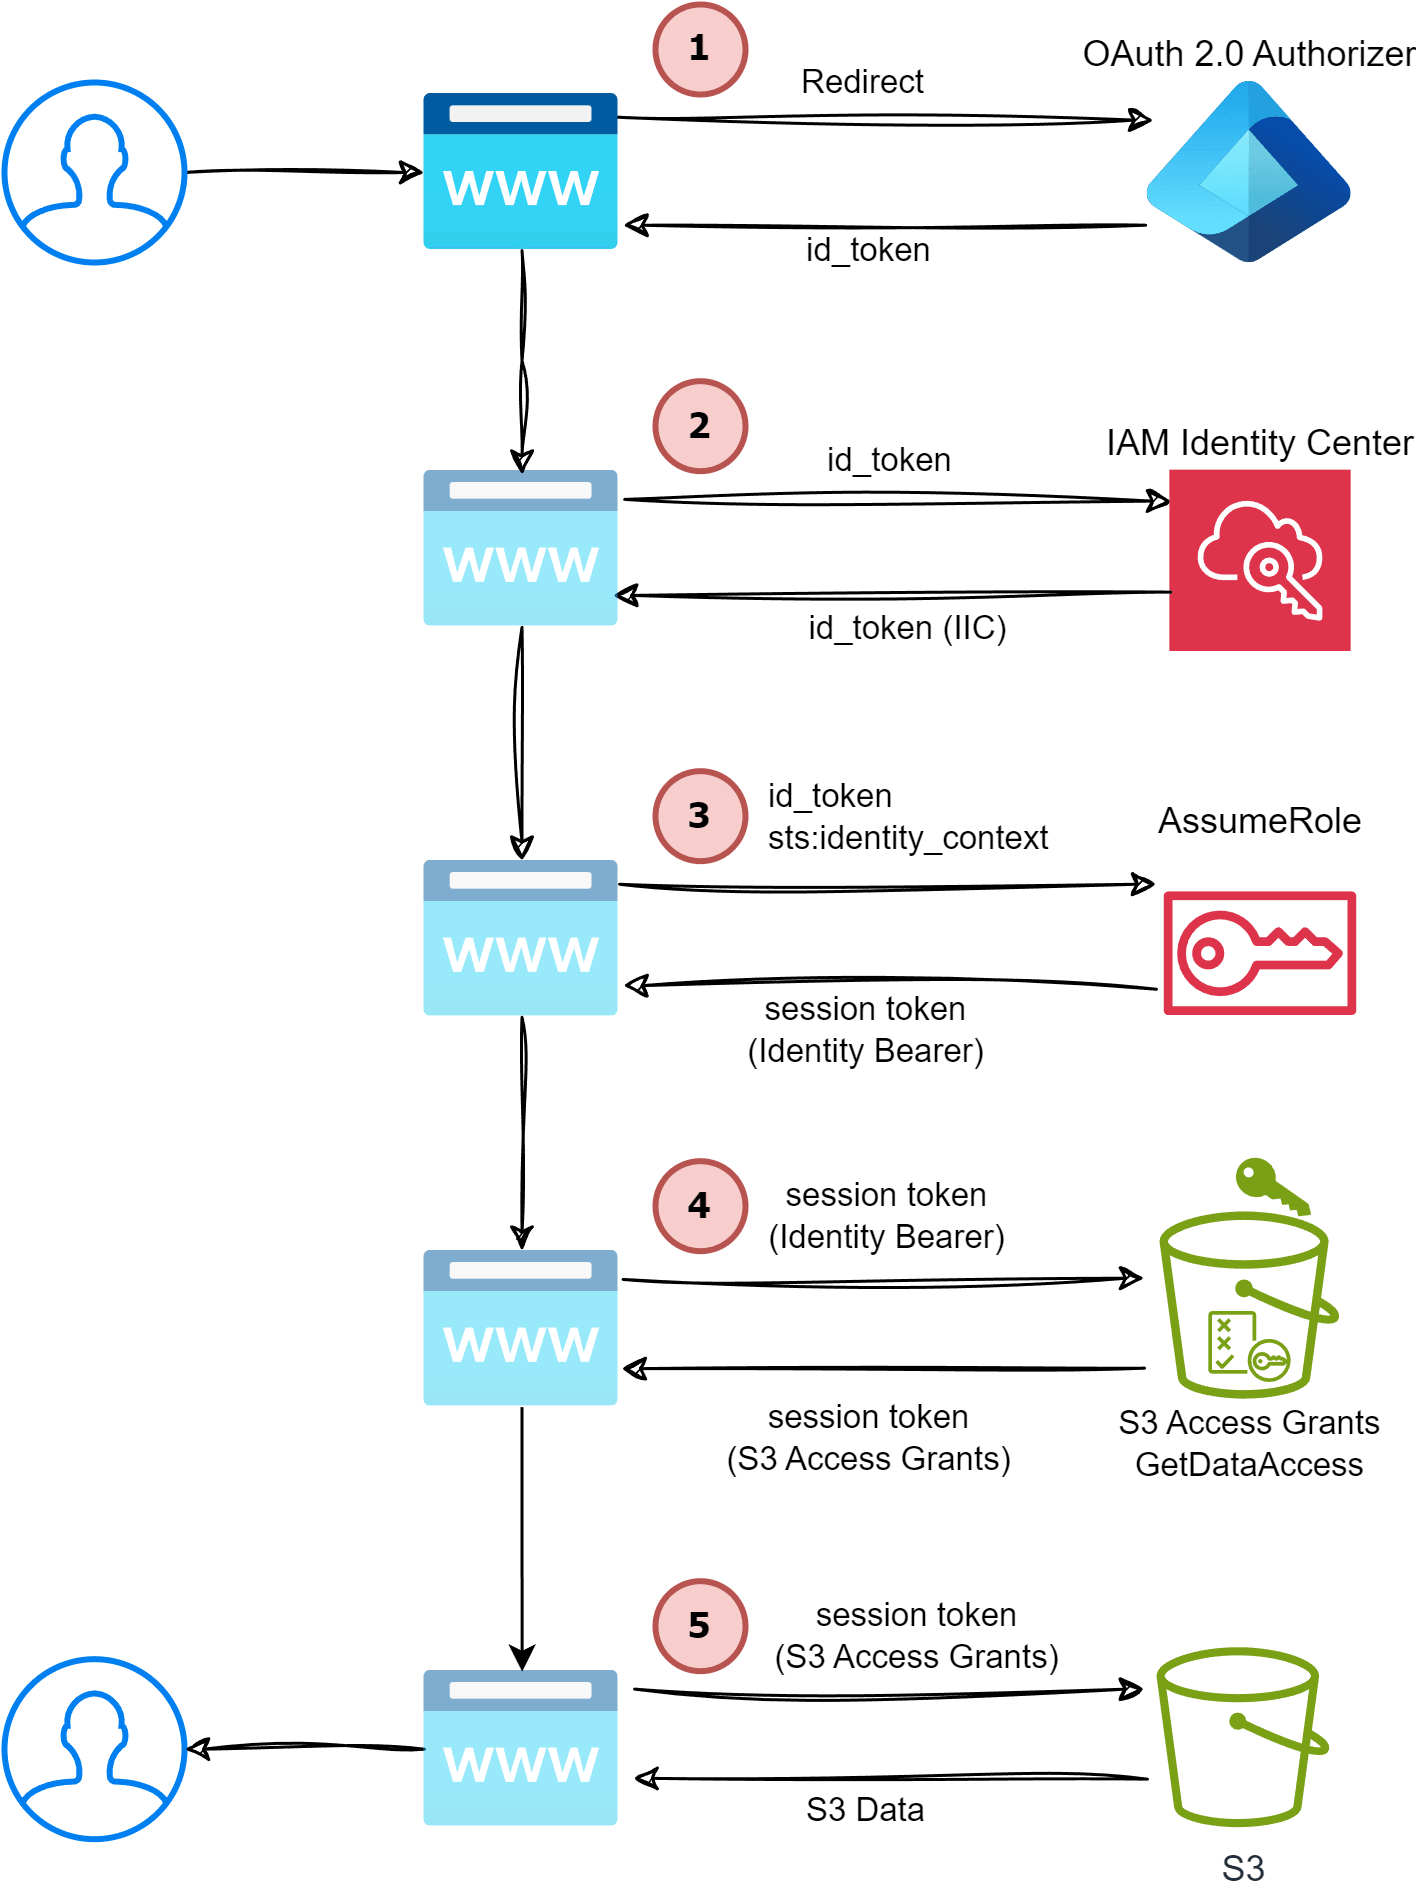
Client application authentication flow
The authentication flow that the client application follows behind the scenes is pretty complicated and involves several sequential API calls to different services. The following diagram shows the flow of the client application when a user logs in.
Client application authentication flow
The steps explained:
The user visits the client application and clicks Login, which redirects them to the IdP login page. Once the user has completed the login process, the IdP redirects the user back to the client application with an OIDC authorization token that contains the IdP (JumpCloud in our case) identity token id_token.
Since we need to make an AWS API call on behalf of the user, we need to exchange the IdP id_token for an IAM Identity Center id_token. This is done by calling CreateTokenWithIAM against the AWS IAM Identity Center OIDC service. The clientId is the AWS IAM Identity Center application ARN that was created via Terraform in the federation directory.
The response from the previous step is an IAM Identity Center id_token JWT that contains a very special field called sts:identity_context which is a token that represents the user's identity! We're going to use this now to assume a role that can perform S3 Access Grant actions but within the security context of the user.
The response from the previous step is temporary credentials that can be used to make a GetDataAccess API call to the S3 Access Grants service. This call returns yet another set of temporary credentials that can be used to access the S3 bucket.
To clean up the resources created in this guide, you can run the following commands.
🔑
Please run this step with the following account
AWS IAM Identity Center (222222222222)
# Authenticate with the AWS IAM Identity Center accountexportAWS_ACCESS_KEY_ID=XXXXXXXXXXXX
exportAWS_SECRET_ACCESS_KEY=YYYYYYYYYYYYYYYYYYYYYYYYYYYYYYYY
exportAWS_SESSION_TOKEN=ZZZZZZZZZZZZZZZZZZZZZZZZZZZZZZZZZZZZ
cd federation
terraform init
terraform destroy
Remove AWS S3 Access Grants configuration
🔑
Please run this step with the following account
AWS S3 Access Grants (111111111111)
# Authenticate with the AWS S3 Access Grants accountexportAWS_ACCESS_KEY_ID=XXXXXXXXXXXX
exportAWS_SECRET_ACCESS_KEY=YYYYYYYYYYYYYYYYYYYYYYYYYYYYYYYY
exportAWS_SESSION_TOKEN=ZZZZZZZZZZZZZZZZZZZZZZZZZZZZZZZZZZZZ
cd..
terraform init
terraform destroy
Summary
In this post, we covered several key aspects of federating S3 access grants with IAM Identity Center Trusted Identity Propagation. I'll be completely honest, this was and still is a complex topic and it took me a while to wrap my head around it. I am personally convinced that the use of trusted identity propagation is a really important direction for AWS to be heading in, especially as more and more services start to support it.
The benefits of having one way of defining access to data and having the session context include the user's identity is a huge deal for governance and audit purposes.
Taking a look at a CloudTrail event when a client requests data from S3 is a great way to see the power of this solution. Rather than just seeing the role that was assumed, you can see the user's identity that the role was assumed on behalf of.
Right now, however, I think the complexity of the solution is a bit of a barrier to entry for most organizations. It's difficult to recommend investing time into this solution unless you have some intense AWS specialists in your organization.
If you have any questions, comments, or feedback, please get in touch with me on Twitter @nathangloverAUS or leave a comment below! I'm interested if you've tried implementing trusted identity propagation for any other AWS services and how you found the experience.
References
Effectively all content by Becky Weiss on this topic is outstanding and I highly recommend checking it out.