Let's Try - AWS Glue Apache Iceberg Statistics


Introduction
In this post, we'll explore the newly supported AWS Glue table statistics feature for Apache Iceberg tables. This feature allows you to generate column-level aggregation statistics, which can significantly accelerate query performance by leveraging these statistics in query optimization.
This post will just be a high-level overview of the feature, how to generate statistics and what they look like.
By the end of this post you will be able to view the number of distinct values (NDV) stats for given columns in your Iceberg table.
What are Table Statistics?
Table statistics provide crucial metadata about the data within your tables, which can significantly enhance query optimization and performance. They include information such as the number of rows, distinct values in columns, and other aggregated data metrics.
The table statistics for Iceberg tables are stored in Puffin files, which are designed to hold indexes and statistics as blob types. One of the key statistics stored in these Puffin files is the number of distinct values (NDV) in a column, calculated using the Theta Sketch algorithm from Apache DataSketches.
The spec for the Puffin file format can be found here.
Pre-requisites
To follow along with this post, you must do some minor setup with Athena, S3 and Glue. If you have used Athena before, there's a good chance you already have this setup (possibly with a different bucket). Feel free to skip this section if you feel confident you have the required setup.
S3
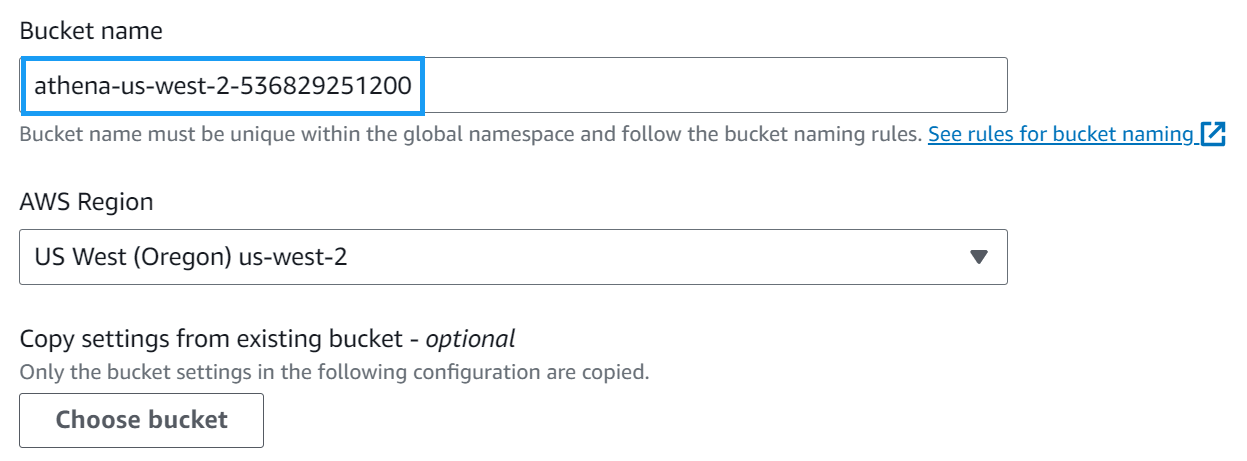
Navigate to the AWS S3 console to start with and create an Athena query bucket
Give the bucket a name such as athena-<region>-<account-id> and click Create bucket. (For example, athena-us-west-2-123456789012.)
Note: for this post, I'll be using the us-west-2 region as it is one of the regions that supports the new automatic compaction feature.
Athena
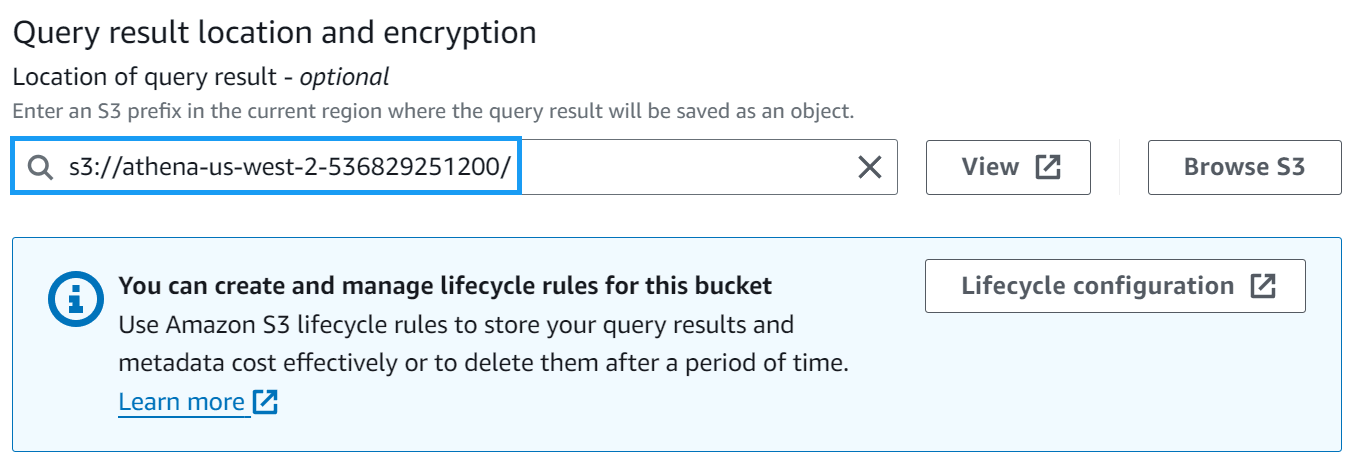
Navigate to the AWS Athena settings console and click Manage under the Query result and encryption settings section.
Change the Location of query results to the bucket you created in the previous step, and click Save.
Glue
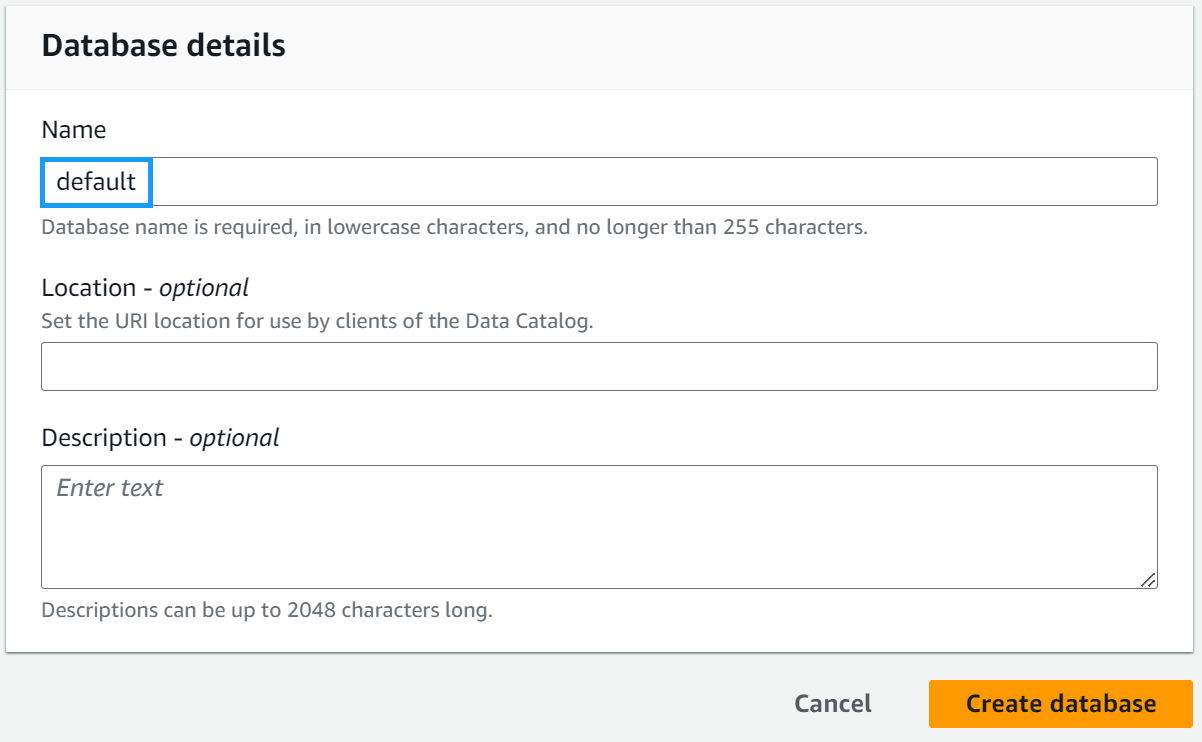
Navigate to the AWS Glue databases console and check to see if you have a database called default. If you do not, create one.
Helper Script
To help demonstrate the glue table statistics feature, I've created a script to do much of the tedious parts of creating an Iceberg table for you. You can find the script here.
At a high level, the script does the following:
- Create an S3 bucket that Iceberg will use to store data and metadata
- Generating 1 million rows of sample data and uploading it to S3
- Create SQL files for:
- Creating an Iceberg table
- Creating a temporary table for loading sample data
- Loading sample data into Iceberg from the temporary table
- Deleting the tables when we're done
- Creating an IAM role for Glue to use for table statistics
Let's grab the script and run it so you can follow along.
Note: You must set up AWS credentials on your machine for this to work. If you don't have them set up, you can follow the AWS CLI configuration guide.
# Download the script, make it executable
curl https://gist.githubusercontent.com/t04glovern/04f6f2934353eb1d0fffd487e9b9b6a3/raw \
    > lets-try-iceberg.py \
    && chmod +x lets-try-iceberg.py

# Create a virtual env (optional)
python3 -m venv .venv
source .venv/bin/activate

# Install the dependencies
pip3 install boto3

# Run the script
./lets-try-iceberg.py --table lets_try_iceberg_statistics --statistics
Have a look at the output, and you should see something like the following:
# INFO:root:Bucket iceberg-sample-data-569068 does not exist, creating it...
# INFO:root:Uploaded samples.jsonl.gz to s3://iceberg-sample-data-569068/sample-data/samples.jsonl.gz
# INFO:root:Created IAM role lets-try-iceberg-statistics-role
# INFO:root:Created IAM policy lets-try-iceberg-statistics-policy
If you check the directory you ran the script from, you should see several files created:
$ ls -l
# -rw-r--r--  1 nathan  staff       366 10 Jul 19:24 1-athena-iceberg-create-table.sql
# -rw-r--r--  1 nathan  staff       403 10 Jul 19:25 2-athena-create-temp-table.sql
# -rw-r--r--  1 nathan  staff        94 10 Jul 19:25 3-insert-into-iceberg-from-temp-table.sql
# -rw-r--r--  1 nathan  staff        62 10 Jul 19:25 4-cleanup-temp-table.sql
# -rw-r--r--  1 nathan  staff        50 10 Jul 19:25 5-cleanup-iceberg-table.sql
The numbered SQL files are the ones we'll be using to create our Iceberg table and load the sample data into it.
Create & Load the Iceberg Table
Head over to the AWS Athena console and ensure that the default database is selected.
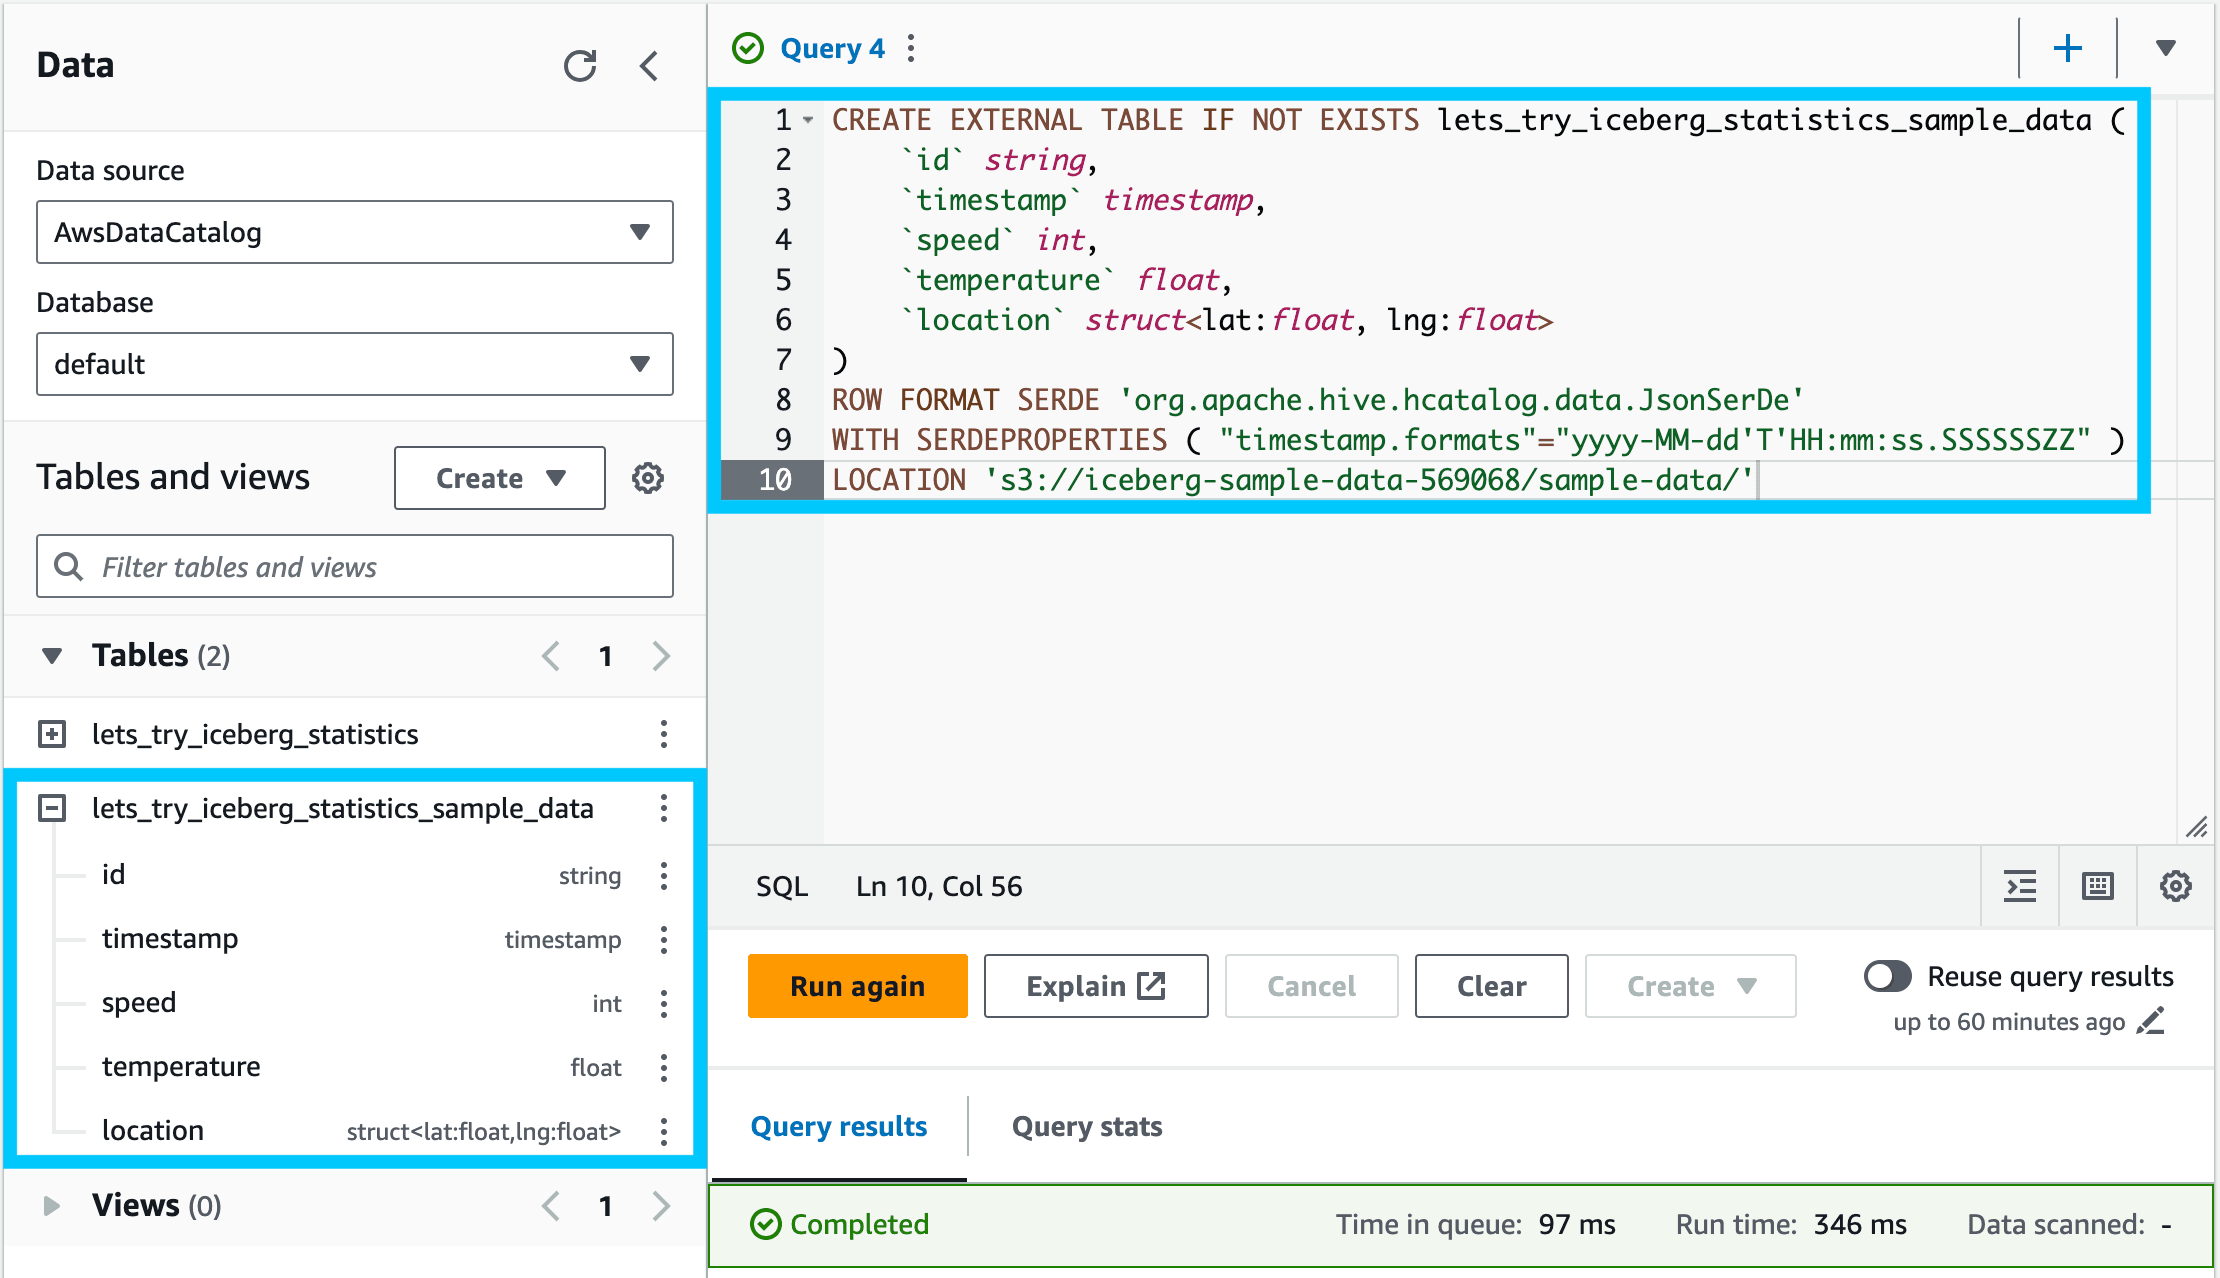
Take the contents of the 1-athena-iceberg-create-table.sql file and paste it into the query editor. Click Run to create the table.
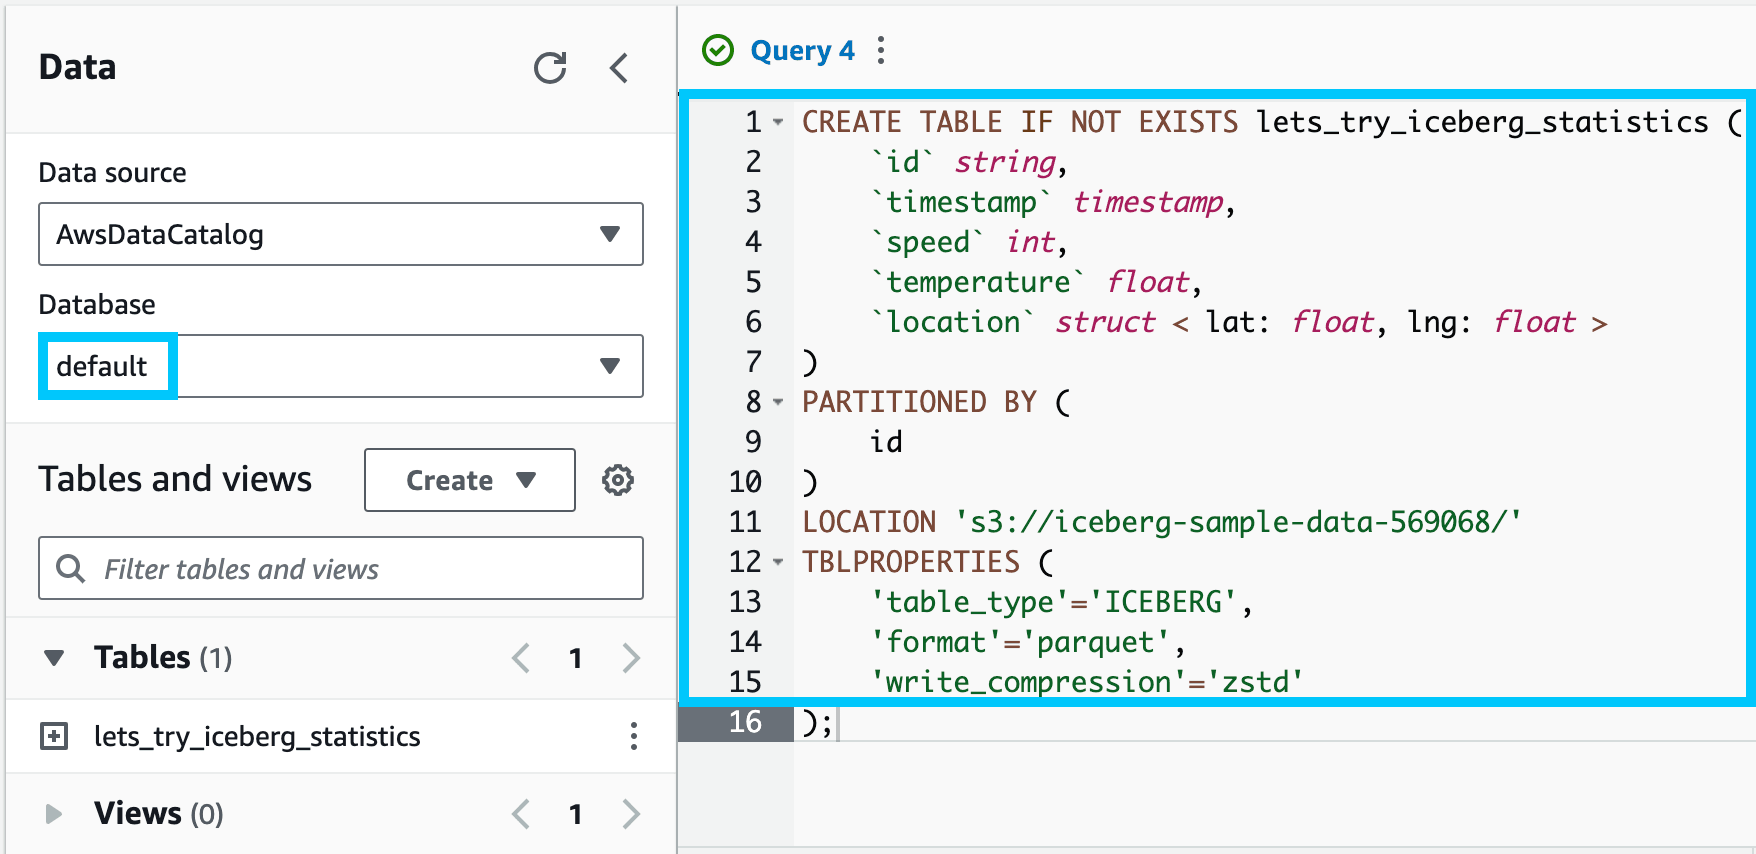
You should see a new table called lets_try_iceberg_statistics under the Tables section of the default database.
We'll create a temporary table to load the sample data into. Copy the 2-athena-create-temp-table.sql file and paste it into the query editor. Click Run to create the table.
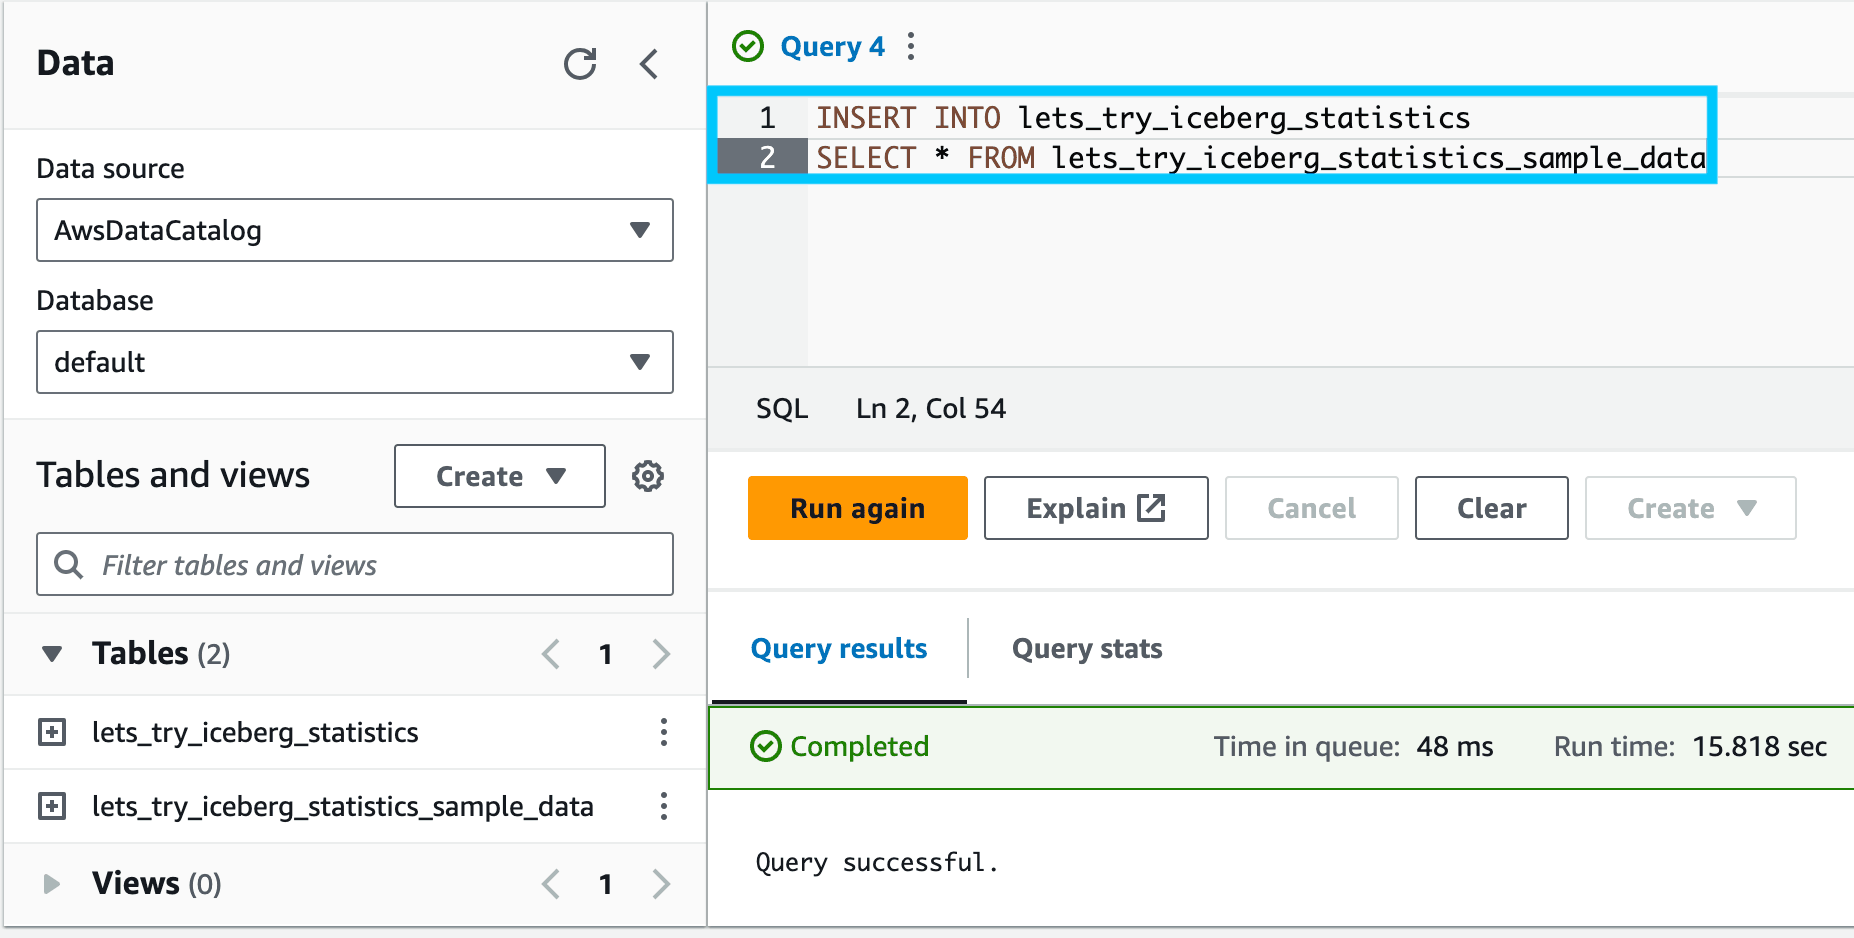
Now, we'll load the sample data from the temporary table into the Iceberg table. Copy the 3-insert-into-iceberg-from-temp-table.sql file and paste it into the query editor. Click Run to load the data.
Note: This query will take 15-30 seconds to run.
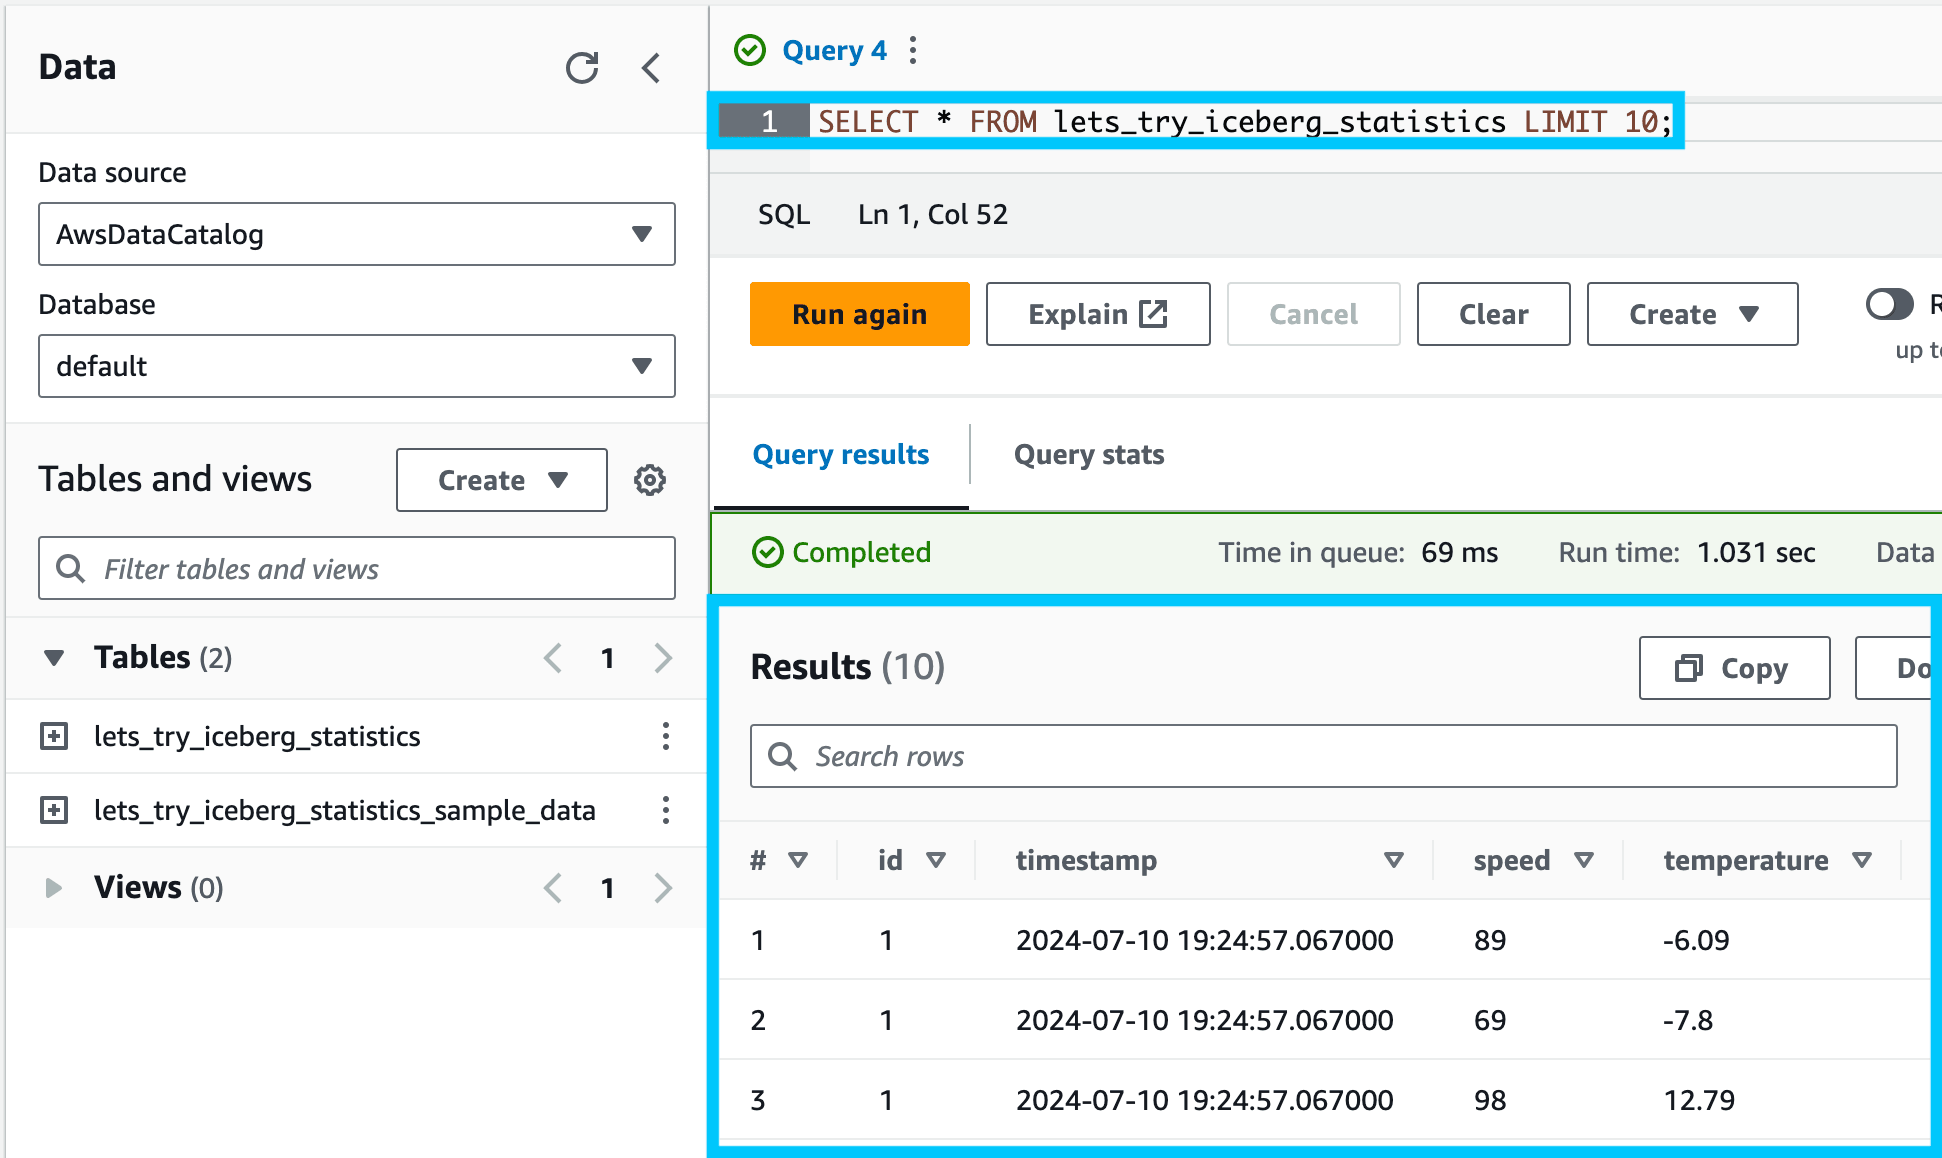
Finally, let's verify that the data was loaded into the table. Run the following query:
SELECT * FROM lets_try_iceberg_statistics LIMIT 10;You should see something like the following:
Generate Statistics
Now that we have our Iceberg table created and our sample data loaded into it let's generate statistics for the table.
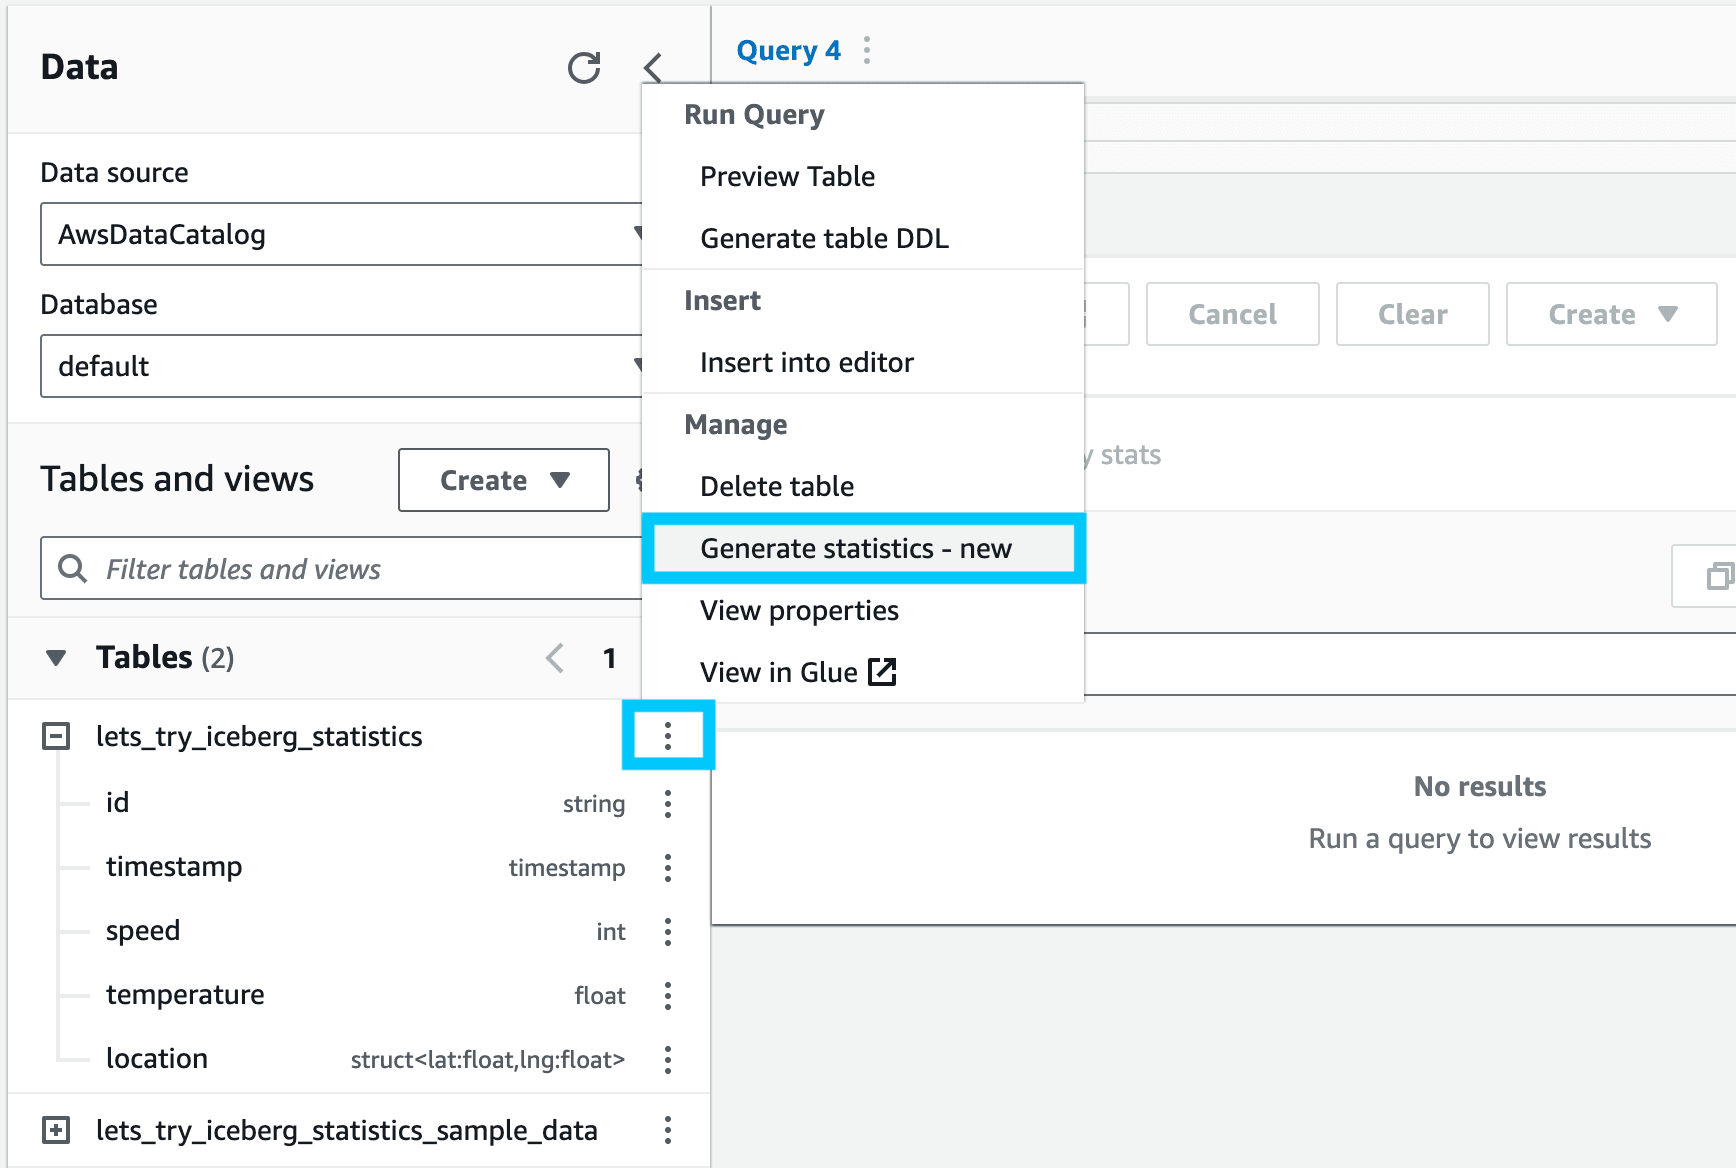
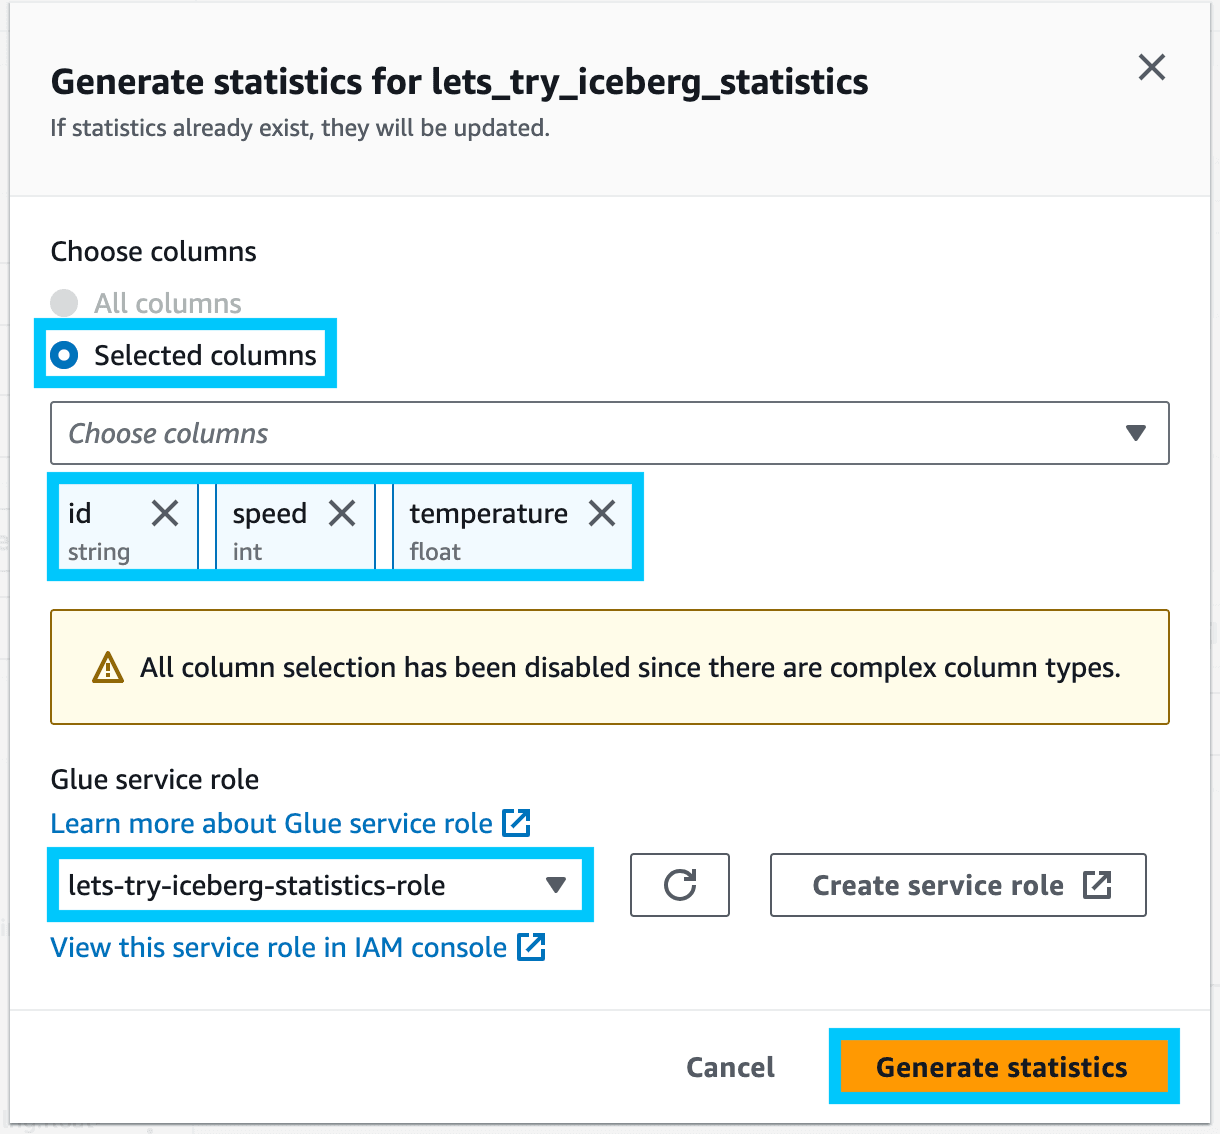
Click on the vertical ellipsis (⋮) next to the lets_try_iceberg_statistics table and select Generate statistics.
Since our data has a struct (complex column types), we cannot use All columns for the statistics. Instead, we'll select Columns and choose the id, speed and temperature columns.
Then from the Glue service role dropdown, select the role created by the script we ran earlier (lets-try-iceberg-statistics-role), and click Generate statistics.
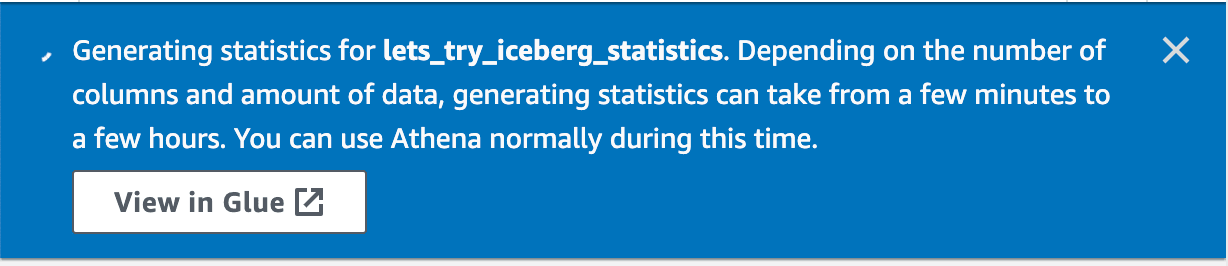
You should see a notification that the statistics are being generated, along with a link to the Glue console to view the progress.
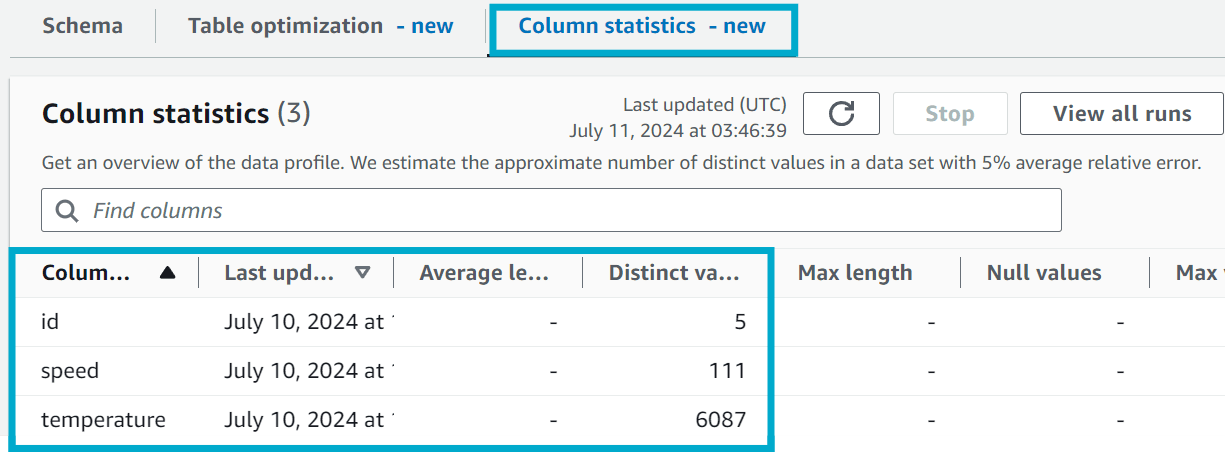
Clicking on the Column statistics tab on your table in Glue will show you the results of the statistics generation.
Cleanup
Once you're done, you can use the 4-cleanup-temp-table.sql and 5-cleanup-iceberg-table.sql files to clean up the temporary and Iceberg tables.
-- 4-cleanup-temp-table.sql
DROP TABLE IF EXISTS lets_try_iceberg_statistics_sample_data;

-- 5-cleanup-iceberg-table.sql
DROP TABLE IF EXISTS lets_try_iceberg_statistics;
Then, navigate to the AWS S3 console and Empty then Delete the bucket that was created by the script.
Finally, navigate to the AWS IAM Roles console and delete the role (lets-try-iceberg-statistics-role) and policy (lets-try-iceberg-statistics-policy) that were created by the script.
Summary
In this post, we explored how to leverage the new AWS Glue table statistics feature for Apache Iceberg tables to view statistics on number of distinct values (NDV) for columns in your Iceberg table.
This is just the "tip of the iceberg" (pun intended) as the statistics generated can be be used to improve query performance when running queries in Amazon Redshift Spectrum.
If you have any questions, comments or feedback, please get in touch with me on Twitter @nathangloverAUS, LinkedIn or leave a comment below!