LinkedIn Professional - Deploying a Serverless project


Table of Contents
- LinkedIn Professional - Project Overview
- LinkedIn Professional - Generating Tech Jargon with DeepAI Text Generator
- LinkedIn Professional - Using LinkedIn's API
- LinkedIn Professional - Deploying a Serverless project
LinkedIn Professional - Deploying a Serverless project
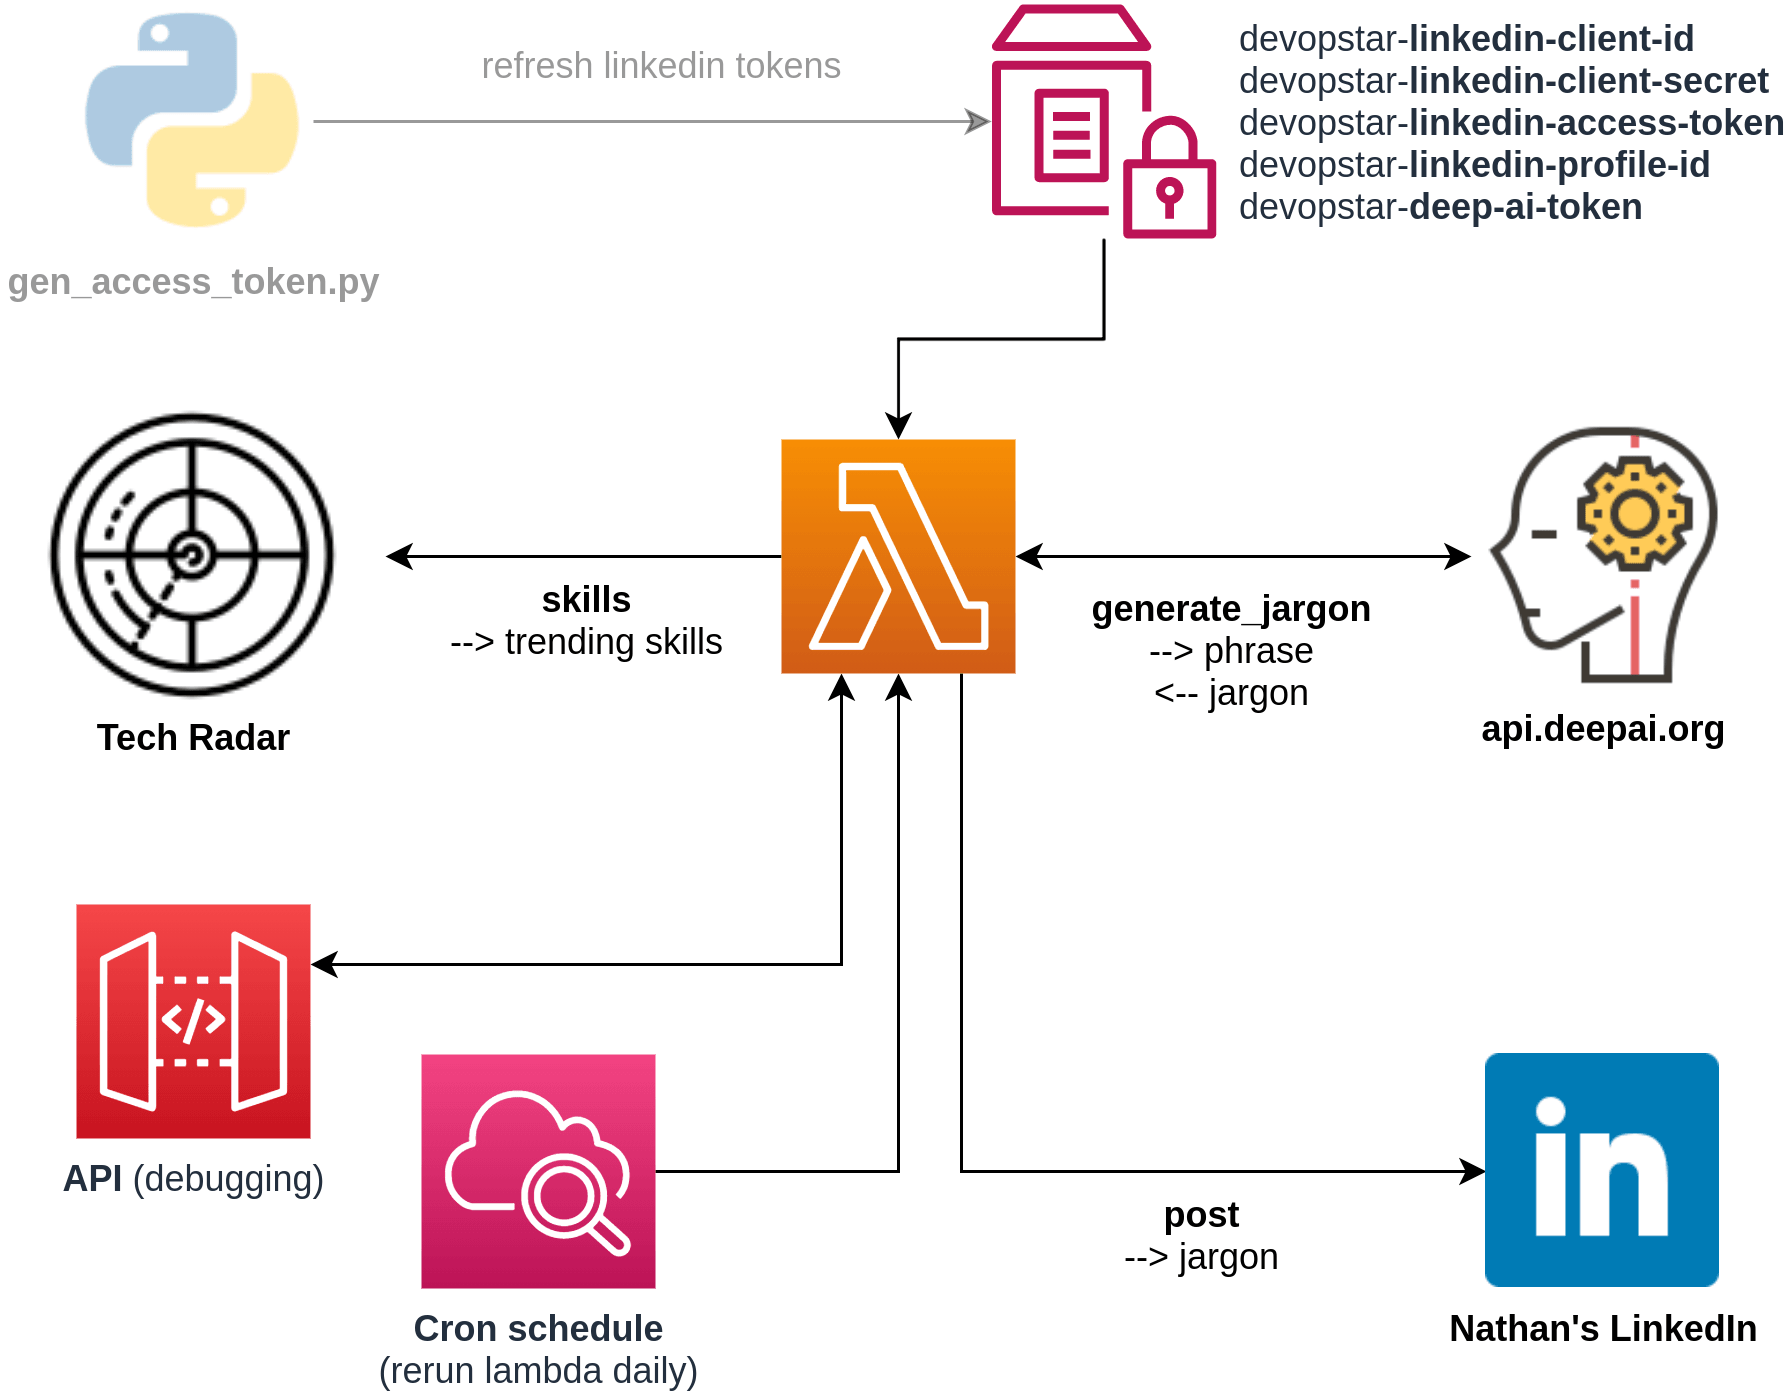
Welcome to the final guide in this series! In this post we are going to wire up all the previous code and run it on AWS Lambda.
I've updated the architecture diagram below to include the components that we will be touching for this portion of the guide.
Prerequisites
To deploy this project yourself you will require a couple things to be pre-setup:
- AWS CLI (with credentials)
- Have completed the previous two steps and have the following AWS Paramter store variables populated in your account
- devopstar-linkedin-access-token
- devopstar-linkedin-profile-id
- devopstar-deep-ai-token
Create a Serverless project
For the deployment of this code we will be using the Serverless framework. You can install it easily by running the following command provided you have NodeJS installed on your system.
npm install -g serverlessFor the purpose of this guide I recommend you use the github repository that I created available at t04glovern/linkedin-professional, however if you want to create a new serverless project from scratch you usually do so by running the following commands:
serverless create --template aws-python3
serverless config credentials --provider aws --key $ACCESS_KEY_ID$ --secret $SECRET_KEY
Then install the python requirements plugin
serverless plugin install -n serverless-python-requirementsAlso make sure the serverless.yml file in your project includes the following
plugins:
  - serverless-python-requirements

custom:
  pythonRequirements:
    dockerizePip: true
Setup the Serverless project
The meat of a serverless project is the serverless.yml file. Take a look at the one included in our project you can see everything is easily defined in YAML format
service: linkedin-professional
frameworkVersion: '2'

custom:
  pythonRequirements:
    dockerizePip: true

provider:
  name: aws
  runtime: python3.8
  lambdaHashingVersion: 20201221
  region: us-east-1
  environment:
    LINKEDIN_ACCESS_TOKEN: ${ssm:devopstar-linkedin-access-token}
    LINKEDIN_PROFILE_ID: ${ssm:devopstar-linkedin-profile-id}
    DEEP_AI_TOKEN: ${ssm:devopstar-deep-ai-token}
    ENABLE_LINKEDIN_POSTS: "True"

functions:
  share:
    handler: handler.share
    events:
      - schedule: rate(24 hours)

plugins:
  - serverless-python-requirements
The most important block is the functions key. This contains all the lambda functions that we want to host. Specifically I've defined a function called share inside of the handler.py file in the repository.
def share(event, context):
    phrase = get_phrase(get_skill_items())
    jargon = generate_jargon(phrase)
    print(os.environ['ENABLE_LINKEDIN_POSTS'])
    if os.environ['ENABLE_LINKEDIN_POSTS'] == "True":
        share_to_linkedin(jargon)
Note how there is also an events key called schedule. This means that the function will be executed daily! but don't worry, if you don't want it to run for whatever reason you can disable this functionality easily by changing the ENABLE_LINKEDIN_POSTS key under the provider.environment field in the serverless.yml file as well.
Deploying the Serverless project
Are you ready to deploy? Great! Just run the following:
npm install
serverless deploy
# linkedin-professional$ serverless deploy
# Serverless: Generated requirements from /linkedin-professional/requirements.txt in /linkedin-professional/.serverless/requirements.txt...
# Serverless: Using static cache of requirements found at /home/user/.cache/serverless-python-requirements/d692445e5ad6eb219ed32840dfabb3ed29d027ffaa34f41c04e9b2e2b6312563_slspyc ...
# Serverless: Packaging service...
# Serverless: Excluding development dependencies...
# Serverless: Injecting required Python packages to package...
# Serverless: Uploading CloudFormation file to S3...
# Serverless: Uploading artifacts...
# Serverless: Uploading service linkedin-professional.zip file to S3 (51.24 MB)...
Once the project is deployed should see posts everyday from your bot from now one!
If you have issues you can actually debug your project locally too. To do this, run the following commands:
# Activate a python envirionment locally
python3 -m venv .venv
source .venv/bin/activate
pip install --upgrade pip
pip install -r requirements.txt

# Test locally
serverless invoke local -f share

# Test Deployed version
serverless invoke -f share
Deploying a Serverless project Summary
Congratulations! We've deployed our Tech jargon bot and got it up and running on AWS Lambda.
If you found this particular section interesting or have used it to generate something cool, please reach out to me on twitter and show me @nathangloverAUS.