Feeding my cat with AWS IoT GreengrassV2


Updated 16th November 2021: Fixed up deployments for latest version of GreengrassV2 components (2.5.0). Added Provisioning cloudformation template for user account used on devices
Setting up Greengrass Core
Navigate to the AWS IoT Greengrass console in the us-west-2 region and straight away you might notice something a bit different.
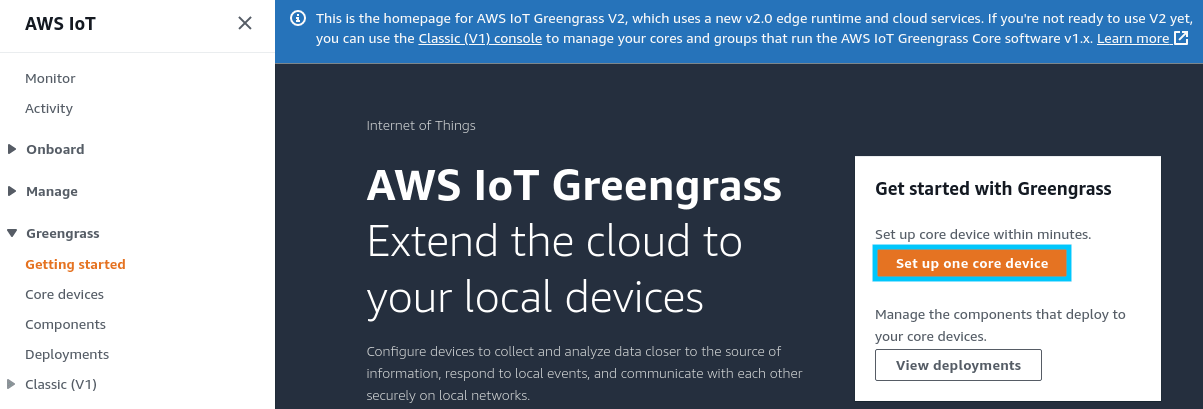
Go ahead and select Set up one core device to begin the process of creating a single Greengrass Core.
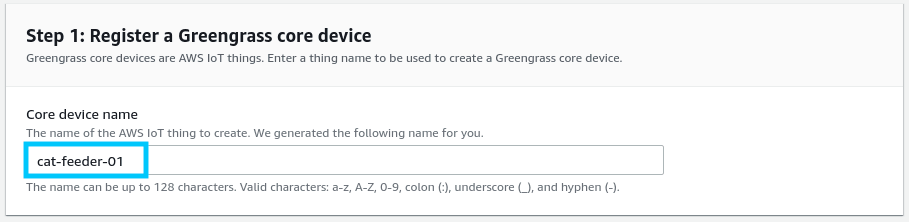
Start by giving the core a name, for this project we'll go with cat-feeder-01.
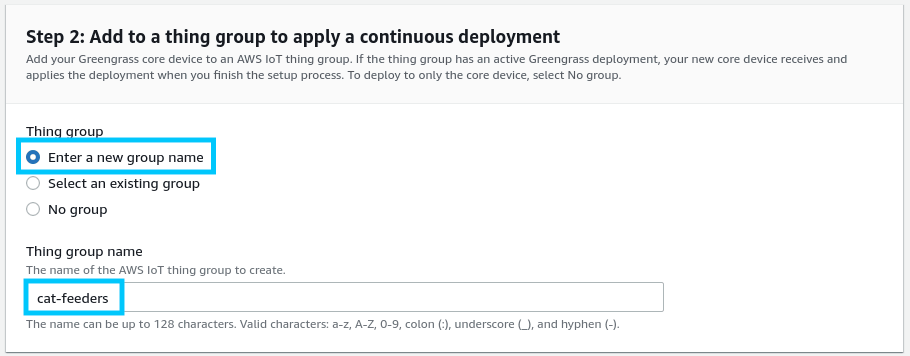
The next step is to define a group name for our cat feeders. We'll go with cat-feeders. Greengrass groups allow us to perform continuous deployments to a select set of devices.
Preparing the IoT Device
In this step we'll briefly go through setting up our Raspberry Pi for running Greengrass core. Start by logging into the device using SSH.
ssh pi@raspberrypi.localNow we install the requirements needed to run AWS IoT Greengrass on the device.
sudo apt-get update
sudo apt-get install openjdk-8-jdk unzip curl python3-pip

# AWS CLI
pip3 install awscli --upgrade
AWS credentials
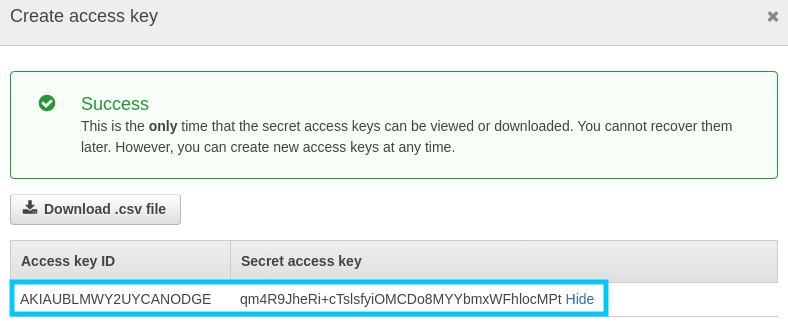
We will be executing the deployment of the device setup directly from the Raspberry Pi itself, which means that we need to have AWS credentials exposed. To do this, create an access key to use for the device temporarily during deployment
The keys should look something like the following
Export these keys by running the following on the Raspberry Pi, replacing the keys with your own.
export AWS_ACCESS_KEY_ID=AKIAIOSFODNN7EXAMPLE
export AWS_SECRET_ACCESS_KEY=wJalrXUtnFEMI/K7MDENG/bPxRfiCYEXAMPLEKEY
[Advanced Users] Note: You can alternatively deploy the greengrass-provisioning-user.yml CloudFormation template to generate an IAM user with Secret access keys. You will need to provide your houses IP address to whitelist the permissions.
Run Greengrass Core setup
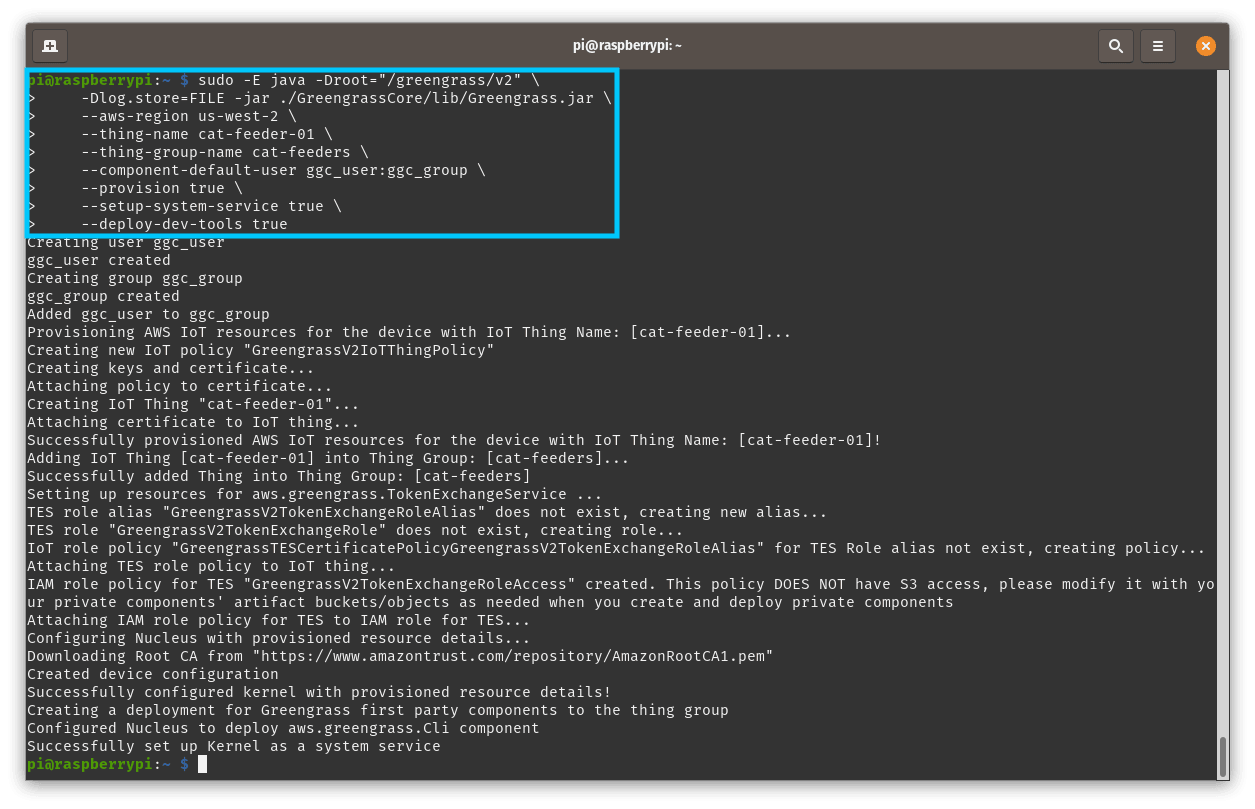
We're ready to deploy our new Greengrass core! Do this by following the instructions provided on the Greengrass core creation page. These commands can also be seen below.
# Download and extract the installer
curl -s https://d2s8p88vqu9w66.cloudfront.net/releases/greengrass-nucleus-latest.zip > greengrass-nucleus-latest.zip && unzip greengrass-nucleus-latest.zip -d GreengrassCore

# Run the installer
sudo -E java -Droot="/greengrass/v2" \
    -Dlog.store=FILE -jar ./GreengrassCore/lib/Greengrass.jar \
    --aws-region us-west-2 \
    --thing-name cat-feeder-01 \
    --thing-group-name cat-feeders \
    --component-default-user ggc_user:ggc_group \
    --provision true \
    --setup-system-service true \
    --deploy-dev-tools true
You will see a bunch of output indicating if things successfully register or not.
If everything went well you should see the output above. If that is the case you can now navigate back to the Greengrass AWS portal and open the Core devices page to view the state of your deployed devices.
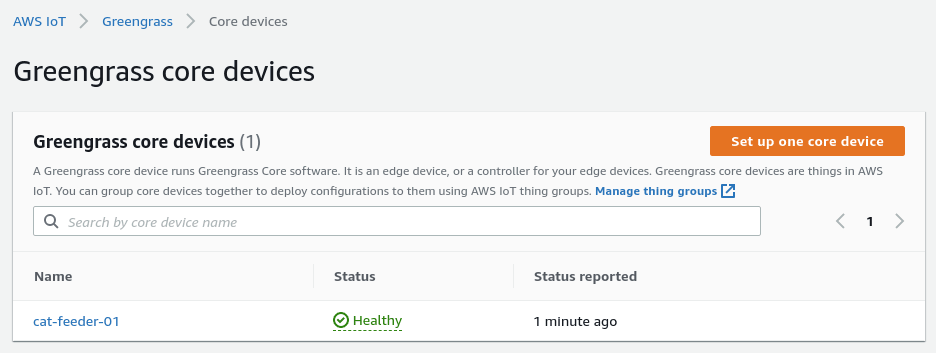
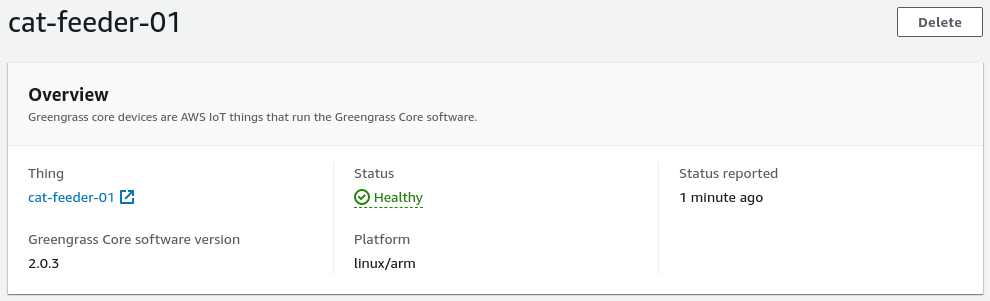
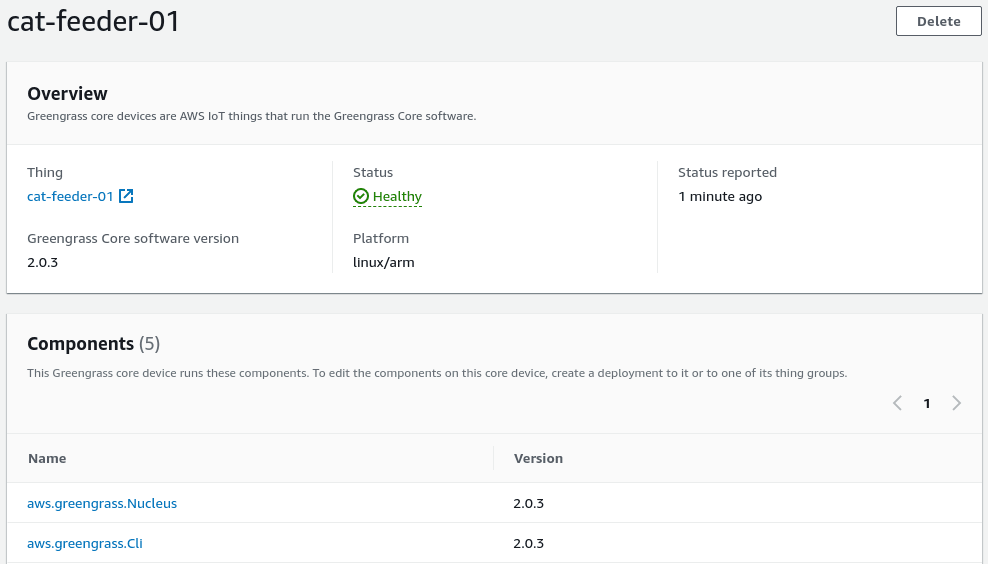
Clicking on the new cat-feeder-01 device will present you with a nice healthy status and some more information about the core.
Running a Deployment
Depending on how you deployed your Greengrass core you may or may not have components already installed on your core. If you included --deploy-dev-tools true for example, you might see aws.greengrass.Cli installed as a component along with aws.greengrass.Nucleus.
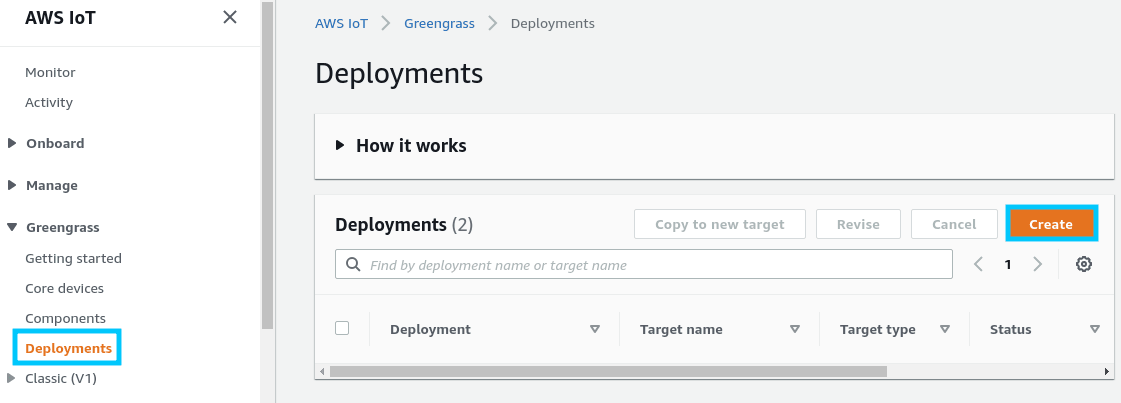
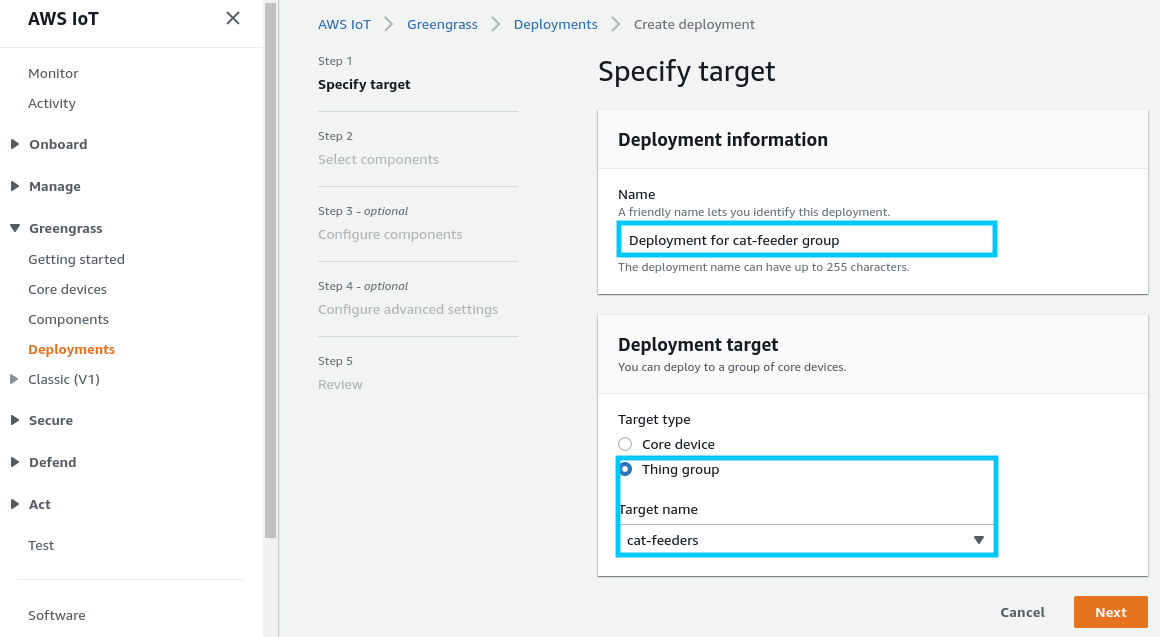
Let's go through an example of doing a deployment to install both of these dependencies in case they are not included on your Greengrass device. Start by navigating to the Deployments under Greengrass and select Create new deployment.
In the create new deployment screen give it a Name and select Thing group as the deployment target, followed by selecting cat-feeders. This will mean that all cat feeder devices will receive this deployment.
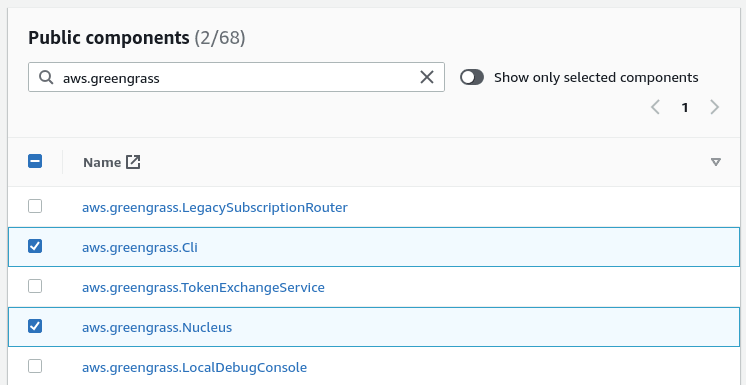
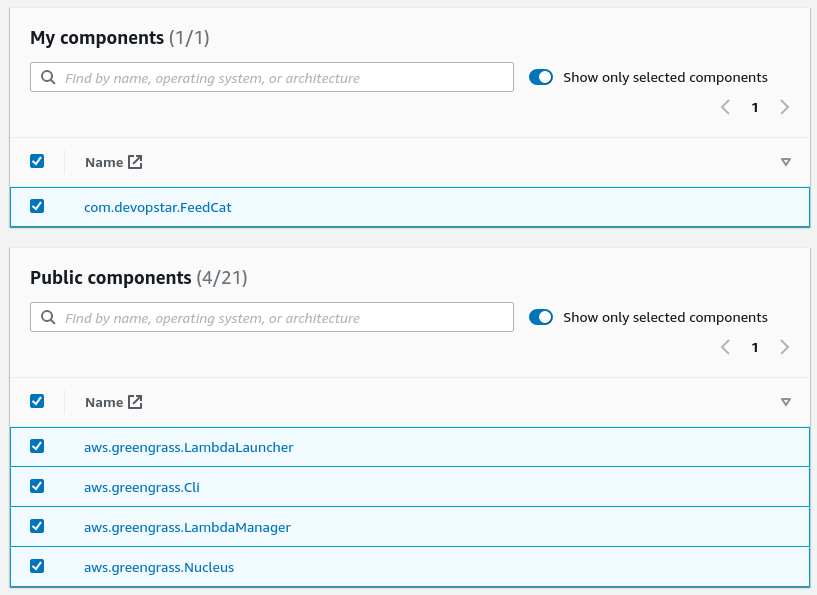
The next screen is the important one, we need to select the components that should be deployed to our core. Go ahead and select aws.greengrass.Cli and aws.greengrass.Nucleus for now, however, you can also browse any of the other public components.
Click next a couple more times and finalize the deployment by clicking Deploy at the end.
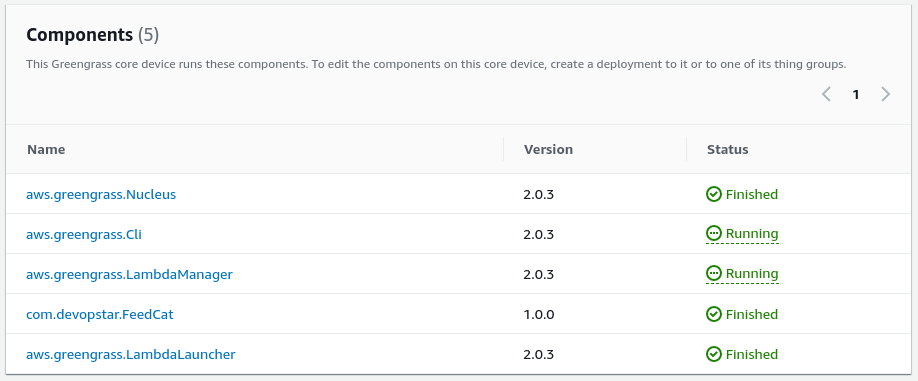
Navigate back to the details page under your cat-feeder-01 Greengrass core and you should see the two components we just deployed under its component list
You should soon have access to the greengrass-cli on the Raspberry Pi once the deployment completes. Back on the Raspberry Pi you can test this by running the following:
sudo /greengrass/v2/bin/greengrass-cli --ggcRootPath /greengrass/v2 component list
# Component Name: UpdateSystemPolicyService
#     Version: 0.0.0
#     State: RUNNING
#     Configuration: null
# Component Name: DeploymentService
#     Version: 0.0.0
#     State: RUNNING
#     Configuration: null
# Component Name: aws.greengrass.Nucleus
#     Version: 2.5.0
#     State: FINISHED
#     Configuration: {"awsRegion":"us-west-2","componentStoreMaxSizeBytes":"10000000000","deploymentPollingFrequencySeconds":"15","envStage":"prod","fleetStatus":{"periodicStatusPublishIntervalSeconds":86400.0},"greengrassDataPlanePort":"8443","httpClient":{},"iotCredEndpoint":"xxxxxxxxxxxxxx.credentials.iot.us-west-2.amazonaws.com","iotDataEndpoint":"xxxxxxxxxxxxxx-ats.iot.us-west-2.amazonaws.com","iotRoleAlias":"GreengrassV2TokenExchangeRoleAlias","jvmOptions":"-Dlog.store=FILE","logging":{},"mqtt":{"spooler":{}},"networkProxy":{"proxy":{}},"platformOverride":{},"runWithDefault":{"posixUser":"ggc_user:ggc_group"},"telemetry":{}}
# Component Name: TelemetryAgent
#     Version: 0.0.0
#     State: RUNNING
#     Configuration: null
# Component Name: aws.greengrass.Cli
#     Version: 2.5.0
#     State: RUNNING
#     Configuration: {"AuthorizedPosixGroups":null,"AuthorizedWindowsGroups":null}
# Component Name: FleetStatusService
#     Version: null
#     State: RUNNING
#     Configuration: null
Custom Cat Feeder component
With our Greengrass core deployed it's time to create a brand new component and recipe for controlling my cat feeder.
Preparing to deploy a component
Deploying a component requires an S3 bucket to exist where the artifacts will live and be available to the Greengrass core device.
First, we will create a bucket that will house all our custom components in the future, along with generating an IAM policy that can be used by roles to access said artifacts
AWS_ACCOUNT_ID=$(aws sts get-caller-identity |  jq -r '.Account')
AWS_REGION="us-west-2"

aws s3 mb s3://greengrass-component-artifacts-${AWS_ACCOUNT_ID}-${AWS_REGION} --region ${AWS_REGION}

cat <<EOF > component-artifact-policy.json
{
    "Version": "2012-10-17",
    "Statement": [
        {
            "Effect": "Allow",
            "Action": [
                "s3:GetObject"
            ],
            "Resource": [
                "arn:aws:s3:::greengrass-component-artifacts-$AWS_ACCOUNT_ID-$AWS_REGION/*"
            ]
        }
    ]
}
EOF

# Creates IAM policy that can be attached to roles
aws iam create-policy \
    --policy-name GreengrassV2ComponentArtifactPolicy \
    --policy-document file://component-artifact-policy.json \
    --region ${AWS_REGION}
If you remember back to earlier on in this post when we deployed our Greengrass device, behind the scenes AWS Greengrass v2 deployed a role called GreengrassV2TokenExchangeRole that is attached to Greengrass and used to access AWS services.
We will now attach our brand new policy document to this role giving Greengrass core access to our components
aws iam attach-role-policy \
    --role-name GreengrassV2TokenExchangeRole \
    --policy-arn arn:aws:iam::${AWS_ACCOUNT_ID}:policy/GreengrassV2ComponentArtifactPolicy \
    --region ${AWS_REGION}
Deploying a component version
Hurray! we're ready to deploy our component. I've created a simple example for our cat feeder app available at t04glovern/aws-greengrassv2-cat-feeder, so for the purpose of this repo; clone it down locally.
git clone https://github.com/t04glovern/aws-greengrassv2-cat-feederWithin the project is an example of how you would lay out a project
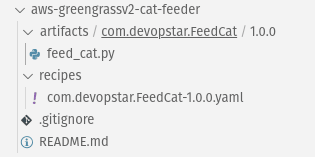
Taking a look at the recipes/com.devopstar.FeedCat-1.0.0.yaml file you should find a simple example of how we can launch a python script that triggers the cat feeder on my desk
NOTE: you will need to change the AWS_ACCOUNT_ID & AWS_REGION variables if you plan to deploy this component also.
---
RecipeFormatVersion: '2020-01-25'
ComponentName: com.devopstar.FeedCat
ComponentVersion: 1.0.0
ComponentDescription: AWS IoT Greengrass component to feed your cat
ComponentPublisher: Nathan Glover
ComponentConfiguration:
  DefaultConfiguration:
    Message: meow
Manifests:
- Name: Linux
  Platform:
    os: linux
  Lifecycle:
    Run:
      Script: python3 {artifacts:path}/feed_cat.py '{configuration:/Message}'
      RequiresPrivilege: True
  Artifacts:
  - Uri: s3://greengrass-component-artifacts-${AWS_ACCOUNT_ID}-${AWS_REGION}/artifacts/com.devopstar.FeedCat/1.0.0/feed_cat.py
Deploying the component first needs us to upload the artifacts to S3 and this is done by running the following CLI command (ensuring to replace your own AWS_ACCOUNT_ID & AWS_REGION)
aws s3 cp \
    artifacts/com.devopstar.FeedCat/1.0.0/feed_cat.py \
    s3://greengrass-component-artifacts-${AWS_ACCOUNT_ID}-${AWS_REGION}/artifacts/com.devopstar.FeedCat/1.0.0/feed_cat.py
Then with the artifacts in S3 run the following to create a component version from inline recipe file
aws greengrassv2 create-component-version \
    --inline-recipe fileb://recipes/com.devopstar.FeedCat-1.0.0.yaml \
    --region ${AWS_REGION}
# {
#     "arn": "arn:aws:greengrass:${AWS_REGION}:${AWS_ACCOUNT_ID}:components:com.devopstar.FeedCat:versions:1.0.0",
#     "componentName": "com.devopstar.FeedCat",
#     "componentVersion": "1.0.0",
#     "creationTimestamp": 1608123861.393,
#     "status": {
#         "componentState": "REQUESTED",
#         "message": "NONE",
#         "errors": {}
#     }
# }
Deploying & Running a component
The final step is to run a deployment that tells AWS IoT Greengrass core to run our new component com.devopstar.FeedCat. To do this navigate to the console and under the existing deployment, select Revise.
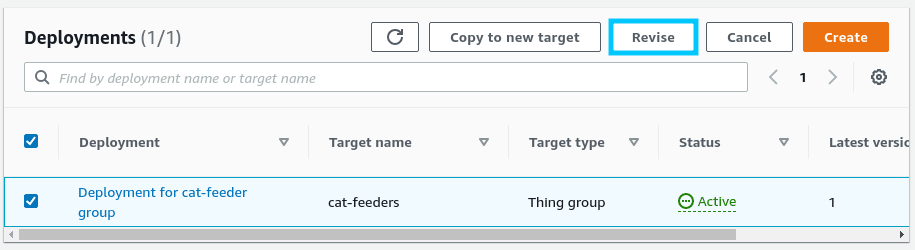
Navigate through until you are prompted to select the components to be deployed. This time select com.devopstar.FeedCat and any other components you want to deploy at the same time. Click through and finalise the deployment.
Once the deployment is successful you should see all green status ticks back on the Core devices screen.
Summary
I think that the latest Greengrass V2 update is a great step towards deployments that allow for configuration of devices to live in code and am eager to explore more ways to try it out in complex environments with more devices scaling
What do you think of the new Greengrass V2 update? I'm interested to hear you've used Greengrass before, or are planning to give the new update a shot! hit me up on Twitter @nathangloverAUS.