AWS IoT - ESP32-CAM Setup
Occasionally while looking for electronics to play around with I come across something so cheap I have to assume it’s a scam. For me the ESP-32 CAM was one such device; sporting Bluetooth, WiFi, SD Card support, and a camera all for ~$7, it does seem too good to be true. Lucky for us, this outstanding little SoC is real and is capable of doing great things (if you are willing to dig into code a little).
In this post, we look at the ESP32-CAM and specifically work to get it running on AWS IoT. We will focus on 3 parts
- Creating your AWS IoT certificates
- Flashing the Firmware
- Deploying an IoT processing stack
This post could not exist without the amazing help of Stephen Mott, you can follow him on Twitter @Phtevem
Prerequisites
To complete this guide you should have access to a couple of prerequisites listed below
- t04glovern/aws-esp32-cam repository - Pull down the example repository from https://github.com/t04glovern/aws-esp32-cam.
- AWS account - You will need an AWS account and a billing method configured. This guide and its contents should remain in free-tier though.
- ESP32-CAM - Purchase an ESP32-CAM from an online store. I picked mine up from DIYMORE but you can find them on most online electronic sites.
- FTDI cable - 3.3V or 5V FTDI cable for connecting your ESP32-CAM to your computer over USB. This is required because the ESP32-CAM doesn’t have an onboard USB to serial.
- PlatformIO - PlatformIO installed in VSCode or any other IDE that is supported. Alternatively, you can use the raw PlatformIO CLI
- Serverless framework - The Serverless framework for deploying a simple Lambda function later on in the tutorial.
Creating Certificates
Given this is an AWS IoT project, we will first need to create some device certificates that we can use to test. This process can be accomplished in a couple of different ways:
- AWS IoT - Certificate Vending project - Using a REST API to manage certificate generation for AWS IoT
- AWS IoT - Register Device Guide - Short guide for registering a basic IoT device. This method is recommended if you’re relatively new to AWS.
NOTE: Make sure you run this command from within the t04glovern/aws-esp32-cam repository
CLI Creation
For this guide, I’ve used the CLI to quickly create some certificates using the following. First, we create a certificate and activate it making sure to take note of the certificateArn from the output.
aws iot create-keys-and-certificate \
  --region "us-east-1" \
  --set-as-active \
  --certificate-pem-outfile "iot_cert_demo.pem" \
  --public-key-outfile "iot_cert_demo.key" \
  --private-key-outfile "iot_cert_demo.private"
# {
#     "certificateArn": "arn:aws:iot:us-east-1:012345678912:cert/9894ba17925e663f1d29c23af4582b8e3b7619c31f3fbd93adcb51ae54b83dc2",
#     "certificateId": "9894ba17925e663f1d29c23af4582b8e3b7619c31f3fbd93adcb51ae54b83dc2",
#     ...etc
# }
Next, we’ll create a basic policy that will allow our device to publish, subscribe, connect and receive from AWS IoT.
# To get your account ID, you can run
aws sts get-caller-identity
There is a sample policy JSON file in docs/iot-policy.json that needs to be edited to use your own AWS account ID instead.
{
  "Version": "2012-10-17",
  "Statement": [
    {
      "Effect": "Allow",
      "Action": "iot:Connect",
      "Resource": "arn:aws:iot:us-east-1:012345678912:client/*"
    },
    {
      "Effect": "Allow",
      "Action": "iot:Subscribe",
      "Resource": "arn:aws:iot:us-east-1:012345678912:topicfilter/foo"
    },
    {
      "Effect": "Allow",
      "Action": "iot:Receive",
      "Resource": "arn:aws:iot:us-east-1:012345678912:topic/foo"
    },
    {
      "Effect": "Allow",
      "Action": "iot:Publish",
      "Resource": "arn:aws:iot:us-east-1:012345678912:topic/foo"
    }
  ]
}
With the JSON file edited create a new policy based on this document.
aws iot create-policy \
  --policy-name "esp32-cam-demo" \
  --policy-document file://docs/iot-policy.json
Finally we attach the certificate to the policy document by substituting in the certificateArn from before.
aws iot attach-policy \
  --policy-name "esp32-cam-demo" \
  --target "arn:aws:iot:us-east-1:012345678912:cert/9894ba17925e663f1d29c23af4582b8e3b7619c31f3fbd93adcb51ae54b83dc2"
You now have a set of certificates (likely named something like iot_cert_demo.key, iot_cert_demo.pem and iot_cert_demo.private) on your local system.
Creating config.h
For the ESP32-CAM firmware to use our new certificates for authentication we need to create a file lib/conf/conf.h based on the example config file in lib/conf/conf.example.h. replace the fields below with the corresponding data
#ifndef WIFI_SSID
#define WIFI_SSID "foo"
#define WIFI_PASSWORD "bar"
#define DEVICE_NAME "foobarbaz"

const char CA_CERT[] ="-----BEGIN CERTIFICATE-----\n"
"XXXXXXXXXXXXXXXXXXXXXXXXXXXXXXXXXXXXXXXXXXXXXXXXXXXXXXXXXXXXXXXX\n"
"XXXXXXXXXXXXXXXXXXXXXXXXXXXXXXXXXXXXXXXXXXXXXXXXXXXXXXXXXXXXXXXX\n"
"-----END CERTIFICATE-----";

const char IOT_CERT[] ="-----BEGIN CERTIFICATE-----\n"
"XXXXXXXXXXXXXXXXXXXXXXXXXXXXXXXXXXXXXXXXXXXXXXXXXXXXXXXXXXXXXXXX\n"
"XXXXXXXXXXXXXXXXXXXXXXXXXXXXXXXXXXXXXXXXXXXXXXXXXXXXXXXXXXXXXXXX\n"
"-----END CERTIFICATE-----";

const char IOT_PRIVATE_KEY[] = "-----BEGIN RSA PRIVATE KEY-----\n"
"XXXXXXXXXXXXXXXXXXXXXXXXXXXXXXXXXXXXXXXXXXXXXXXXXXXXXXXXXXXXXXXX\n"
"XXXXXXXXXXXXXXXXXXXXXXXXXXXXXXXXXXXXXXXXXXXXXXXXXXXXXXXXXXXXXXXX\n"
"-----END RSA PRIVATE KEY-----";
const char IOT_ENDPOINT[] = "xxxxxxxxxxxxx-ats.iot.us-east-1.amazonaws.com";
#endif
- WIFI_SSID - Your home/office WiFi SSID
- WIFI_PASSWORD - Your home/office WiFi Password
- DEVICE_NAME - Unique device name for your camera
- CA_CERT - Download the AWS Root CA and implant it here. Make sure to delimit each new line with
\nat the end. - IOT_CERT - Copy in the contents of iot_cert_demo.key. Make sure to delimit each new line with
\nat the end. - IOT_PRIVATE_KEY - Copy in the contents of iot_cert_demo.private. Make sure to delimit each new line with
\nat the end. - IOT_ENDPOINT - Retrieve the IoT endpoint URL using the
aws iot describe-endpointcommand.
After the steps above are complete the ESP32-CAM project is set up and ready to be flashed to a new board with AWS IoT authentication.
Flashing the Firmware
This project uses PlatformIO due to the simple way it manages dependencies and configuration for us. In order to use PlatformIO, you can install it through the VSCode plugin system
PlatformIO is particularly helpful here as you can define that the board we want to build for is the esp32cam specifically in the platformio.ini file
[env:esp32cam]
platform = espressif32
board = esp32cam
framework = arduino
monitor_speed = 9600
Connect up your FTDI programmer to your ESP32-CAM by referring to the following table.
| ESP32-CAM | FTDI Programmer |
|---|---|
| GND | GND |
| 5V | VCC (5V) |
| U0R | TX |
| U0T | RX |
| GPIO 0 | GND |
The following diagram comes from https://randomnerdtutorials.com/. You should check out their stuff, it’s really helpful for working with the ESP32-CAM
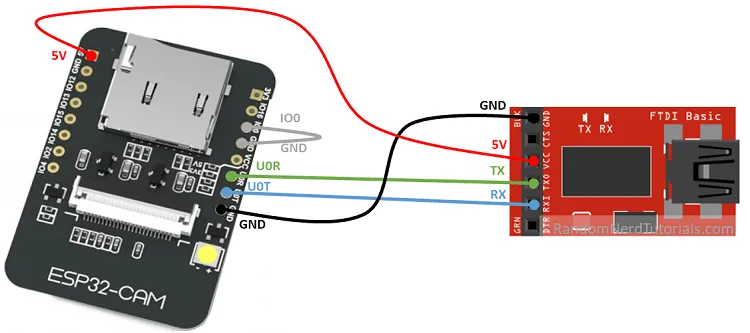
Note that there are several different board designs, so don’t base your connections on entirely the diagram above, instead, refer to the pin names on the board and collect up as needed.
NOTE: Pin
IO0andGNDmust be connected to flash the board with firmware
With the FTDI connector attached to the ESP32-CAM and your computer via USB, you should now be able to flash the Firmware using PlatformIO. Click the -> arrow to do so.
![]()
Once deployed, unplug the FTDI adaptor from your computer, then remove the jumper cable between the IO0 and GND pins and reconnect the FTDI cable to boot into the new firmware.
Deploying Serverless IoT Processor
The final step for this tutorial is to deploy the serverless stack to handle the incoming image byte stream from AWS IoT and convert them to images. For this, we’ll be using the Serverless framework which can be easily installed by running the following (provided you have NodeJS installed)
npm install -g serverless
Below is a heavily simplified outline of the architecture the project uses to process the byte stream coming from the ESP32-CAM.
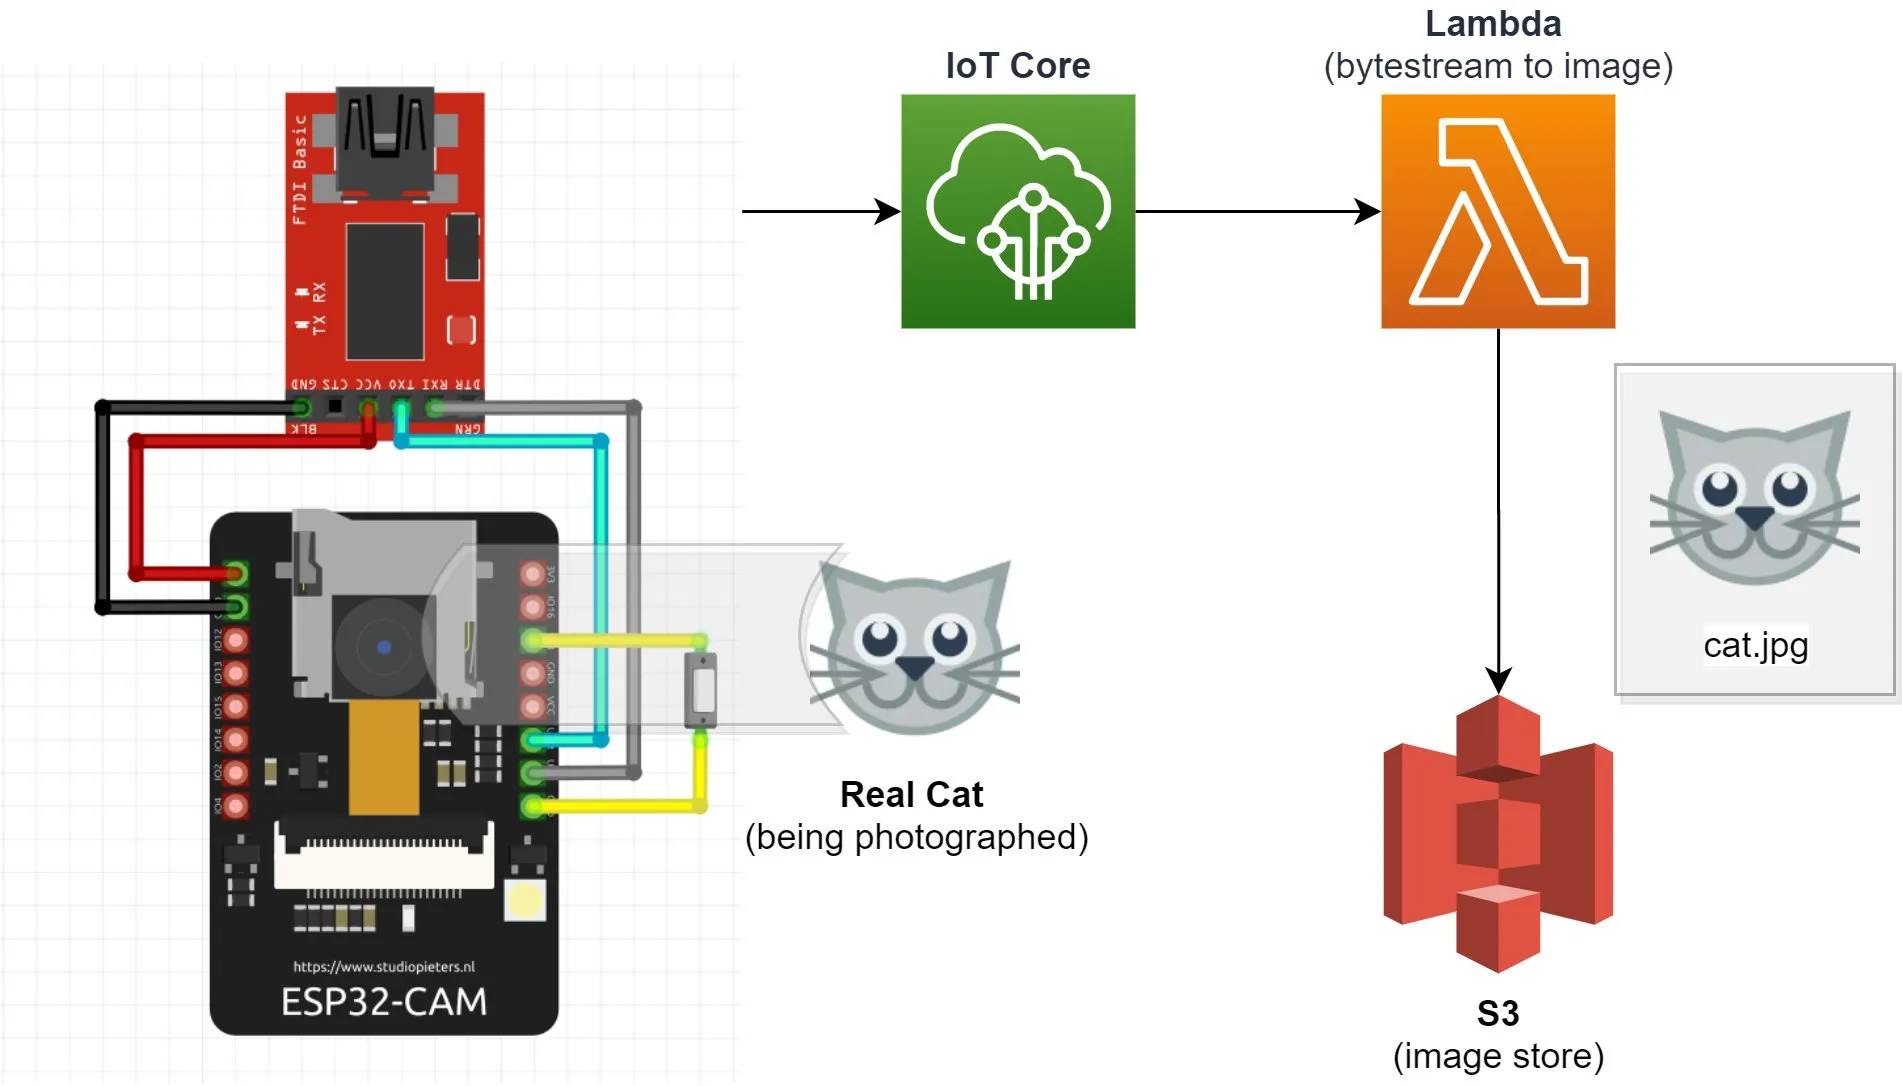
When data is published on the foo topic, it is sent to a Lambda function where it is converted to an image file and stored in S3. The code for this can be seen below, and as you can see it isn’t very complicated since most of the heavy lifting is done for us by AWS
import io
import json
import base64
import os
import uuid
import boto3

from PIL import Image

bucket_name = os.environ['BUCKET_NAME']

def image(event, context):
    # Convert image from base64 payload
    imageStreamBytes = base64.b64decode(event['data'])
    imageFile = Image.open(io.BytesIO(imageStreamBytes))
    imageFileInMemory = io.BytesIO()
    imageFile.save(imageFileInMemory, format='jpeg')
    imageFileData = imageFileInMemory.getvalue()

    # Create S3 client and store image
    image_file_name = str(uuid.uuid1()) + '.jpg'
    s3 = boto3.client('s3')
    s3.put_object(Body=imageFileData, Bucket=bucket_name, Key=image_file_name)

    # Return details
    body = {
        "file_name": image_file_name,
        "bucket_name": bucket_name
    }

    response = {
        "statusCode": 200,
        "body": json.dumps(body)
    }

    return response
The definitions for the resources that support the code above can be found in the backend/serverless.yml file which can also be seen below. Note some of the important lines
- iamRoleStatements - Provides the serverless function write permission into the bucket of our choosing
- bucket: devopstar-esp32-cam - Defines a unique bucket to be used for the project
- sql: “SELECT encode(*, ‘base64’) AS data FROM ‘foo’” - Handles the event triggering AWS IoT to send messages on the
footopic to Lambda
service: esp32-cam-image-handler

plugins:
  - serverless-python-requirements

provider:
  name: aws
  runtime: python3.8
  region: us-east-1
  iamRoleStatements:
    - Effect: Allow
      Action:
        - s3:PutObject
      Resource: "arn:aws:s3:::${self:custom.bucket}/*"
  environment:
    BUCKET_NAME: ${self:custom.bucket}

custom:
  bucket: devopstar-esp32-cam
  pythonRequirements:
    dockerizePip: true

functions:
  image:
    handler: handler.image
    events:
      - iot:
          sql: "SELECT encode(*, 'base64') AS data FROM 'foo'"
          sqlVersion: "2016-03-23"

resources:
  Resources:
    Esp32CamBucket:
      Type: AWS::S3::Bucket
      Properties:
        BucketName: ${self:custom.bucket}
To deploy this project, make sure you have changed the bucket name in bucket: devopstar-esp32-cam to something unique, and then run the following commands
# Change into the backend folder with the serverless project
cd backend

# Install dependencies and deploy
npm install
serverless deploy
Testing Image Pipeline
Once the serverless app is successfully deployed, you can try plugging in the ESP32-CAM and confirming the functionality. You should start to see images appearing in the S3 bucket you created (an example of the URL for your bucket could be https://s3.console.aws.amazon.com/s3/buckets/devopstar-esp32-cam/?region=us-east-1)
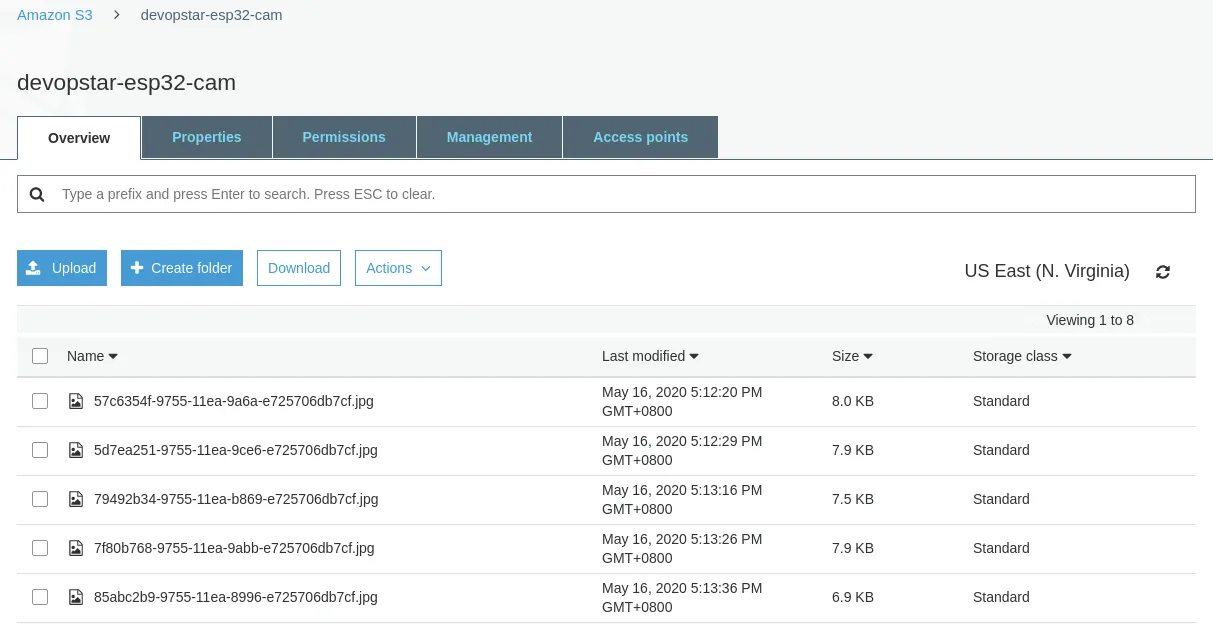
Open up any of the files in the bucket and you should see the output from the camera
Conclusion
The ESP32-CAM is a fantastic little device that won’t break the bank. You can get far better performance and developer experience working with the Raspberry Pi camera and a Raspberry Pi, however that equipment is a lot more expensive and hard to justify when you want to deploy a handful of cameras.
I believe the ESP32-CAM fits nicely for camera projects that need to be scaled out to 10-50 without costing heaps of money. I’m interested to hear what you think, hit me up on Twitter @nathangloverAUS.