Dyson Fan Control over MQTT via Serverless

Buying an IoT Fan
Near the end of last year we decided to pick up an air purifier to help fight my pesky seasonal allergies. I opted for the Dyson Pure Hot+Cool Link for the super silly reason that it had internet connectivity and a reasonably decent mobile app for controlling it. Doing a quick google on my phone I also noted that there was an open-source library for controlling the fan, so I was mildly confident that I'd be able to high-jack control at some point.
The setup process for the device was simple enough and was guided nicely by the Dyson mobile app. The information required for setup was pretty standard; and once connected to the devices setup WiFi network you were prompted for the following:
- WiFi SSID / Password (2.4Ghz only)
Part of the process requires you to setup a Dyson account, this account & password are registered against your device and serial number. Once you've logged into the app you'll be able to control and view the environmental statistics about your new expensive desk fan.
Dyson Recon
In its initial state, the Fan is pretty interesting to sniff packets to/from. There's a fantastic blog post on the AAkira Developer Blog that covers the technical breakdown of the MQTT communication layer for the device.
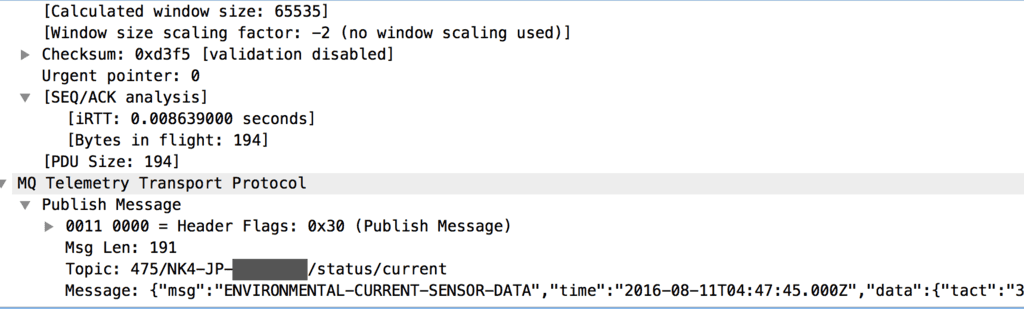
The important take aways from the post are:
- MQTT topic is a make up of {dyson_product_code}/{dyson_serial_number}/*
- Authentication token can be MITM'd from the android application, however it retrieves it by making a request to an authentication provider at https://api.cp.dyson.com/v1/userregistration/authenticate
- The device appears to subscribe to a topic within Dyson's domain and that's how it receives commands from our mobile requests.
This is great! It means that we're able to communicate with the device over MQTT on our local network and control it ourselves without Dyson.
libpurecoollink Python library
The libpurecoollink python library is what we'll be using for this implementation, mostly because it's the only library available at the time of writing this. The major benefits of this library (rather then rolling my own) is:
- It handles the authentication token retrieval
- Retrieves a list of devices linked to the account provided
- Huge list of correct constants that should be used when communicating with the MQTT endpoints
Network Setup
Due to the nature of this implementation needing to connect to our Dyson device from a location outside of our local network there's a requirement to expose the device publicly.
NOTE: I'm aware this isn't super ideal from a security perspective; however since all communication with the device is authenticated by a session token from Dyson I'm personally fine with the risk from a consumer perspective.
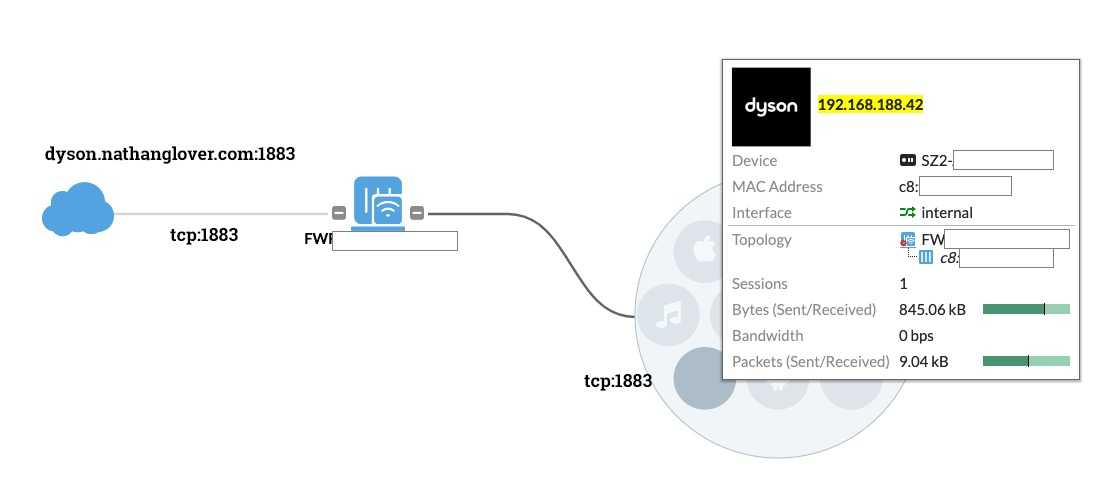
The Dyson device talks over MQTT on port 1883; so we simply forward that port for the device internally. I've also attached a domain endpoint for the use of resolving my IP (you don't need this however).
Serverless Implementation
Setup Serverless & Create Project
Creating our serverless project requires the Serverless framework cli toolchain. This can be installed either by following the guide HERE or with the following commands
npm install -g serverless
serverless config credentials --provider aws --key $ACCESS_KEY_ID --secret $SECRET_KEY
Create a new project; making use of the aws-python3 template
mkdir aws-serverless-dyson
cd aws-serverless-dyson
serverless create --template aws-python3 --name aws-serverless-dyson
This process creates a couple files
.
├── .gitignore
├── handler.py
└── serverless.yml
Serverless Secrets
Because there's secrets that need to be deployed with our Serverless template, there's a requirement to store these details somewhere other then the configuration. Luckily as outlined in Managing secrets, API keys and more with Serverless since version 1.22 of the Serverless Framework there has been integration with the Parameter Store meaning parameters stored in AWS SSM can be referenced in our serverless.yml config.
Add the four parameters using the following commands:
aws ssm put-parameter --name devopstar-dyson-account-email        --type String --value $dyson_account_email
aws ssm put-parameter --name devopstar-dyson-account-password     --type String --value $dyson_account_password
aws ssm put-parameter --name devopstar-dyson-account-region       --type String --value $dyson_account_region
aws ssm put-parameter --name devopstar-dyson-mqtt-public-endpoint --type String --value $dyson_mqtt_public_endpoint
Later on when defining the serverless.yml configuration we're able to reference these parameters using the following syntax:
- ${ssm:devopstar-dyson-account-email}
- ${ssm:devopstar-dyson-account-password}
- ${ssm:devopstar-dyson-account-region}
- ${ssm:devopstar-dyson-mqtt-public-endpoint}
serverless.yml Configuration
Edit the existing serverless.yml file to include the following
service: aws-serverless-dyson

provider:
  name: aws
  runtime: python3.7
  environment:
    DYSON_EMAIL: ${ssm:devopstar-dyson-account-email}
    DYSON_PASS: ${ssm:devopstar-dyson-account-password}
    DYSON_LANG: ${ssm:devopstar-dyson-account-region}
    DYSON_ENDPOINT: ${ssm:devopstar-dyson-mqtt-public-endpoint}

functions:
  stats:
    handler: handler.stats
    events:
      - http:
          path: stats
          method: get
  sleep_timer:
    handler: handler.sleep_timer
    events:
      - http:
          path: sleep
          method: post
The syntax above creates two serverless Lambda functions that will handle a GET and POST request. Also note that our provider is AWS, Python3.7 and our secret environment variables are also included in the deployment.
Python Requirements
Final serverless problem that needs to be solved is how we can include 3rd party python libraries. This can be accomplished nicely using the serverless-python-requirements plugin. To include it you need to install the plugin using the following command
serverless plugin install -n serverless-python-requirementsNext add the following to the end of your existing serverless.yml
plugins:
  - serverless-python-requirements

custom:
  pythonRequirements:
    dockerizePip: non-linux
Finally add a requirements.txt file for the dependencies you'd like to include in the serverless deploy
libpurecoollink==0.4.2Code Implementation
The code for the project is available at t04glovern/aws-serverless-dyson, however all that's needed is to replace the contents of handler.py with the following code that handles the stats and sleep_timer requests from the serverless.yml configuration.
from libpurecoollink.dyson import DysonAccount
import os
import json


def stats(event, context):
    # Log to Dyson account
    dyson_account = DysonAccount(os.environ['DYSON_EMAIL'], os.environ['DYSON_PASS'], os.environ['DYSON_LANG'])
    logged = dyson_account.login()

    if not logged:
        body = {
            "message": "Unable to login to Dyson account"
        }
        response = {
            "statusCode": 200,
            "body": json.dumps(body)
        }

        return response

    # List devices available on the Dyson account
    devices = dyson_account.devices()

    if os.environ['DYSON_ENDPOINT']:
        # Connect using discovery to the first device
        connected = devices[0].connect(os.environ['DYSON_ENDPOINT'])
    else:
        # Connect using discovery to the first device
        connected = devices[0].auto_connect()

    if connected:
        body = {
            "state": devices[0].state.fan_mode,
            "fan_state": devices[0].state.fan_state,
            "night_mode": devices[0].state.night_mode,
            "speed": devices[0].state.speed,
            "oscillation": devices[0].state.oscillation,
            "filter_life": devices[0].state.filter_life,
            "quality_target": devices[0].state.quality_target,
            "standby_monitoring": devices[0].state.standby_monitoring,
            "tilt": devices[0].state.tilt,
            "focus_mode": devices[0].state.focus_mode,
            "heat_mode": devices[0].state.heat_mode,
            "heat_target": devices[0].state.heat_target,
            "heat_state": devices[0].state.heat_state
        }
        response = {
            "statusCode": 200,
            "body": json.dumps(body)
        }

        # Disconnect
        devices[0].disconnect()

        return response


def sleep_timer(event, context):
    # Log to Dyson account
    dyson_account = DysonAccount(os.environ['DYSON_EMAIL'], os.environ['DYSON_PASS'], os.environ['DYSON_LANG'])
    logged = dyson_account.login()

    if not logged:
        body = {
            "message": "Unable to login to Dyson account"
        }
        response = {
            "statusCode": 200,
            "body": json.dumps(body)
        }

        return response

    # List devices available on the Dyson account
    devices = dyson_account.devices()

    if os.environ['DYSON_ENDPOINT']:
        # Connect using discovery to the first device
        connected = devices[0].connect(os.environ['DYSON_ENDPOINT'])
    else:
        # Connect using discovery to the first device
        connected = devices[0].auto_connect()

    if connected:
        timer = event['sleep_timer']
        devices[0].set_configuration(sleep_timer=timer)

        body = {
            "sleep_timer": timer
        }
        response = {
            "statusCode": 200,
            "body": json.dumps(body)
        }

        # Disconnect
        devices[0].disconnect()

        return response
Serverless Deployment
Deploying the serverless application is super simple; just run the following command
serverless deployThe results of the deploy should be presented to you after it completes
Service Information
service: aws-serverless-dyson
stage: dev
region: us-east-1
stack: aws-serverless-dyson-dev
resources: 16
api keys:
  None
endpoints:
  GET - https://xxxxxxxxxxx.execute-api.us-east-1.amazonaws.com/dev/stats
  POST - https://xxxxxxxxxxx.execute-api.us-east-1.amazonaws.com/dev/sleep
functions:
  stats: aws-serverless-dyson-dev-stats
  sleep_timer: aws-serverless-dyson-dev-sleep_timer
layers:
  None
Serverless: Removing old service artifacts from S3...
Serverless Testing
While developing your serverless function the following commands can be run to invoke the code locally for each function.
# Activate a python envirionment locally
python3 -m venv ./venv
source venv/bin/activate
pip install -r requirements.txt

# Test locally
serverless invoke local -f stats
serverless invoke local -f sleep_timer --data '{ "sleep_timer":5 }'

# Test Deployed version
serverless invoke -f stats
serverless invoke -f sleep_timer --data '{ "sleep_timer":5 }'