Serverless Watermark using AWS Lambda Layers & FFmpeg

Lambda Layers are a relatively new way of extending the use cases of your cloud functions. A lot of the time I find myself not able to use Lambda / Serverless patterns purely because of a dependency on a <insert_random_binary_here>. Layers are a way to get around this by letting you mount a common piece of code to the function at runtime that can be leveraged.
The Layer itself is attached to the /opt directory of your lambda. It can be referenced directly; as you’ll see later we can call our layer from /opt/bin/ffmpeg. The benefit is that instead of having to bundle up our dependency with our lambda (100mb+ each time we deploy), we can inherit its functionality (deploys remain tiny).
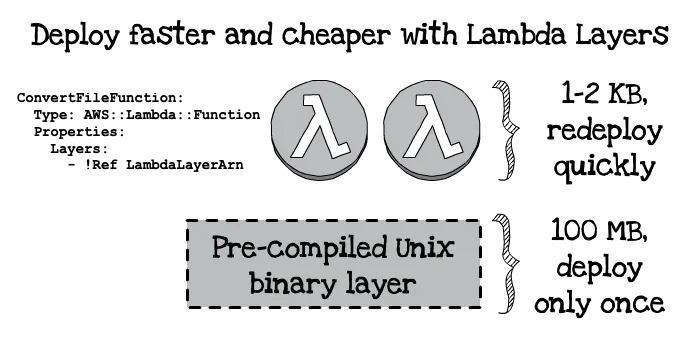
Gojko Adzic’s fantastic image describing this on https://serverless.pub/lambda-utility-layers/
Video Watermarking Issue
Let’s talk through the problem that we’re looking to solve with Lambda Layers. As you might know, I put up video on Udemy, which has proven to be a great way to distribute some of my video learnings. Recently however I’ve started DevOpStar and wanted to consolidate my company branding across all my videos. This meant having to re-edit all my (250+) video files to include a watermark in the bottom left corner of the screen.
Lower lefthand corner watermark
Initially I tried to do this manually in my video editing tool but quickly realised after only getting through 3 videos in 20 minutes (transcoding time on a MacBook pro 2015 kills me) that I’d have to change up my strategy. Not to mention it was really involved, required a lot of manual steps and for me to get this right 250 times without small inconsistencies was very unlikely.
FFmpeg Watermark
To start with I worked on getting the FFmpeg pipeline working on my local laptop. It did take a while to get it working; but ultimately the implementation for adding a Watermark (and also merging videos) was pretty straight forward.
You can find the code for these steps in t04glovern/udemy-video-utils.
### all of these are 10 pixel padding

## Top Left
ffmpeg -i input-video.mp4 -i watermark-icon.png \
    -filter_complex "overlay=10:10" \
    output-video.mp4

## Bottom Left
ffmpeg -i input-video.mp4 -i watermark-icon.png \
    -filter_complex "overlay=10:main_h-overlay_h-10" \
    output-video.mp4

## Top Right
ffmpeg -i input-video.mp4 -i watermark-icon.png \
    -filter_complex "overlay=main_w-overlay_w-10:10" \
    output-video.mp4

## Bottom Right
ffmpeg -i input-video.mp4 -i watermark-icon.png \
    -filter_complex "overlay=main_w-overlay_w-10:main_h-overlay_h-10" \
    output-video.mp4

## Center
ffmpeg -i input-video.mp4 -i watermark-icon.png \
    -filter_complex "overlay=main_w/2-overlay_w/2:main_h/2-overlay_h/2" \
    output-video.mp4
Slightly unrelated to this post, but there’s also a method for merging two videos (adding an intro video)
ffmpeg -i intro-video.mp4 -i input-video.mp4 \
    -filter_complex "[0:v:0] [0:a:0] [1:v:0] [1:a:0] concat=unsafe=1:n=2:v=1:a=1 [v] [a]" \
    -map "[v]" -map "[a]" output-video.mp4
I then put a bunch of videos inside the input folder and then run the following bash script to add the watermark
#!/bin/bash

cd input
for line in *.mp4;
  do name=`echo $line | cut -d'.' -f1`;
  echo $line;
  echo $name;
  ffmpeg -i $line -i ../media/base/icon.png -filter_complex "overlay=10:main_h-overlay_h-10" "../output/${name}-watermarked.mp4"
done
This method worked well enough, and I was patient enough to let it process 100 or so of my videos over the course of a day. The major drawback was that my computer was basically unusable while I was running this conversion. I knew I had to come up with a better way to offload the processing to AWS.
FFmpeg Lambda Layer
I read a fantastic post by Gojko Adzic and was directed to the newly released FFmpeg implementation for Lambda Layers. Although I could just utilise the one that he had deployed I was eager to understand how it worked myself. I created my own version using his FFmpeg/FFprobe AWS Lambda layer and then heavily influenced my watermark code on his Serverless video thumbnail builder (though I had some issues with his code).
You can find my final implementation at https://github.com/t04glovern/aws-ffmpeg-serverless-convert if you would like to follow along.
The actual Lambda Layer itself is deployed over a CloudFormation template where the resource type is AWS::Lambda::LayerVersion and takes the location of an S3 bucket and S3 key (the source files for the lambda).
  LambdaLayer:
    Type: AWS::Lambda::LayerVersion
    Properties:
      CompatibleRuntimes:
        - nodejs8.10
        - python3.6
        - ruby2.5
        - java8
        - go1.x
      Description: FFMPEG for AWS Lambda
      LayerName: ffmpeg
      LicenseInfo: GPL-2.0-or-later
      Content:
        S3Bucket: DEPLOYMENT_BUCKET_NAME
        S3Key: DEPLOYMENT_KEY
We have to deploy our own version of the Layer using the Makefile in the root folder of lambda-layer/. The key parts to take note of are seen below.
You should change the DEPLOYMENT_BUCKET_NAME and DEPLOYMENT_KEY to a bucket you have control over.
BASE_NAME=ffmpeg
DEPLOYMENT_BUCKET_NAME := devopstar
DEPLOYMENT_KEY := resources/aws-ffmpeg-serverless-convert/$(shell echo $(BASE_NAME)-$$RANDOM.zip)
STACK_NAME := $(BASE_NAME)-lambda-layer

clean:
  rm -rf build

build/bin/ffmpeg:
  mkdir -p build/bin
  rm -rf build/ffmpeg*
  cd build; \
    curl https://johnvansickle.com/ffmpeg/releases/ffmpeg-release-amd64-static.tar.xz | tar x
  mv build/ffmpeg*/ffmpeg build/ffmpeg*/ffprobe build/bin

build/layer.zip: build/bin/ffmpeg
  cd build && zip -r layer.zip bin
The simplicity of the layer is quite beautiful really; all we do is curl down the binary, move the binary(ies) to the build folder then zip the folder up. Then the zip is pushed to our S3 bucket, and turned into a CloudFormation stack.
To run this deployment, simply execute make deploy from the lambda-layer folder. You should receive and output containing the ARN of your brand new Lambda Layer! In my case it was arn:aws:lambda:us-east-1:XXXXXXXXXXXX:layer:ffmpeg:2.
Watermark Converter Function
Now that we have our ARN, we can deploy our watermark converter lambda function. First up, lets upload a watermark to an S3 bucket that we’ll make accessible from our Lambda. Running the following (change for whatever bucket you decide to use) will achieve this.
aws s3 cp assets/icon.png s3://devopstar/resources/aws-ffmpeg-serverless-convert/base/icon.png
Jump into the video-converter folder in the project and again, in the Makefile make sure you have the DEPLOYMENT_BUCKET_NAME and DEPLOYMENT_BUCKET_PREFIX parameters setup the way you need them for your bucket.
Finally, open up the CloudFormation template in video-converter/cloudformation/template.yml and make sure:
- LambdaLayerArn - Points to your Lambda Layer ARN from the previous section
- S3ResourceBucket - Is setup to be your Bucket Name
- S3ResourceKeyIcon - The key to the bucket contents
Here’s an example of what mine would look like
Parameters:
  LambdaLayerArn:
    Type: String
    Default: 'arn:aws:lambda:us-east-1:XXXXXXXXXXXX:layer:ffmpeg:1'
  ConversionFileType:
    Type: String
    Default: mp4
  ConversionMimeType:
    Type: String
    Default: video/mp4v-es
  S3ResourceBucket:
    Type: String
    Default: 'devopstar'
  S3ResourceKeyIcon:
    Type: String
    Default: 'resources/aws-ffmpeg-serverless-convert/base/icon.png'
Now you can simply run make deploy again (within video-converter this time). It will go through and create two buckets (yours will definitely be different based on your stack name):
- uploads-ffmpeg-video-converter
- results-ffmpeg-video-converter
We can now go ahead and upload our video we want watermarked to the uploads-ffmpeg-video-converter bucket, and expect the processed video to land in the results-ffmpeg-video-converter once completed. Run the following from the project root to test using the demo video (change to your bucket name).
aws s3 cp assets/demo.mp4 s3://uploads-ffmpeg-video-converter/demo.mp4
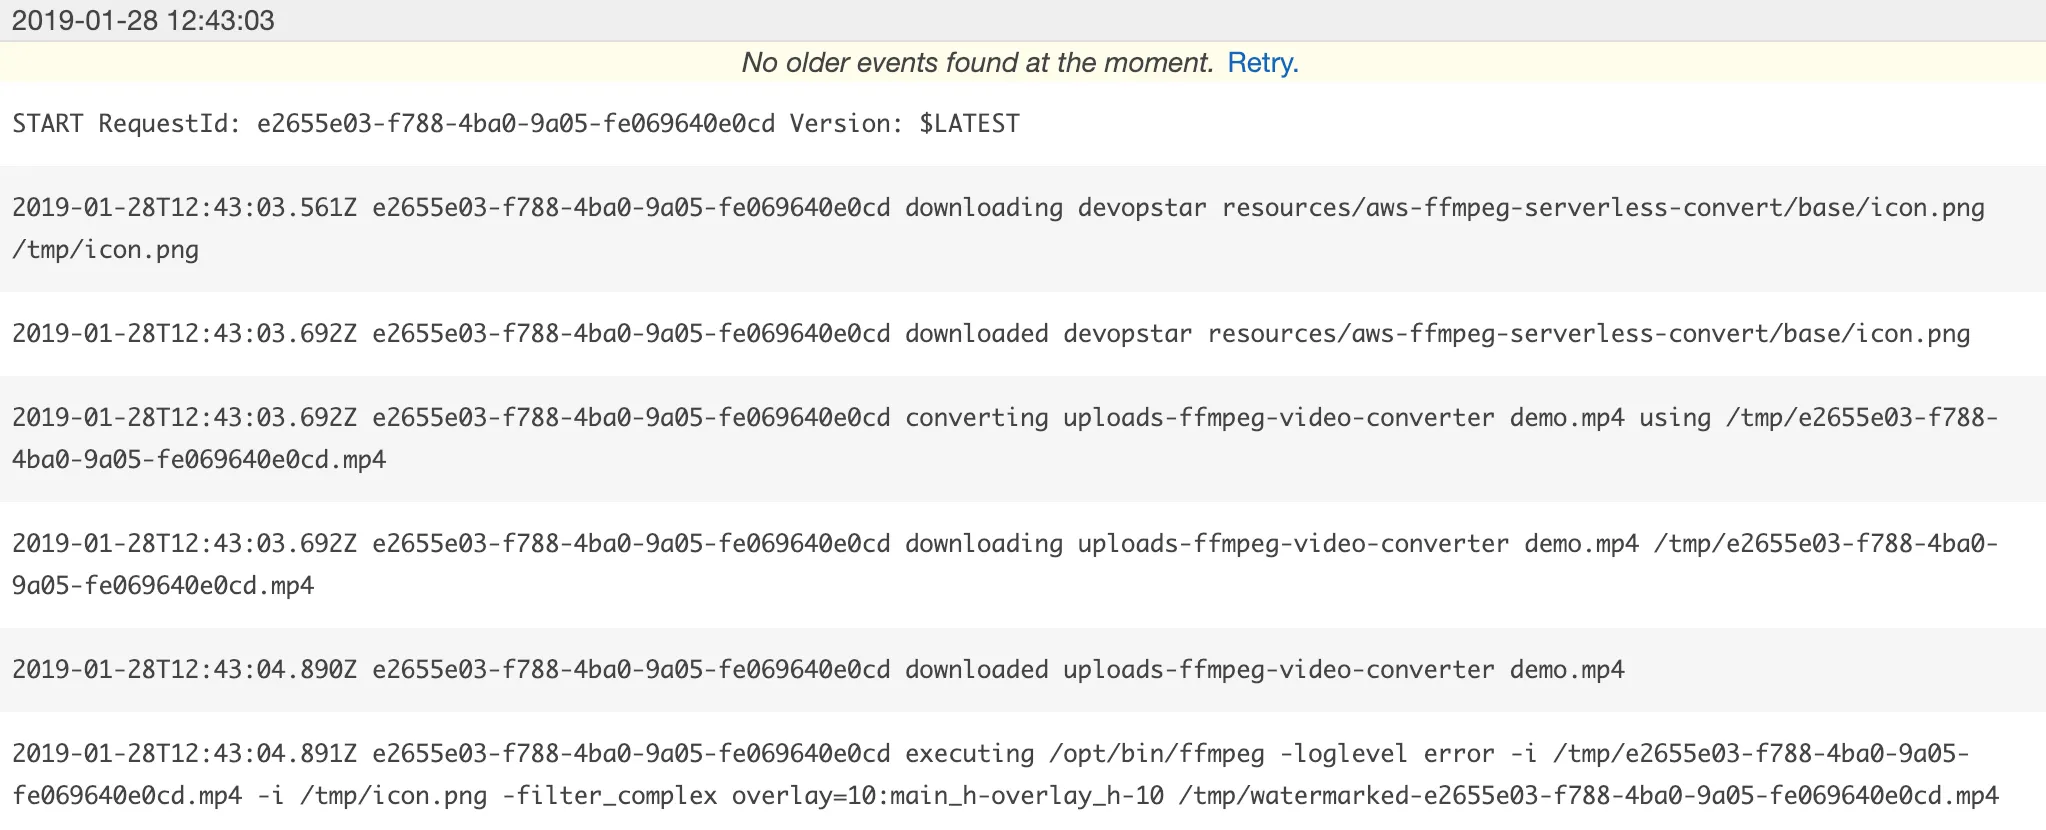
You can track the conversion process through CloudWatch logging for the lambda function. The process can take up to 5 minutes (based on the video file I included as a demo).
Once its complete, download your output video from the results bucket and confirm you have your watermark

FFmpeg Lambda Code
The code for the convert isn’t anything super special. It can be viewed in video-converter/src/index.js. The important lines are near the bottom; we download the ICON file (watermark) from our S3 bucket, then using that we spawn a ffmpeg child process and pass in the command we used from before to convert our video. Then finally, we upload the converted file back to S3 (our results bucket).
s3Util.downloadFileFromS3(RESOURCE_BUCKET, ICON_FILE, iconFile)
    .then(() => {
        console.log('converting', inputBucket, key, 'using', inputFile);
        return s3Util.downloadFileFromS3(inputBucket, key, inputFile)
            .then(() => childProcessPromise.spawn(
                '/opt/bin/ffmpeg',
                ['-loglevel', 'error', '-i', inputFile, '-i', iconFile, '-filter_complex', 'overlay=10:main_h-overlay_h-10', watermarkerFile], {
                    env: process.env,
                    cwd: workdir
                }
            ))
            .then(() => s3Util.uploadFileToS3(OUTPUT_BUCKET, resultKey, watermarkerFile, MIME_TYPE));
    })
Conclusion
I’d be lying if I said I thought this solution was the best way to perform this sort of workload. In fact the chances of it working really well at scale aren’t great at all (15 minute deadline on Lambda functions).
However It worked really well for my workload, and gave me a great excuse to learn how Lambda Layers worked.