Managing AWS Fargate with CloudFormation Nested Stacks
What is Fargate?
Fargate is an AWS offering that allows developers to worry even less about the systems their code runs on. The service itself is a further abstracted version of the existing ECS (Elastic Container Service) that tries to reduce the barriers around taking docker containers, and running them in the Cloud.
What is CloudFormation?
The simplicity of Fargate really shines when its partnered with CloudFormation, an Amazon service that allows you to define resources and other Cloud infrastructure as codified templates.
CloudFormation is really based on the concept commonly called Infrastructure as Code (IaC), and its usefulness has become more and more apparent in our new Cloud Native age. Particularly due to the movement towards running Microservices and needing a way to tie everything together neatly (and safely).
Architecture
To start with, let’s try to peak your interest! Below is the final architecture diagram for the solution we’re going to work through together in this post:
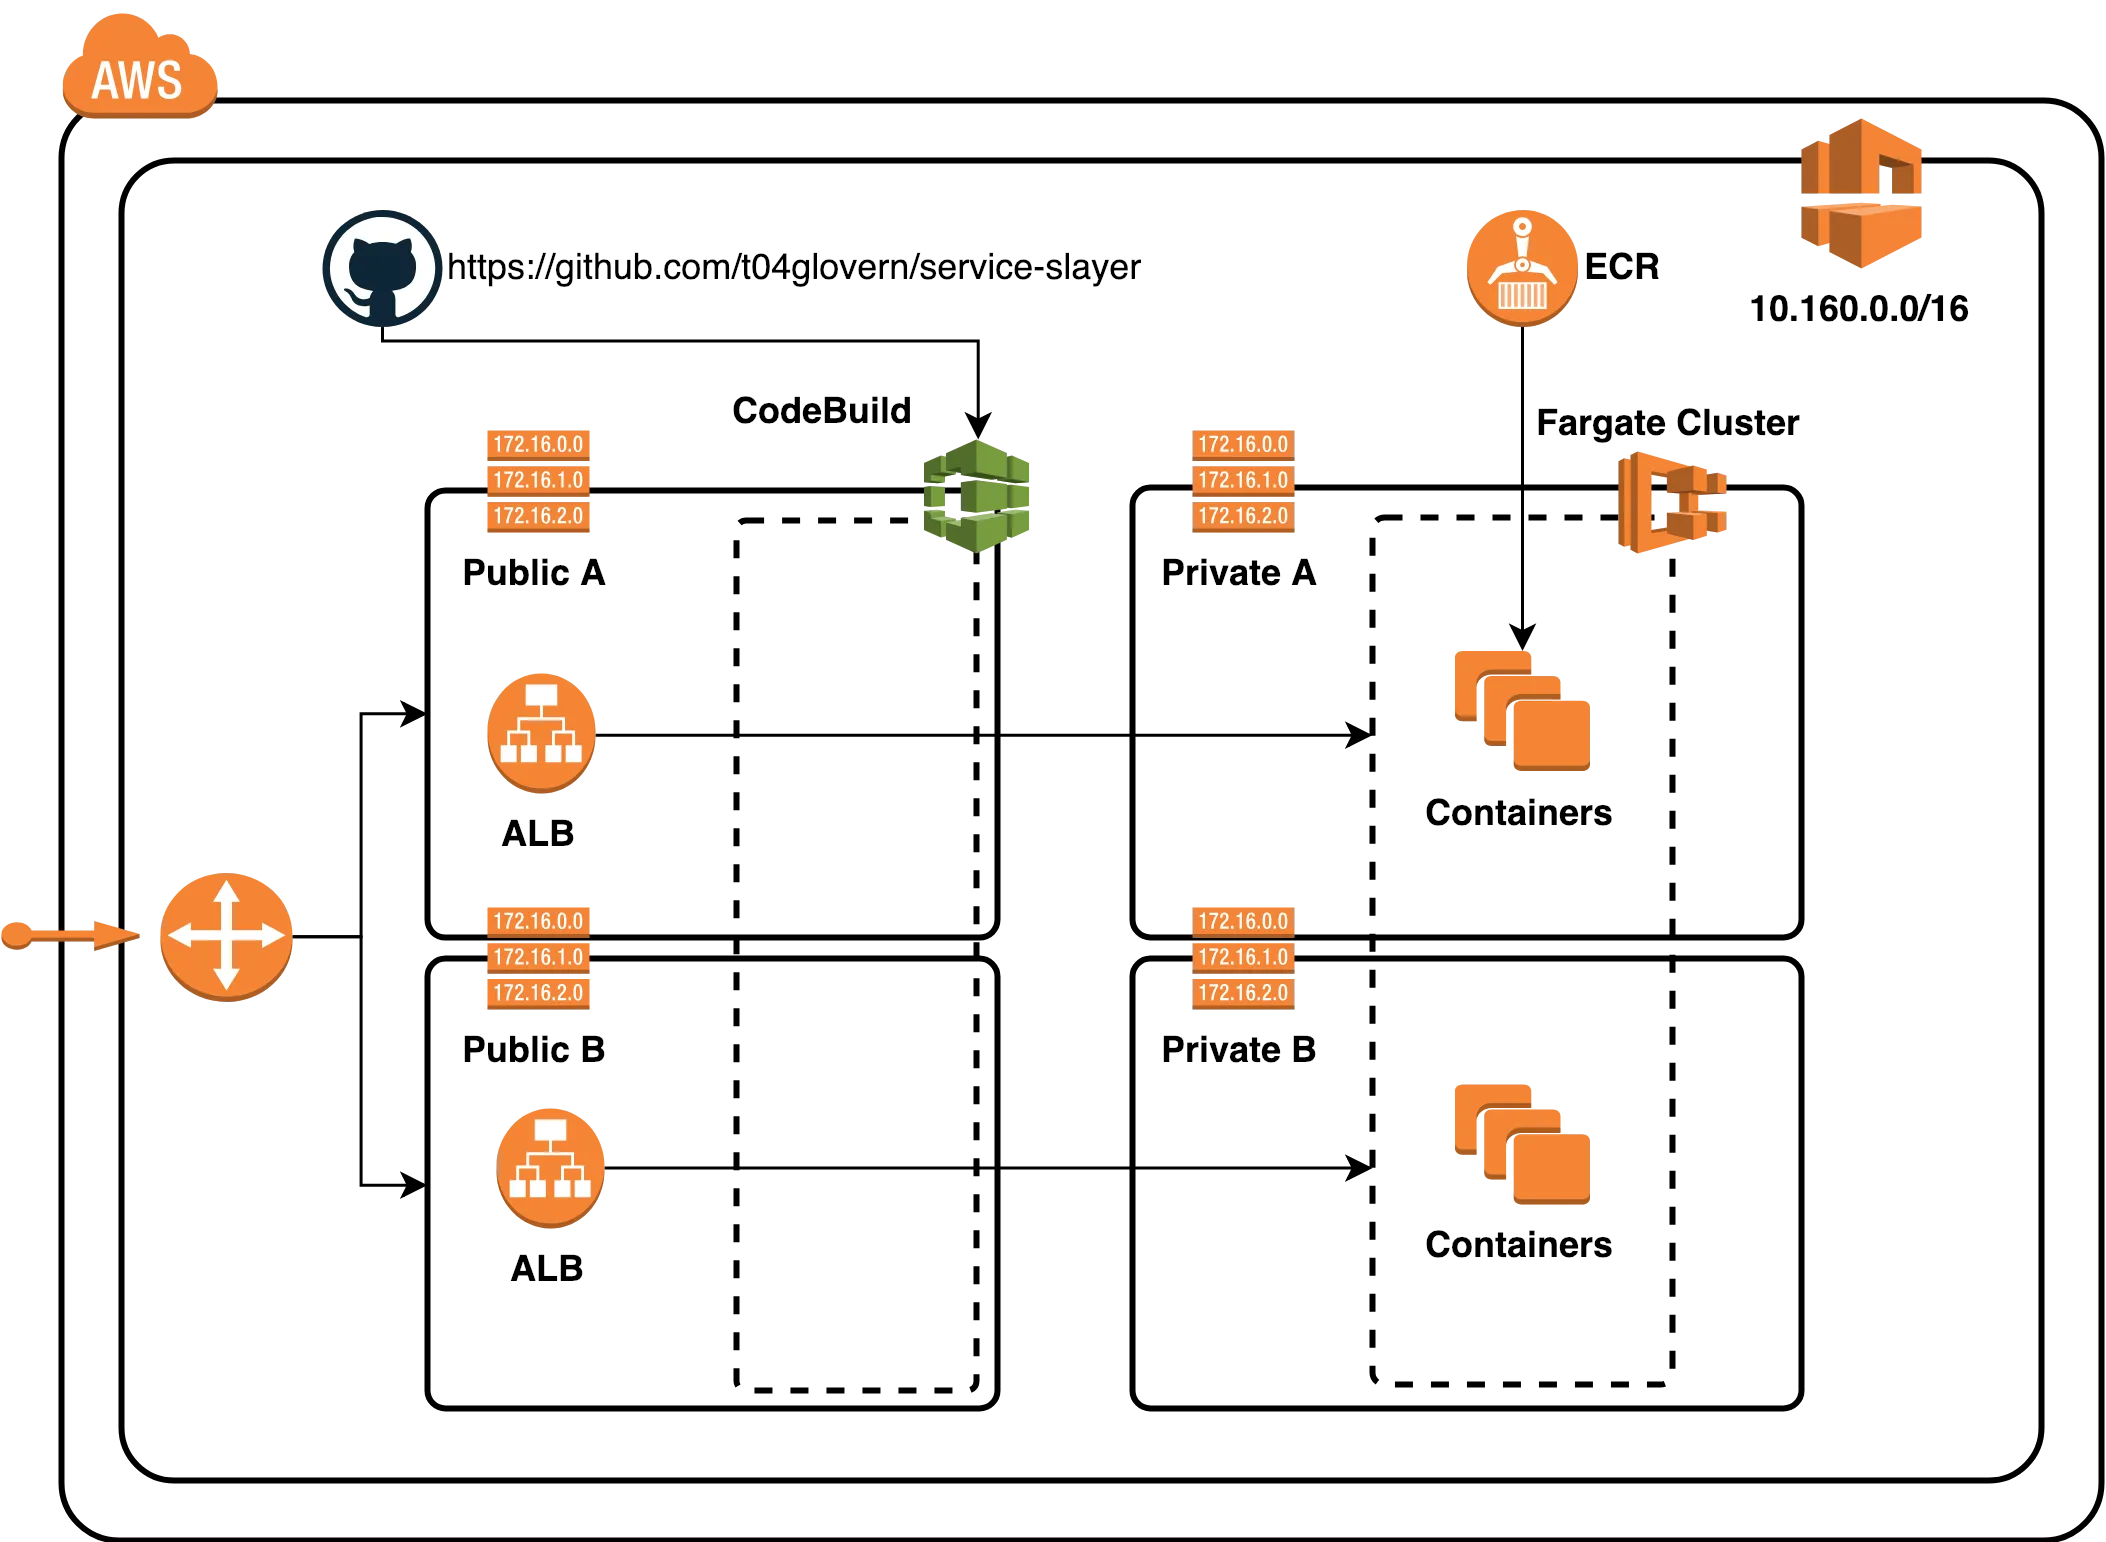
In our Fargate cluster we are deploying three small containerised applications, each of these will be given their own application load balancer to make it accessible publicly.
The architecture might appear somewhat complex, but don’t worry because you aren’t alone! Naming just a few of the core resources that make up the architecture and we have:
- VPC (Virtual Private Cloud), Subnets, Routes, Route Tables
- Internet & NAT Gateways
- Security Groups & ACLs
- Application Load Balancers, Target Groups
- IAM Policies and Roles
- Fargate Cluster, Services and Tasks
- Container Repositories (ECR)
- CodeBuild (CI/CD from GitHub CodeBase)
That’s quite a lot of complexity, and to be totally fair; you won’t be responsible for all of this if you’re part of a team where responsibility for particular services are delegated to the subject matter experts (SME’s).
Simple CloudFormation Template
Let’s now take a look at how each of these resources are defined in CloudFormation templates. Below is an example of a template that creates a basic Fargate Cluster.
AWSTemplateFormatVersion: 2010-09-09
Description: Deploys a Fargate cluster

Parameters:
  ClusterName:
    Description: Fargate Cluster Name
    Type: String

Resources:
  FargateCluster:
    Type: 'AWS::ECS::Cluster'
    Properties:
      ClusterName: !Ref ClusterName

Outputs:
  FargateCluster:
    Description: Fargate Cluster
    Value: !Ref FargateCluster
The template is probably one of the simplest examples of what CloudFormation can achieve, however just deploying one single resource kind of depletes the purpose of IaC.
Complex CloudFormation Templates
One the other end of the spectrum, we have CloudFormation templates that try to do way too much in one single file. For example we could in theory have one template that contains every single resource in one file
However, I did the maths and we’d end up with:
- 62 Parameters
- ~90 Resources
- A whole lot of confusion
Not only would we have a lot of resources, but we also have a lot of duplicate code written for the three different services we are deploying.
Export Vs Nesting Stacks
There are two common ways of achieving the kind of IaC operating environment we need.
Export
Exporting resources for Global use across your account is a very common practice with AWS. If we think about it from the perspective of our architecture, we could have our Network Engineers design and maintain a Network Stack CloudFormation template. Then they could simply Export all the Subnet’s, VPC’s and Security groups for other teams to import.
Outputs:
  StackVPC:
    Description: Team VPC
    Value: !Ref TeamVPC
    Export:
      Name: !Sub "${AWS::StackName}-TeamVPC"
Nesting Stacks
The process of Nesting stacks is one we’ll go into details about soon, however the concept is simple. You can create a Resource within your CloudFormation template of type AWS::CloudFormation::Stack.
You pass the stack a URL to the Template file in S3, along with the parameters needed.
Resources:

  baseFargate:
    Type: AWS::CloudFormation::Stack
    Properties:
      Parameters:
        ClusterName:
          !Ref ClusterName
      TemplateURL: https://s3.amazonaws.com/bucket-name/fargate-cluster.yaml
Repeat this process for each of your core resource groups, and when you deploy you’ll find that these nested stacks show up under the main template you create.
Verdict
Both are actually very valid, and in fact Export is most likely the more logical way of approaching these kinds of problems; however for our deployment I wanted to maintain the state of the entire stack in code so that you guys; the readers could deploy your very own without needing stack prerequisites.
Introducing Service Slayer
Service Slayer is the demo project I’ve setup for this post. It has three containerised NodeJS apps that can be found in the following folders in the repo:
- containers/defense-api
- containers/offense-api
- containers/arbiter-api
We’ll need ECR (Elastic Container repositories) for each of the containerised apps. I’ve created a simple script in containers/container_push.sh. It will go through and create your container repos, build and then push the containers to ECR.
# Create ECR (if not already existing)
aws ecr create-repository --repository-name "service-slayer-arbiter-api"
aws ecr create-repository --repository-name "service-slayer-defense-api"
aws ecr create-repository --repository-name "service-slayer-offense-api"

ACCOUNT_ID=$(aws sts get-caller-identity |  jq -r '.Account')
$(aws ecr get-login --no-include-email --region us-east-1)

docker build -t service-slayer-arbiter-api ./arbiter-api/
docker tag service-slayer-arbiter-api:latest $ACCOUNT_ID.dkr.ecr.us-east-1.amazonaws.com/service-slayer-arbiter-api:latest
docker push $ACCOUNT_ID.dkr.ecr.us-east-1.amazonaws.com/service-slayer-arbiter-api:latest

docker build -t service-slayer-defense-api ./defense-api/
docker tag service-slayer-defense-api:latest $ACCOUNT_ID.dkr.ecr.us-east-1.amazonaws.com/service-slayer-defense-api:latest
docker push $ACCOUNT_ID.dkr.ecr.us-east-1.amazonaws.com/service-slayer-defense-api:latest

docker build -t service-slayer-offense-api ./offense-api/
docker tag service-slayer-offense-api:latest $ACCOUNT_ID.dkr.ecr.us-east-1.amazonaws.com/service-slayer-offense-api:latest
docker push $ACCOUNT_ID.dkr.ecr.us-east-1.amazonaws.com/service-slayer-offense-api:latest
Note: This post was written for the use in us-east-1. Although theres no reason why you couldn’t run the stack in any region (just references to us-east-1 in the bash scripts will need to be substituted).
CloudFormation Templates
We have a number of templates that we’ll be using in order to deploy our stack
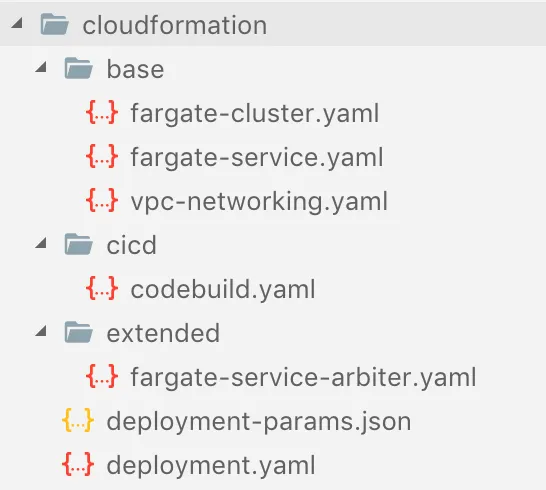
All the templates besides deploymeny.yaml and deployment-params.json are going to be what we use to create our smaller components. Since we’re going to need the templates to live in S3, I’ve created another script cloudformation_deploy.sh.
The script will create a bucket (edit the BUCKET_NAME variable) and then upload your template files to a location in the bucket.
#!/bin/sh

BUCKET_NAME=devopstar

## Creates S3 bucket
aws s3 mb s3://$BUCKET_NAME

## S3 cloudformation deployments
### Base
aws s3 cp cloudformation/base/fargate-cluster.yaml s3://$BUCKET_NAME/resources/service-slayer/cloudformation/base/fargate-cluster.yaml
aws s3 cp cloudformation/base/fargate-service.yaml s3://$BUCKET_NAME/resources/service-slayer/cloudformation/base/fargate-service.yaml
aws s3 cp cloudformation/base/vpc-networking.yaml s3://$BUCKET_NAME/resources/service-slayer/cloudformation/base/vpc-networking.yaml
### Extended
aws s3 cp cloudformation/extended/fargate-service-arbiter.yaml s3://$BUCKET_NAME/resources/service-slayer/cloudformation/extended/fargate-service-arbiter.yaml
### CI/CD
aws s3 cp cloudformation/cicd/codebuild.yaml s3://$BUCKET_NAME/resources/service-slayer/cloudformation/cicd/codebuild.yaml
CloudFormation Metadata
With all our templates deployed, we can have a look at the main cloudformation/deployment.yaml file. At the very top we define some metadata; thing information will appear to the user when they try to run the template from the CloudFormation web interface and it aims to help give more context to each parameter.
Let’s take a look at a smaller section so you can get a better understanding of what each piece does.
....

Metadata:

  Authors:
    Description: Nathan Glover (nathan@glovers.id.au)

  AWS::CloudFormation::Interface:
    ParameterGroups:
    - Label:
        default: Project Information
      Parameters:
        - ProjectName
        - BucketName

    ParameterLabels:
      ProjectName:
        default: Project Name
      BucketName:
        default: Bucket Name

Parameters:

  ProjectName:
    Description: Project Name (used for Tagging)
    Type: String
  BucketName:
    Description: Bucket name where nested templates live
    Type: String

....
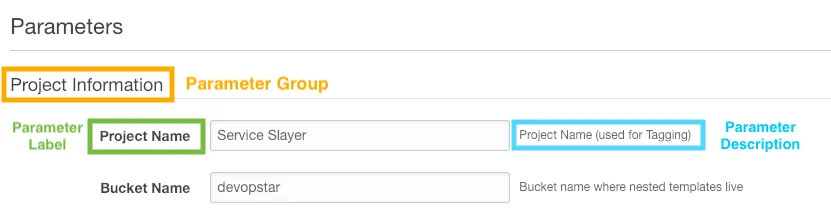
Parameter Groups are usually a good way to well… group parameters that cover a similar type of data. In our case we group parameters for:
- Base Networking Infrastructure
- Base Fargate Cluster
- Defense, Offense & Arbiter Services
- Defense, Offense & Arbiter CodeBuild
Personally I find myself grouping parameters that belong to the same nested templates, however there are certainly cases where this kind of structure isn’t conducive to deduplication.
Referencing Outputs
If you skip over the rest of the parameters, you’ll begin to see the listing of resources. After we deploy our two base stacks baseFargate & baseNetworking we run into our first nested stack that requires the output from another stack.
  defenseService:
    DependsOn: [ baseFargate, baseNetworking ]
    Type: AWS::CloudFormation::Stack
    Properties:
      Parameters:
        ....
        VPCId:
          !GetAtt [ baseNetworking, Outputs.VPC ]
        PublicSubnetIDs:
          !GetAtt [ baseNetworking, Outputs.SubnetsPublic ]
        PrivateSubnetIDs:
          !GetAtt [ baseNetworking, Outputs.SubnetsPrivate ]
        FargateCluster:
          !GetAtt [ baseFargate, Outputs.FargateCluster ]
        ....
We are able to reference the outputs of other nested stacks pretty easily by using the !GetAtt function along with the name of the stack and then defining the output key presented by that stack. Example:
!GetAtt [ baseNetworking, Outputs.VPC ]
baseNetworking is the networking stack where we want to retrieve a reference to the VPC output from that template.
Note: Be sure that the template you are trying to retrieve an output from actually outputs that resource!
Outputs:

  VPC:
    Description: 'VPC.'
    Value: !Ref VPC
Its also a very good practice to include the stack you want to retrieve outputs from in the DependsOn list within the resource.
  defenseService:
    DependsOn: [ baseFargate, baseNetworking ]
    Type: AWS::CloudFormation::Stack
I’ve experienced mixed results when I don’t define dependent stacks, CloudFormation can sometimes resolve them anyway. One of the benefits of defining dependent stacks explicitly is parallelisation of resource creation, as all stacks that can be created (not waiting on other stacks) will begin spinning up in parallel.
Stack Output
Outputs work exactly the same as Outputs in nested stacks. You can reference the Outputs as Outputs!
Outputs:

  DefenseApiEndpoint:
    Description: API Endpoint for the Defense Service
    Value: !GetAtt [ defenseService, Outputs.EndpointUrl ]

  OffenseApiEndpoint:
    Description: API Endpoint for the Offense Service
    Value: !GetAtt [ offenseService, Outputs.EndpointUrl ]

  ArbiterApiEndpoint:
    Description: API Endpoint for the Arbiter Service
    Value: !GetAtt [ arbiterService, Outputs.EndpointUrl ]
Stack Parameters (as code)
The final recommendation I like to make when working with stacks with a wide range of parameters is to define them as code as well (seeing a pattern here?). You can create a json params list with key pairs for each parameter you are passing into your CloudFormation template.
[
    { "ParameterKey":"ProjectName", "ParameterValue":"Service Slayer" },
    { "ParameterKey":"BucketName",  "ParameterValue":"devopstar" },
    ...
]
Once you have your full parameter list complete you are ready to deploy your stack using the CLI
Stack Deployments (CLI)
This part is dead simple, you can use aws-cli to deploy a new stack and pass in the template-body and parameters files.
aws cloudformation create-stack \
    --stack-name "service-slayer" \
    --template-body file://cloudformation/deployment.yaml \
    --parameters file://cloudformation/deployment-params.json \
    --capabilities CAPABILITY_IAM
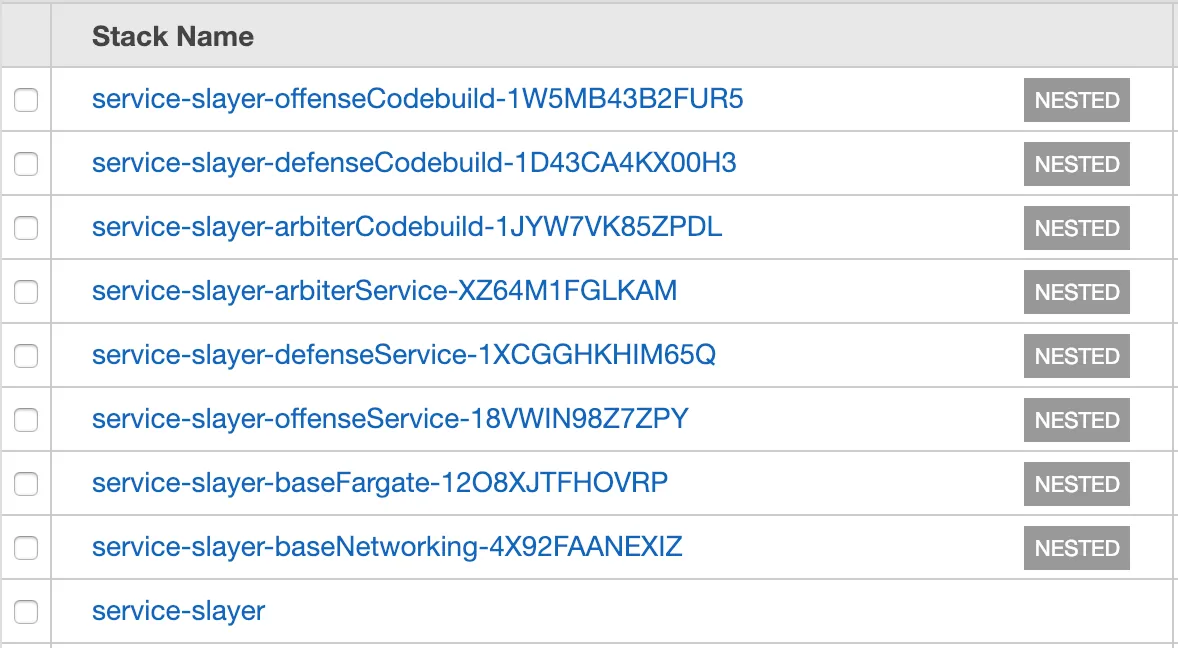
Yours various stacks should start to fire up with each nested stack showing up as NESTED in the CloudFormation UI. Once complete you should see all green CREATE_COMPLETE’s
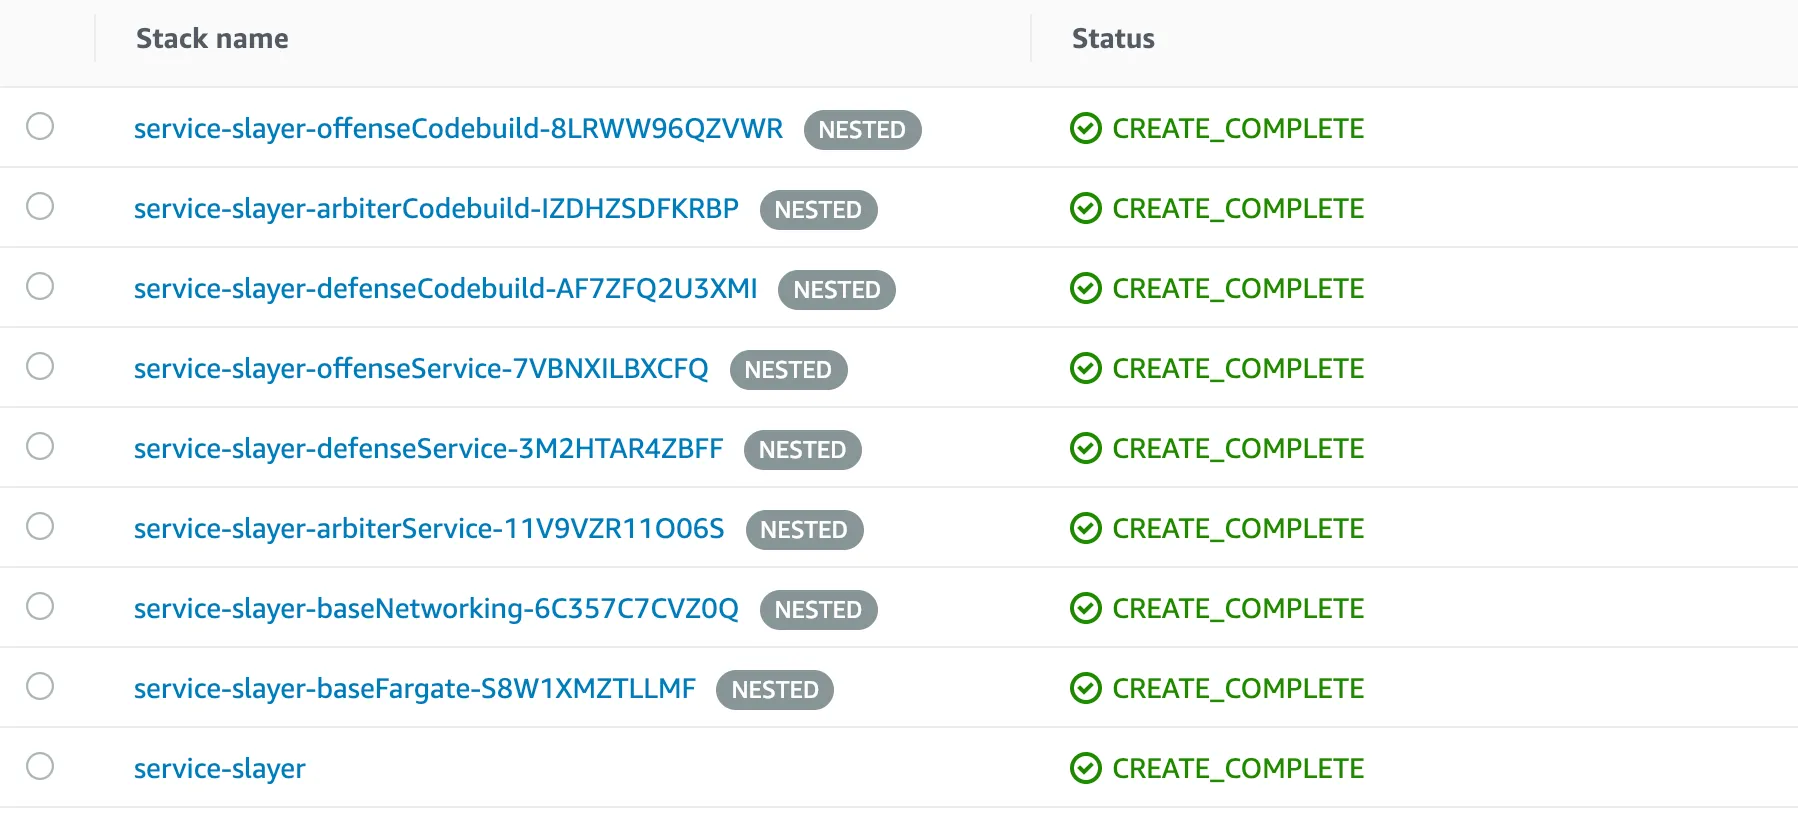
Navigating to the Outputs tab under the root stack (service-slayer) will also display the three outputs we defined. These are the Application Load Balancer endpoints for the three services.

As a sneaky little side note, if you open up the ArbiterApiEndpoint and navigate to the /tasks endpoint of it you can get a list of the running tasks in your Fargate Cluster
http://service-slayer-arbiter-api-lb-667483123.us-east-1.elb.amazonaws.com/tasks

{
    "data": {
        "taskArns": [
            "arn:aws:ecs:us-east-1:xxxxxxxxxxxx:task/614a8925-8f9f-49a1-b758-2d67e4e9edbf",
            "arn:aws:ecs:us-east-1:xxxxxxxxxxxx:task/8cea7081-aafa-4937-8da9-b7c97dffa1b2",
            "arn:aws:ecs:us-east-1:xxxxxxxxxxxx:task/aa7bcb24-0dde-45e1-9e0e-3749be8479a4",
            "arn:aws:ecs:us-east-1:xxxxxxxxxxxx:task/c8883339-7191-4394-8b7a-3184cb8b96f4",
            "arn:aws:ecs:us-east-1:xxxxxxxxxxxx:task/dd913457-2326-478d-a9c8-cc98a895f9aa"
        ]
    }
}
Updating Stacks
No doubt you’ll come across a time when you need to update the stack with new changes. To do this, just change the templates and re-run the sample command you used to create the stack except this time use update-stack
aws cloudformation update-stack \
    --stack-name "service-slayer" \
    --template-body file://cloudformation/deployment.yaml \
    --parameters file://cloudformation/deployment-params.json \
    --capabilities CAPABILITY_IAM
One of the best parts about having a Health Endpoint check setup on Fargate tasks is that if you do make changes to the stack, and they don’t come up properly; your old services will remain live throughout the whole transition period so you never have downtime if the changes have to roll back!
Deleting Stacks
Before closing off, I’d recommend deleting the stack we’ve created, as it’ll cost money to keep running. You can do this either via the UI; or from the command line using the delete-stack command
aws cloudformation delete-stack --stack-name "service-slayer"
You’ll begin to see the resources drain, and disappear from existence. This demonstrates the final awesome part about CloudFormation; when you create something and delete it as a template, you know without a doubt that it’ll be deleted. It makes auditing who is using what resources, and allows you to experiment with Resources and have an easy way to clean up after yourself.
Closing Statements
CloudFormation and Fargate are both really powerful in there own rights, and when they working together they make something beautiful. Dare I say I “ship” this couple.